
Support teams can absorb a few routing gaps when case volumes are low. Once requests begin to come in from multiple channels and across different issue types, those gaps become harder to hide. Cases wait too long in the wrong queue, urgent requests lose momentum, and agents spend time triaging work that should have been routed correctly from the start.
That is why routing needs more than a basic rule or a shared queue. It needs a framework that can evaluate incoming work, properly classify it, and route it to the right destination without constant manual intervention. In Dynamics 365 Customer Service, unified routing helps create that framework by bringing together workstreams, queues, intake rules, classification logic, and assignment behavior.
For service teams managing large volumes of cases, this has a direct operational impact. Better routing improves response times, reduces unnecessary handoffs, balances workload more effectively, and gives agents a clearer starting point when they open a case. It also makes service operations easier to scale because the process depends less on manual sorting and more on structured logic.
How does routing quality shape service performance?
Poor routing does more than slow down case handling. It affects queue health, agent productivity, and the overall service experience. When the wrong work reaches the wrong team, delays begin before the case is even picked up.
With Dynamics 365 Customer Service unified routing, teams can move away from broad manual triage and use a more deliberate routing model based on case attributes, priorities, and business conditions.
Read more: Scale team collaboration with Dynamics 365 Customer Engagement and Teams
What does unified routing manage?
At a practical level, Dynamics 365 case routing is about deciding how records should enter the system, how they should be evaluated, and where they should go next.
A complete routing structure usually includes:
- Workstreams
- Queues
- Intake rules
- Classification rules
- Route-to-queue logic
- Assignment behavior
Each part serves a different purpose. Together, they create a more reliable routing model.
The building blocks: workstreams, queues, and routing logic
Dynamics 365 Customer Service workstreams act as the main containers for routing logic. They control how work is evaluated and processed before it reaches an agent.
Queues support that logic by acting as the destination for incoming work. A strong routing setup depends on both being aligned. If the queue structure is weak, routing outcomes will also be weak. If the workstream logic is too shallow, queues become cluttered with the wrong records.
Take control of your business operations
Discover how Confiz services can simplify your complex workflows and improve decision-making.
Get a Free QuoteWhat to confirm before configuration starts?
Before building the routing setup, make sure the environment is ready.
You should have:
- System Administrator access
- Unified routing enabled
- The relevant record type is enabled for routing
- Support users or agents already configured
- Queue ownership and fallback logic planned. Without these basics, the setup usually becomes fragmented.
Further readings: Understanding Dynamics 365 Support: A journey beyond standard assistance
Instructions for setting up unified routing
Unified routing of records (cases) focuses on Workstreams, a dedicated container that masterfully handles the classification and dispatching of your entire workload. Here is the step-by-step process to set up a workstream:
Step 1. Complete the prerequisites
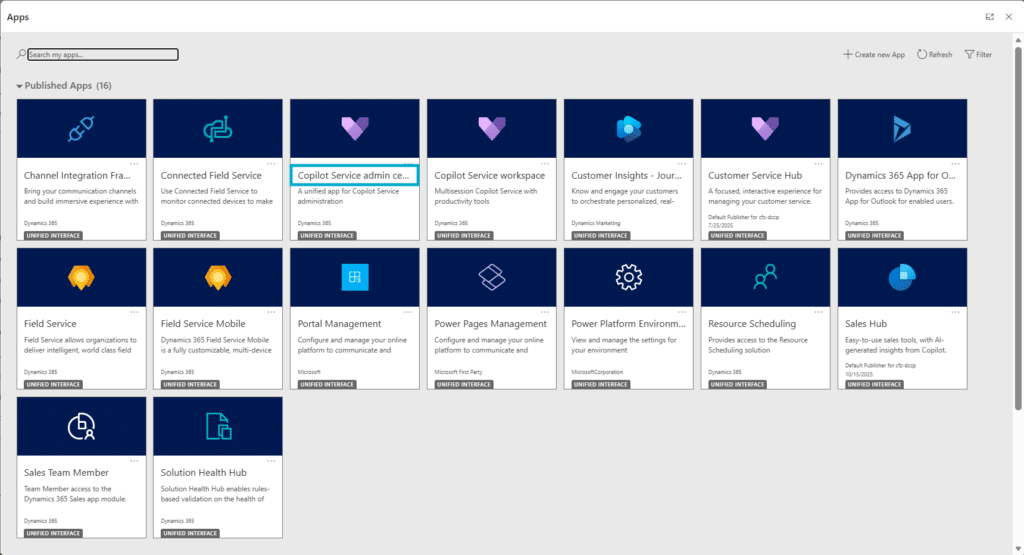
Ensure you have the System Administrator role before starting. Access the Copilot Service Admin Center and enable Unified Routing
Step 2. Build queues to organize incoming cases
Think of queues as holding areas where cases wait before being assigned to the right agent.
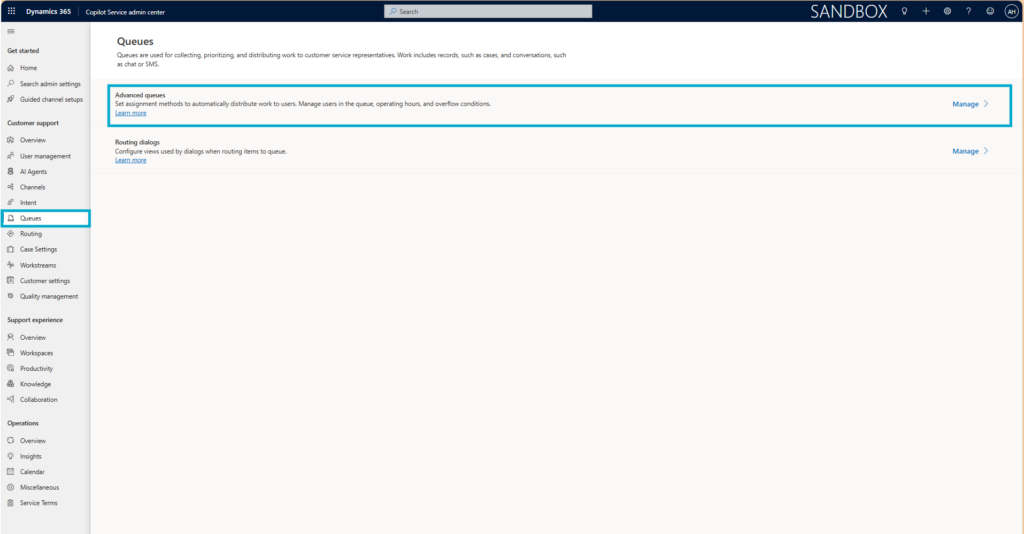
- Navigate to Customer Support → Queues.
- Select Manage for Advanced Queues and click on New Queue.
- Set the Queue type to the Record.
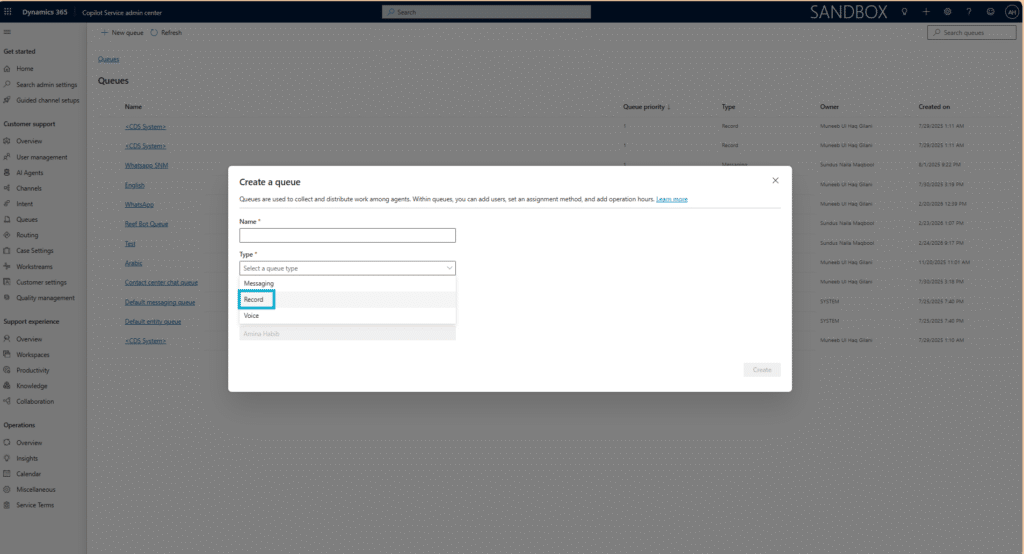
- Assign Priority and add the specific Users/Agents who belong to that queue.
Step 3. Managing channels
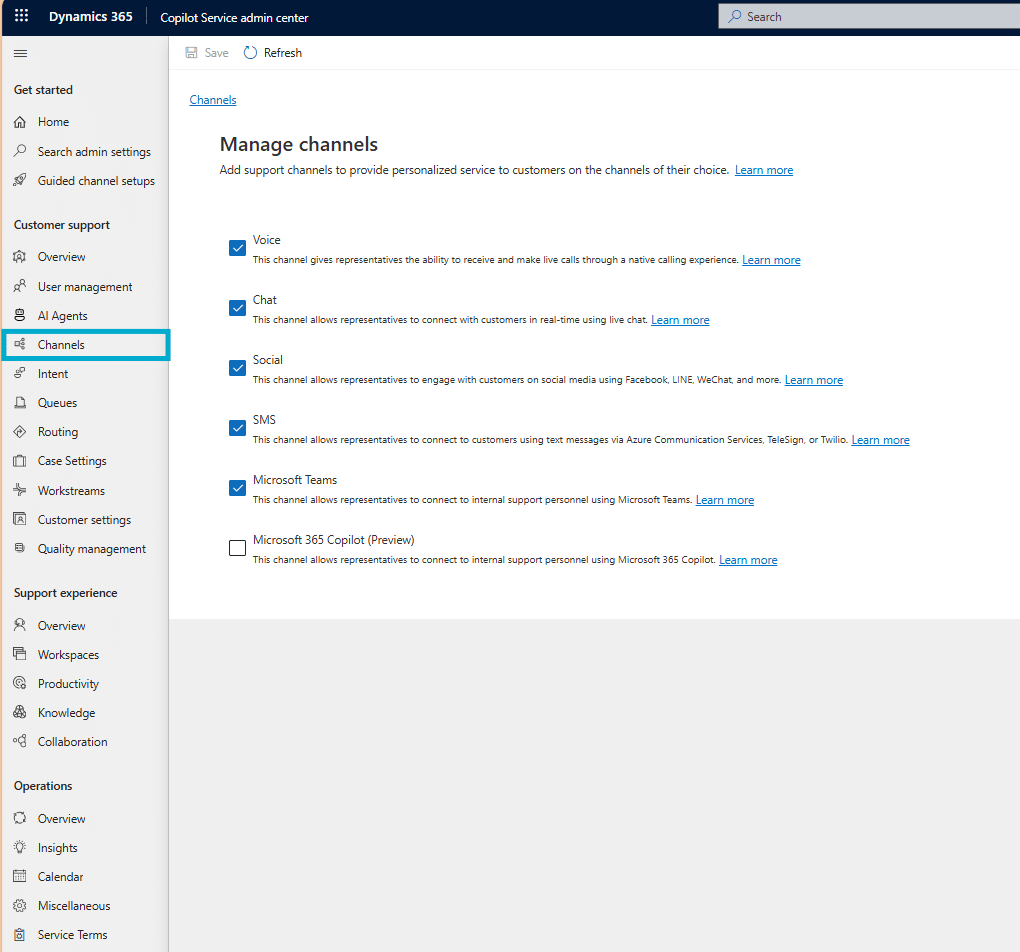
Channels define how customer interactions enter the system. These must be enabled before they can be used within workstreams.
- Navigate to Customer Support → Channels and select Manage Channels.
- Choose the channels required for your organization.
Step 4. Messaging account configuration
If you plan to route messaging conversations (like WhatsApp), you need a connected account with a platform such as Twilio or ACS
- Navigate to Channels → Messaging Accounts and select New Account.
- Enter the Account SID and Authentication Token.
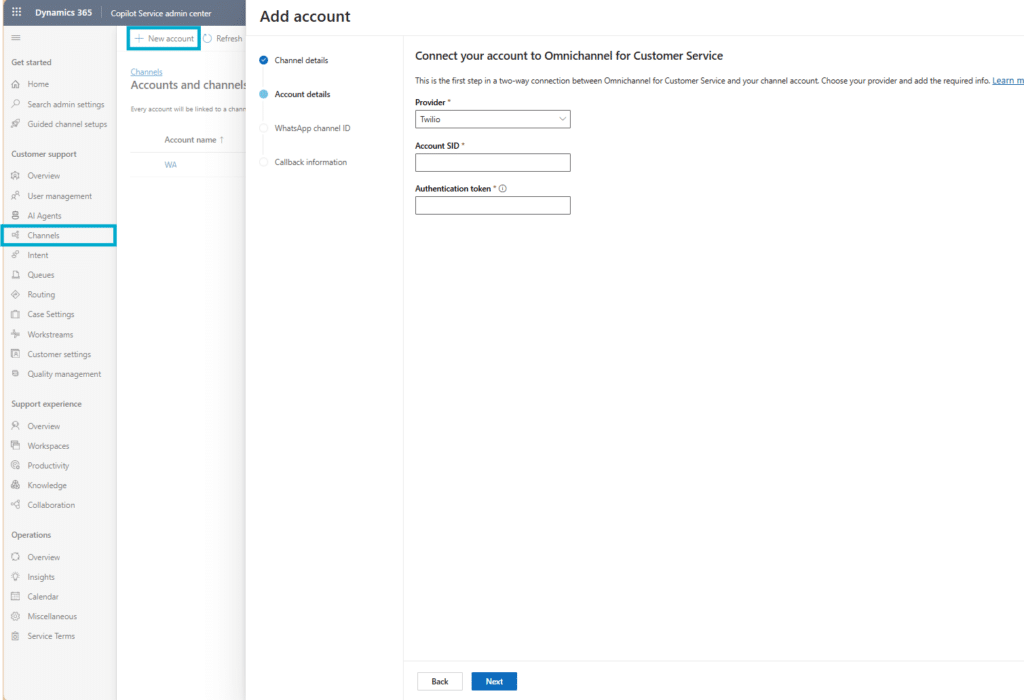
- Add the phone number and configure the inbound callback URL on your provider.
Step 5. Teams’ configuration
Teams organize the people who handle the work.
- In the Power Platform Admin Center, go to Environments → [Your Environment] → Settings.
- Navigate to Users + Permissions → Teams and click Create Team.
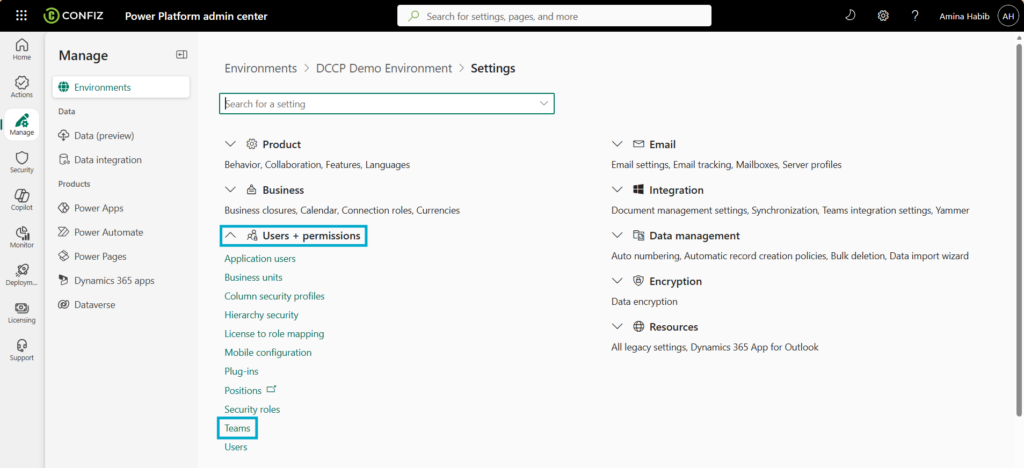
- Enter team details and add your support agents.
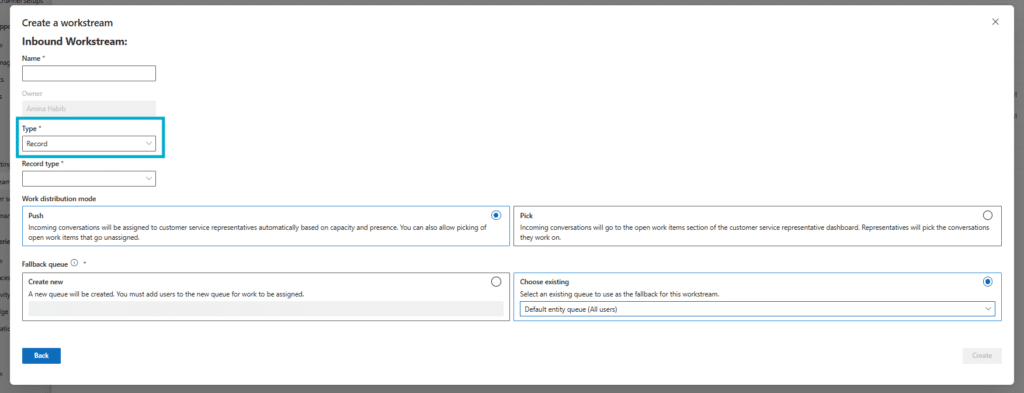
Step 6. Create the workstream
Once all the above prerequisites are in place, create a workstream that serves as the central logic engine for the automated routing framework. This ensures that every customer interaction is consistently managed in alignment with predefined organizational standards.
- In the Admin Center, go to Workstreams → New Workstream.
- Choose the Inbound category and select Type = Record.
- Also, select a fallback queue for the workstream.
- This creates an environment where your classification and routing rules will exist.
Step 7. Set up intake & classification rules
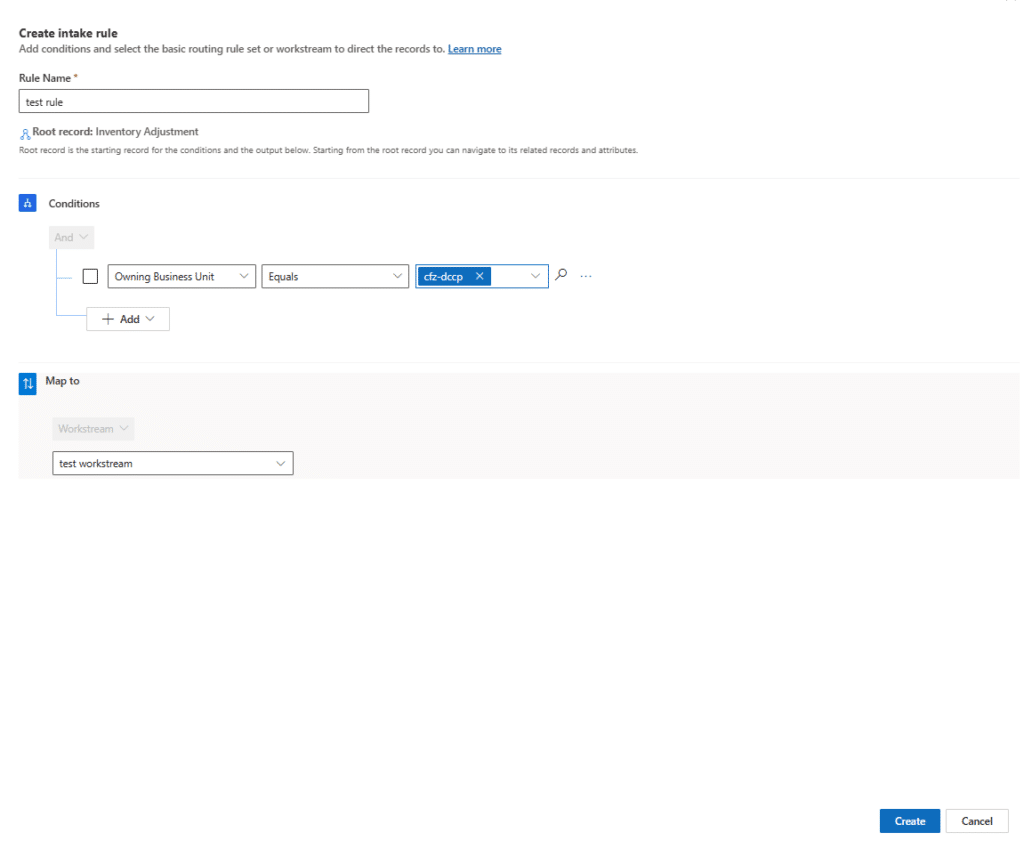
- Intake rules: Define which cases enter this stream (e.g., “All cases where Origin is Email”).
To configure intake rules, follow these steps:
- Navigate to the Intake rules section within the workstream configuration and select Create rules.

- Confirm that the Record type is set to Case.
- Establish the specific conditions required for the record to enter the workstream.
- Classification rules: Add depth to the case. These logical rules follow a “Condition-Output” format, ensuring every case is accurately prioritized and categorized before reaching an agent.
To configure a logical work classification ruleset, follow these steps:
- Locate Work classification and select Create Ruleset.
- In the setup dialog, ensure the Rule type is set to Logical rules.
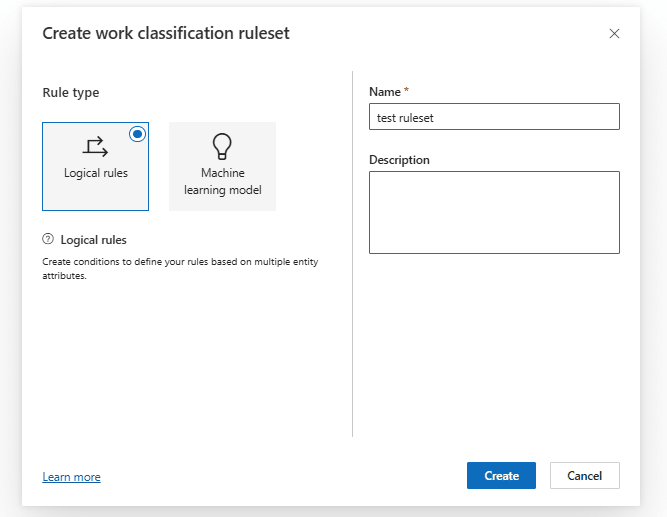
- On the Decision list page, define specific business criteria and specify the output values for attributes before saving the ruleset to activate the classification logic.
Step 8. Configure route-to-queue rules
Finally, map your classified cases into your queues.
- Locate the Route to queues section and select Create ruleset to begin.
- Define your conditions and choose the primary Route to queues destination where work items should be directed when conditions are met.

What usually weakens routing setups?
Routing models usually become weak for three reasons:
- The queue structure is too broad
- Classification logic is too shallow
- The assignment is considered too late
For example, Dynamics 365 Customer Service case assignment should never be treated as separate from routing design. A case can reach the right queue and still lose time if assignment behavior was not planned properly.
Accelerate growth at an unprecedented pace
Discover how Confiz can help you take control of your daily operations, increasing growth and revenue.
Book a Free ConsultationWhere does routing deliver the most value?
Once the structure is in place, routing becomes useful for far more than simple queue delivery.
For example, record routing in Dynamics 365 Customer Service supports cleaner workload separation, while skills-based routing becomes more relevant when issue type, specialist knowledge, or service complexity should influence who handles the case.
That is when routing starts to improve not only speed but also the quality of service delivery.
Conclusion
Unified routing gives service teams a more structured way to manage case flow in Dynamics 365 Customer Service. When queues, workstreams, intake rules, classification logic, and routing rules are aligned, cases move with more consistency, workloads are distributed more effectively, and delays caused by manual triage are reduced.
For organizations looking to strengthen service operations, the real value lies in building routing as a connected framework rather than a set of isolated rules. At Confiz, this approach helps turn routing configuration into a more practical and scalable service model. To explore the right setup for your environment, reach out to marketing@confiz.com.