
Inventory planning is one of the most critical activities in a supply chain operation. Organizations need to maintain enough inventory to satisfy demand while avoiding excess stock, unnecessary carrying costs, and procurement inefficiencies. Microsoft Dynamics 365 Finance & Operations provides a robust Master Planning framework that helps automate replenishment recommendations by evaluating demand, supply, lead time, minimum stock, approved vendors, and order quantity constraints.
This technical blog explains the complete configuration and process execution for Master Planning in D365 F&O. It is written as a general implementation guide and does not refer to any specific organization. The steps can be adapted for organizations that use standard master planning, Planning Optimization, or a combination of both.
Scope of the master planning process
The scope covered in this guide includes both configuration and operational execution:
- Planning Optimization enablement and parameters
- Master Plan creation and planning setup
- Coverage Group configuration
- Approved Vendor setup
- Item Coverage configuration
- Default Order Settings for purchased items
- Safety Stock Journal generation and posting
- Master Planning execution
- Review of planned purchase orders
- Firming planned orders into purchase orders
- Purchase order confirmation
| Area | Purpose | Business Impact |
|---|---|---|
| Master Planning | Generates replenishment recommendations based on supply and demand. | Improves inventory availability and reduces manual planning effort. |
| Safety Stock Journal | Calculates minimum stock using demand history, lead time, growth factor, and buffer days. | Maintains a more accurate inventory buffer. |
| Planned Orders | Displays suggested purchase orders before procurement execution. | Allows planner review before committing to suppliers. |
| Firming | Converts planned orders into purchase orders. | Moves the process from planning to procurement. |
| PO Confirmation | Formally confirms the purchase order. | Marks completion of the procurement portion of the workflow. |
End-to-end process overview
The planning process normally follows this flow:
- Inventory is monitored against minimum stock or safety stock levels.
- Master Planning is executed manually or through a scheduled batch job.
- D365 evaluates on-hand inventory, open purchase orders, demand, lead time, and item coverage settings.
- The system generates planned purchase orders when replenishment is required.
- Planners review planned orders, quantities, dates, and supplier details.
- Approved planned orders are firmed into purchase orders.
- Procurement reviews and confirms purchase orders.
- The vendor delivers goods, and the product receipt is posted, updating inventory.
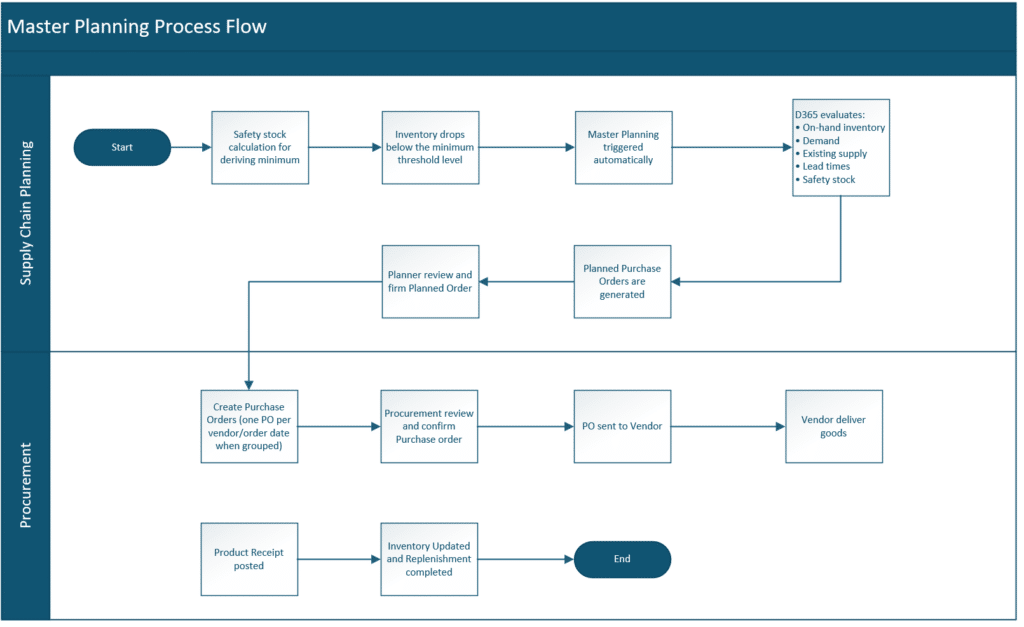
Master Planning Process Flow
Prerequisites for running master planning
Before executing Master Planning, make sure the following setup is complete. Missing or inaccurate setup is one of the most common causes of incorrect planned orders, missing replenishment suggestions, or incorrect delivery dates.
| Prerequisite | Why It Matters | Common Risk If Missing |
|---|---|---|
| Planning Optimization | Enables scalable and faster planning calculations. | Planning may run slowly or not use the intended calculation engine. |
| Master Plan | Defines planning behavior and execution scope. | Planning cannot run correctly without a valid plan. |
| Coverage Group | Controls replenishment logic for items. | Items may not generate planned orders as expected. |
| Approved Vendor | Identifies the supplier for purchased items. | Planned purchase orders may miss vendor assignment. |
| Item Coverage | Defines minimum stock and coverage dimensions. | Planning may ignore inventory thresholds or generate incorrect suggestions. |
| Default Order Settings | Controls MOQ, multiples, lead time, site, and warehouse. | Planned quantities and dates may be incorrect. |
Configuration steps
Step 1: Enable planning optimization
Planning Optimization is the modern planning calculation engine for D365 F&O. It improves performance by moving planning calculations outside the transactional database and into an optimized planning service.
Navigation: Master Planning > Setup > Planning Optimization Parameters
Typical setup considerations:
- Confirm that Planning Optimization is installed and enabled for the environment.
- Review supported and unsupported planning features before activation.
- Validate that the legal entity is configured to use the desired planning engine.
- Run initial planning tests in a non-production environment before scheduling production batch jobs.
Technical note: Planning Optimization requires clean planning master data. Incorrect coverage settings, missing lead times, or invalid approved vendors will still produce inaccurate results even if the planning engine is enabled.
Step 2: Create and configure master plans
A Master Plan defines how planning calculations are executed. Organizations often maintain at least one operational plan and may also maintain simulation plans for testing future scenarios.
Navigation: Master Planning > Setup > Plans > Master Plans
| Plan Type | Recommended Usage | Notes |
|---|---|---|
| Dynamic Plan | Daily or frequent operational planning. | Used by planners for current replenishment recommendations. |
| Static Plan | Simulation, testing, or scenario planning. | Useful for comparing planning outcomes without impacting operational recommendations. |
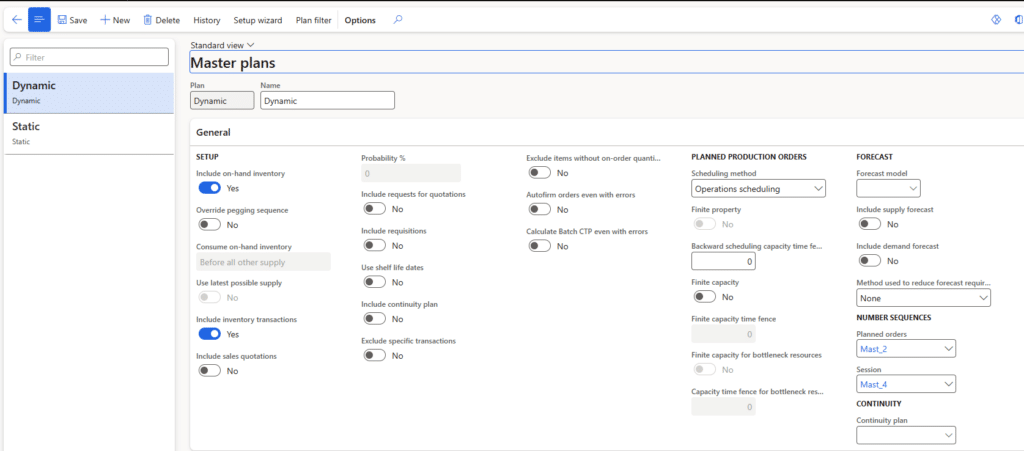
Master Plans
Key fields and decisions when creating a Master Plan:
- Plan ID and description: use a clear naming convention.
- Coverage scope: decide whether the plan applies to all items or to selected coverage groups.
- Forecast inclusion: determine whether demand forecasts should be included.
- Planning time fences: define how far into the future the system should plan.
- Batch execution: schedule recurring runs for operational planning.
Step 3: Configure coverage groups
Coverage Groups control the replenishment calculation method for items. They determine how D365 evaluates requirements and when planned orders should be generated.
Navigation: Master Planning > Setup > Coverage > Coverage Groups
| Field | Recommended Value / Consideration | Explanation |
|---|---|---|
| Coverage group | Use a meaningful code — by vendor, category, or planning policy. | Helps planners filter and execute planning runs by logical groups. |
| Name | Enter a clear description. | Improves maintainability and support. |
| Coverage code | Requirement | Generates replenishment based on actual requirements and inventory shortage. |
| Calendar | Standard working-day calendar or relevant business calendar. | Controls planned dates and working days. |
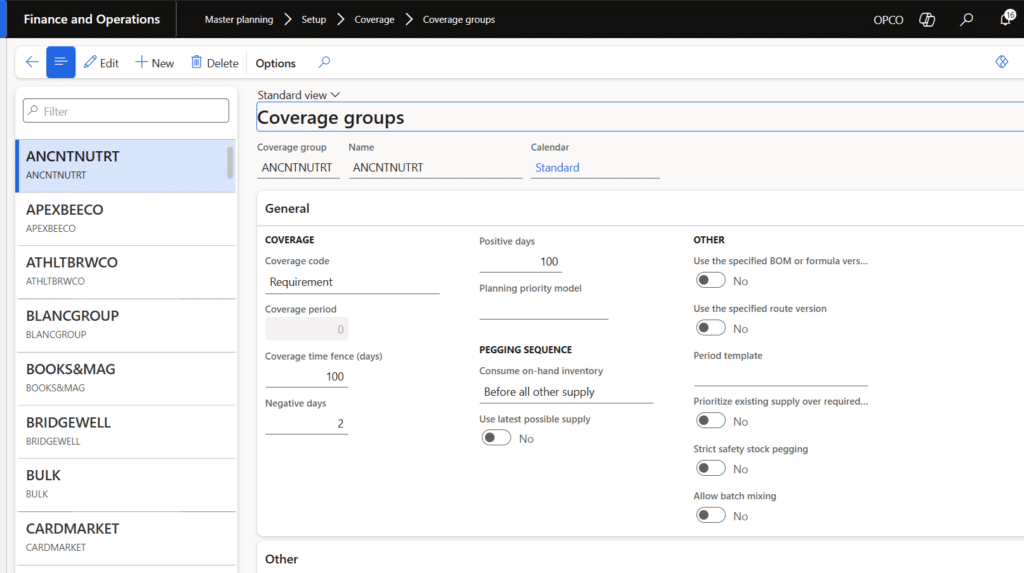
Coverage Groups configuration — Coverage code set to Requirement, Standard calendar assigned
Best practice: Use a consistent coverage group strategy. Some organizations create coverage groups by vendor, while others create them by product category, planning policy, or replenishment method.
Step 4: Configure approved vendors by item
Approved vendor setup links purchased items with valid suppliers. This setup is important because planned purchase orders require vendor assignment before they can be firmed.
Navigation: Procurement and sourcing > Vendors > Vendor/Item relations > Approved vendor list by item
- Open the Approved vendor list by item form.
- Select the item number.
- Select the vendor account.
- Define effective dates if vendor validity should be controlled by period.
- Save the record and validate that the item/vendor relationship is active.
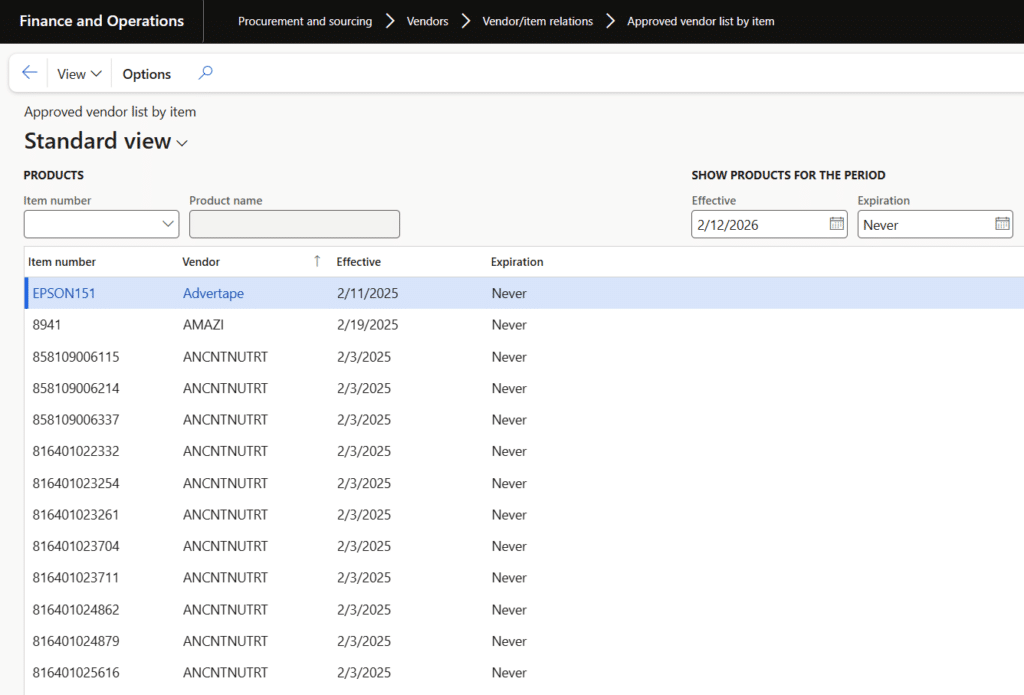
Approved vendor list by item — item-to-vendor assignments with effective dates
Step 5: Configure item coverage
Item Coverage determines how Master Planning evaluates an item at the site, warehouse, or dimension level. This setup connects the item with a coverage group and can also define minimum inventory levels.
Note: Item coverage is updated upon posting the safety stock journal as well.
Navigation: Master Planning > Setup > Item Coverage
| Field | Purpose | Planning Impact |
|---|---|---|
| Item number | Identifies the item being planned. | Planning runs at the item and dimension level. |
| Coverage group | Assigns replenishment logic. | Controls how requirements are calculated. |
| Minimum | Defines minimum inventory/safety stock. | Planned orders generated when projected inventory falls below this value. |
| Site/Warehouse | Defines storage dimension coverage. | Incorrect dimensions can create planning gaps or duplicate suggestions. |
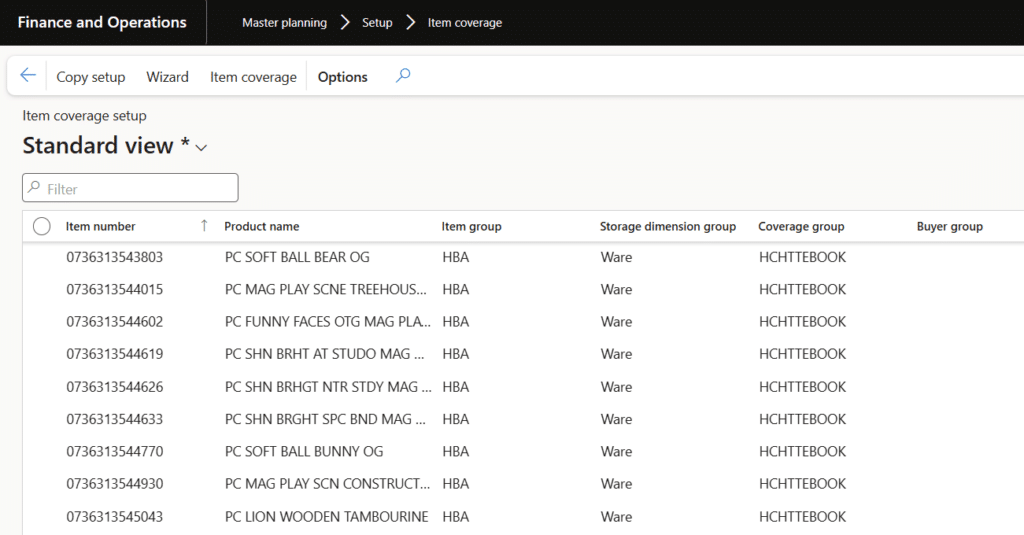
Item Coverage setup — items with coverage group assignments by site and warehouse
Step 6: Configure default order settings
Default Order Settings are critical for purchase planning because they define how planned purchase quantities and dates are calculated.
Navigation: Product Information Management > Released Products > Plan > Default Order Settings
| Field | Description | Example |
|---|---|---|
| Minimum order quantity | Smallest quantity that should be ordered. | If demand is 25 and the MOQ is 100, the planned quantity may be 100. |
| Multiple | Ordering increment or pack size. | If multiple is 12 and the requirement is 25, the planned quantity rounds to 36. |
| Purchase lead time | Supplier delivery lead time. | Used to calculate the order date and delivery date. |
| Default site | Default receiving site. | Prevents blank storage dimension errors. |
| Default warehouse | Default receiving warehouse. | Ensures purchase orders are created for the correct warehouse. |
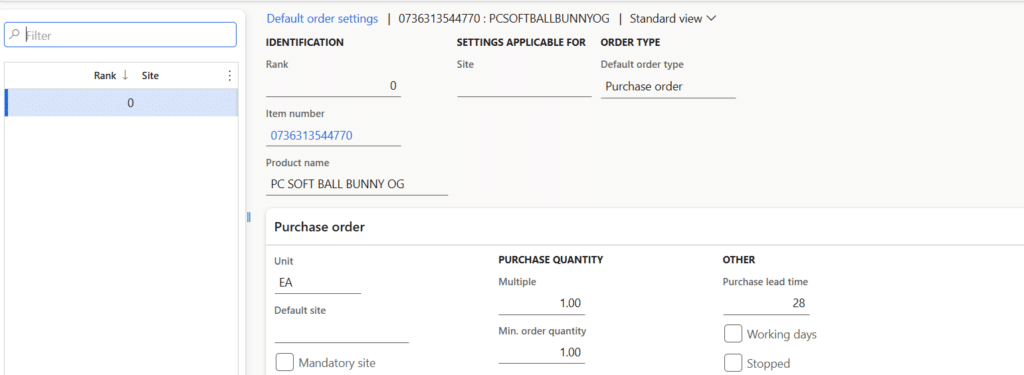
Default Order Settings — Purchase order tab showing Multiple, Min. order quantity, and Purchase lead time
Safety stock journal execution
Safety stock is the minimum inventory level maintained to protect against demand fluctuations, supplier delays, and seasonal increases. In D365, the Safety Stock Journal calculates and updates minimum inventory values on item coverage based on historical consumption, lead time, and growth factors.
Navigation: Master Planning > Run > Safety Stock Journal
Functional logic of the safety stock journal
The Safety Stock Journal calculates Minimum Stock based on:
- Average Issue per Month — historical monthly consumption.
- Lead Time — vendor-reported delivery period.
- Multiplication Factor — growth or seasonal adjustment.
- Lead Time Margin — extra buffer days added on top of lead time.
| Input | Meaning | Usage |
|---|---|---|
| Average issue per month | Historical monthly consumption. | Base demand value used in the calculation. |
| Lead time | Supplier delivery period. | Calculates demand during replenishment time. |
| Lead time margin | Extra buffer days or period. | Protects against delays and variability. |
| Multiplication factor | Growth or seasonal factor. | Increases the calculated minimum for seasonal demand. |
| Use the calculated minimum as the new minimum | Updates the proposed value as the new minimum. | Required when the proposal should update item coverage after posting. |
Safety stock calculation formula
The standard calculation approach is:
Minimum Stock = Average Issue per Month × (Lead Time + Buffer Days) × Growth Factor
Example calculation:
| Variable | Value |
|---|---|
| Average Issue per Month | 100 units |
| Lead Time | 2 months |
| Buffer Days / Period Equivalent | 1 month |
| Growth Factor | 1.20 |
| Calculated Minimum Stock | 100 × (2 + 1) × 1.20 = 360 units |
Step-by-step: Create a safety stock journal
Step 1 — Open the Safety Stock Journal and create a new journal
Navigation: Master Planning > Master Planning > Run > Safety Stock Journal
- Navigate to Safety Stock Journal.
- Click New to create a new journal.
- The journal header is created with a journal number and type, Safety stock.
- Click Create lines to generate journal lines from historical consumption data.
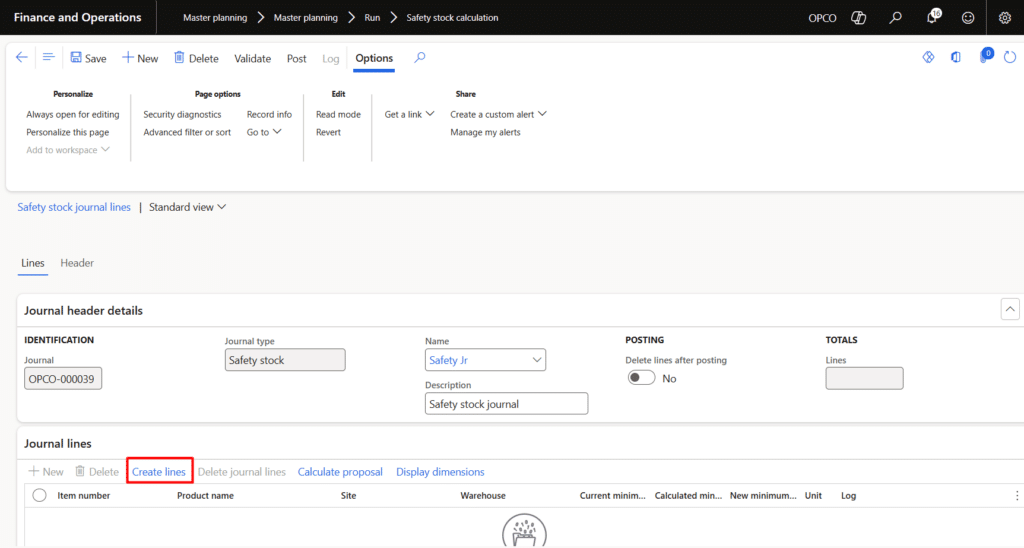
Safety Stock Journal — new journal created, Create lines button highlighted
Step 2 — Set date range and filter by coverage group
The Create lines dialog allows you to define the historical period for consumption analysis and scope the items by coverage group.
- Enter the From date and To date to define the analysis period.
- Under Records to include, click Filter and add the Coverage group field.
- Enter the relevant coverage group or a range using double-dot notation (e.g., GROUPA..GROUPZ).
- Click OK to generate journal lines for all items assigned to the selected coverage groups.
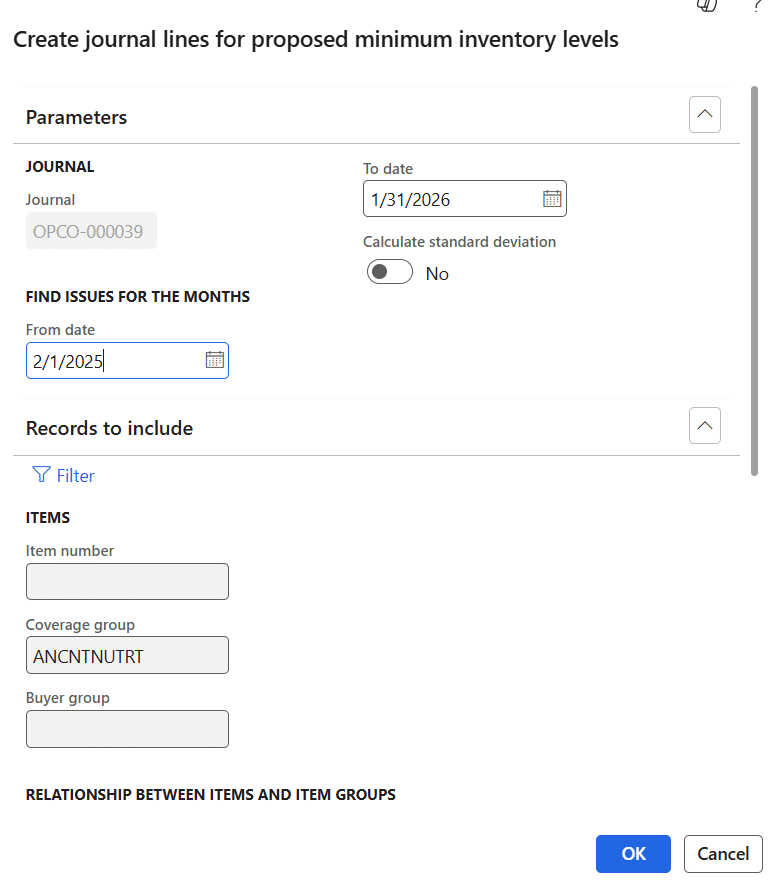
Create journal lines dialog — date range and coverage group filter
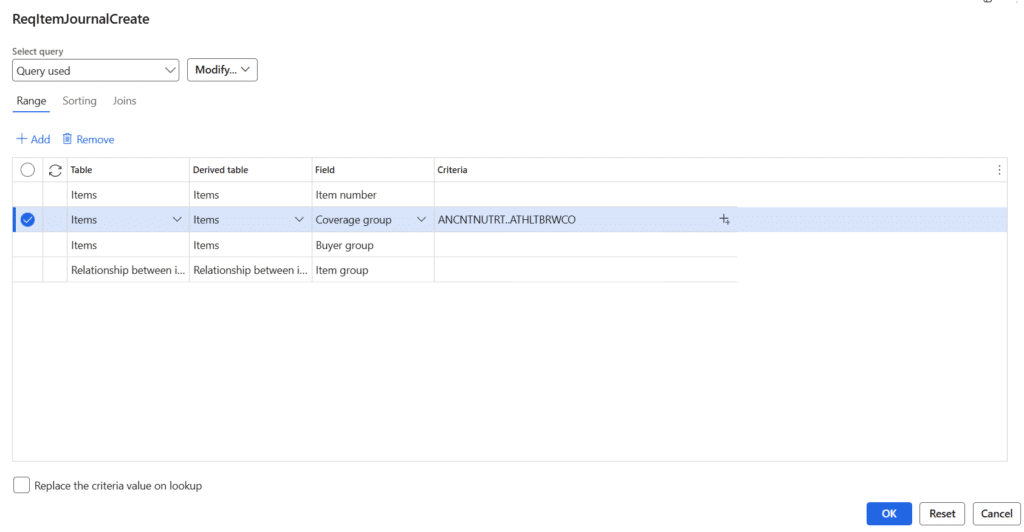
Coverage group filter with range selection — items within the range will be included
Step 3 — Review generated journal lines
After clicking OK, the system generates journal lines for all items that have consumption history within the defined date range and coverage group.
- Each line shows the item, site, warehouse, Current minimum, Calculated minimum, and New minimum.
- The Calculated minimum is initially 0 until Calculate proposal is run.
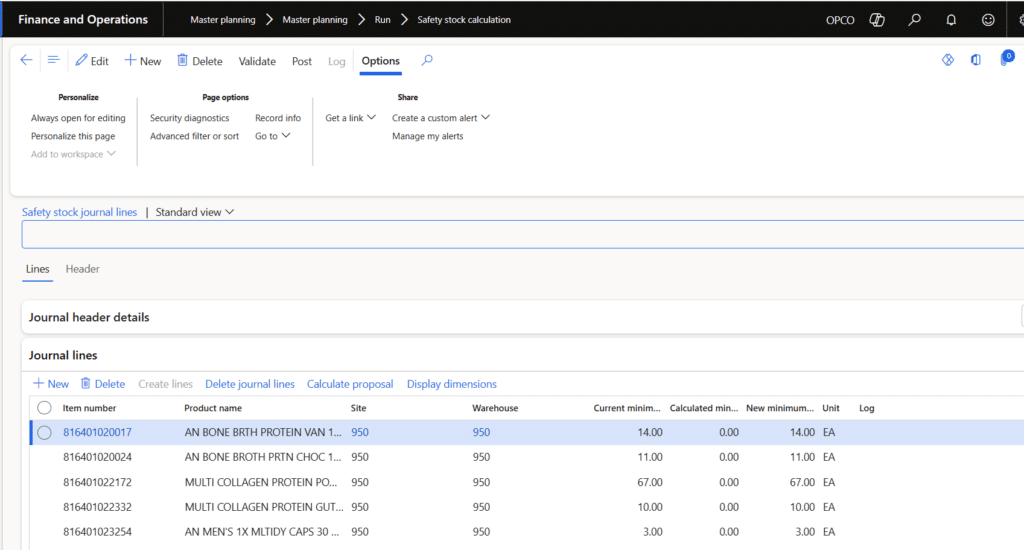
Journal lines populated after Create lines — showing items with current minimum values
Step 4 — Calculate proposal
Click Calculate proposal to compute new minimum quantities. The dialog allows you to configure the growth factor and buffer days.
- Click Calculate proposal in the journal lines toolbar.
- Set the Multiplication factor (e.g., 1.00 for exact sales, 1.20 for 20% growth buffer).
- Set a Lead time margin to add additional buffer days on top of the vendor lead time.
- Enable Use the calculated minimum quantity as the new minimum quantity.
- Click OK to run the calculation.
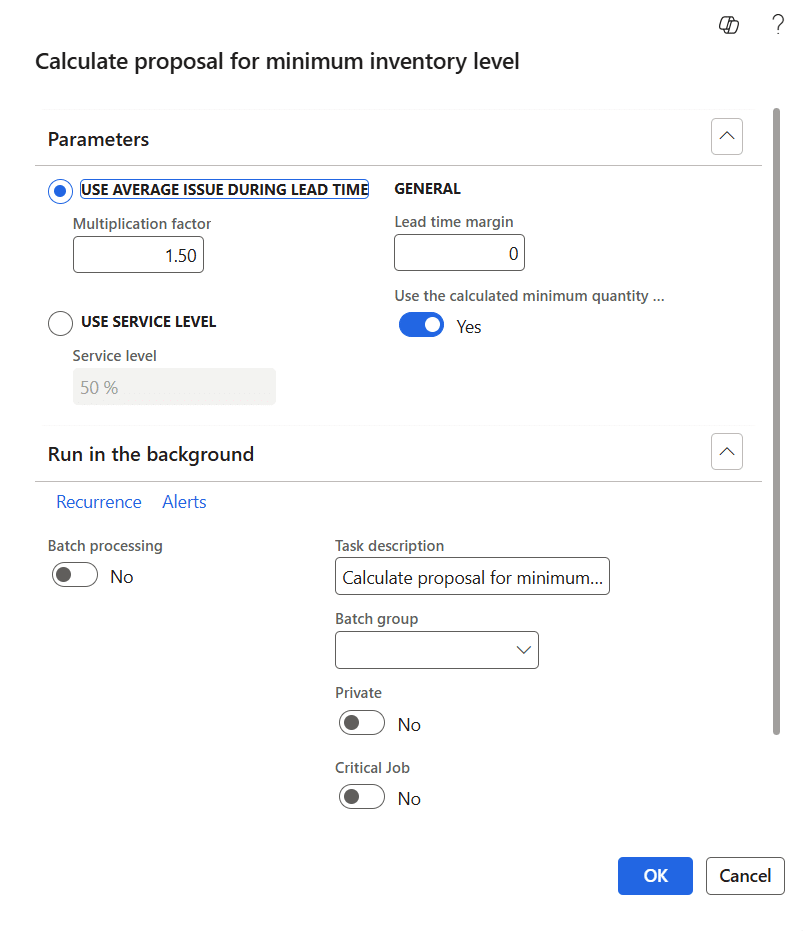
Calculate proposal dialog — Multiplication factor, Lead time margin, and Use calculated minimum toggle
Step 5 — Review proposal results
After the calculation runs, the journal lines update with the new proposed minimum values. Review each line before posting.
- Compare the Current minimum, Calculated minimum, and New minimum columns.
- Validate unusually high or low proposals – particularly if using high growth factors or wide date ranges.
- Click into any line to see the full Line details, including Average issues per month, lead time, and average issues per lead time.
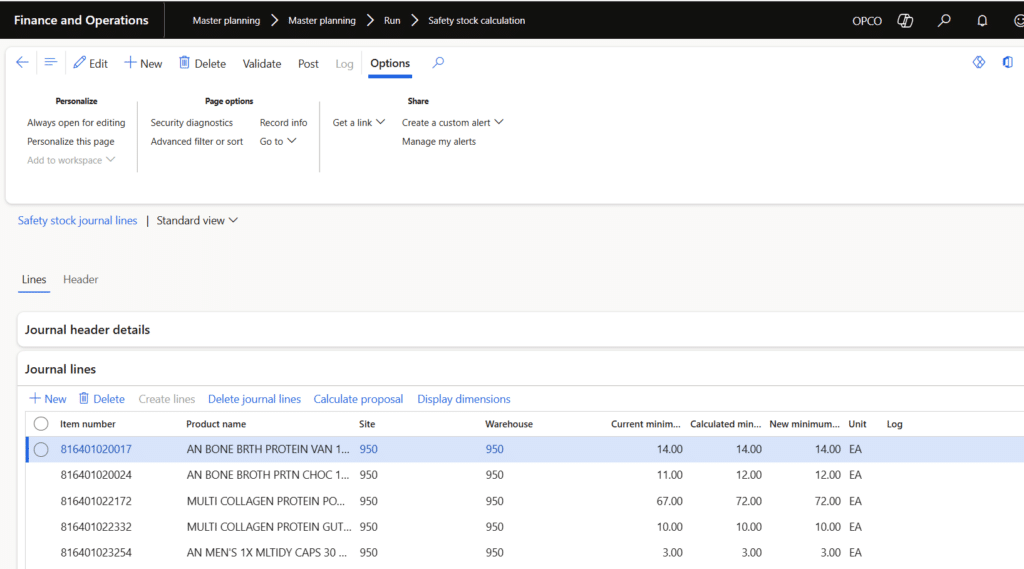
Journal lines after Calculate proposal — New minimum column updated with calculated values
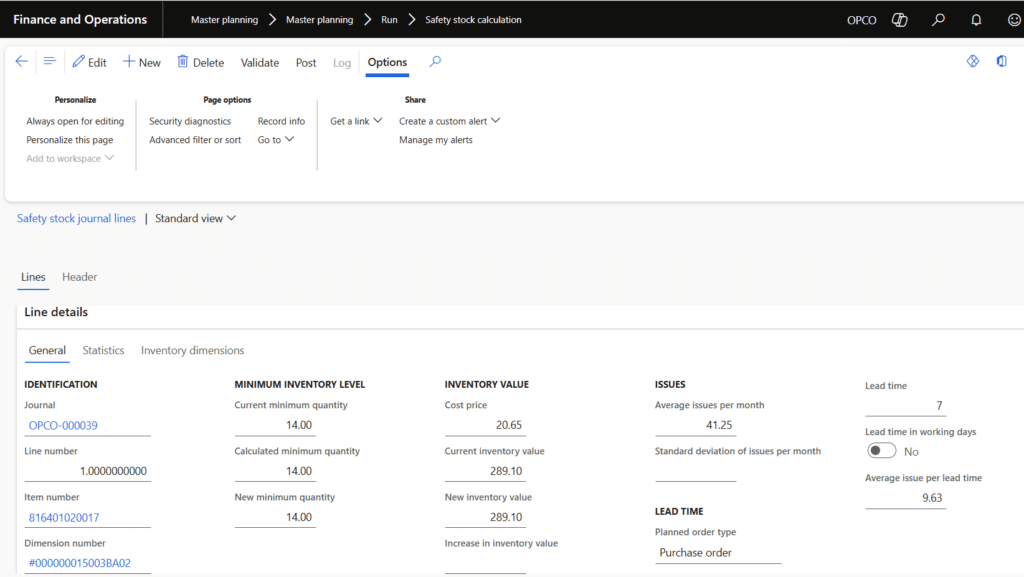
Line details — showing Average issues per month, Lead time, and Calculated minimum values
Step 6 — Post the safety stock journal
After reviewing the proposals, post the journal to update the Minimum values on Item Coverage.
- Review all proposed minimum quantities.
- Validate any unusual values.
- Click Post.
- Confirm that the minimum quantity has been updated on Item Coverage.
Control point: Posting Safety Stock Journal updates and planning master data. The planner should review all proposals before posting, especially when using high growth factors or wide date ranges.
Running master planning
After configuration and minimum stock values are ready, execute Master Planning to generate replenishment recommendations.
Navigation: Master Planning > Run > Master Planning
- Open the Master Planning run form.
- Select the required plan (e.g., a Dynamic Plan for operational planning).
- Click Filter under Records to limit the run’s scope to specific items, vendors, or coverage groups.
- Enter the relevant coverage group or range of coverage groups in the criteria.
- Click OK to start the planning run.
- Review batch execution details if the process is scheduled or running in the background.
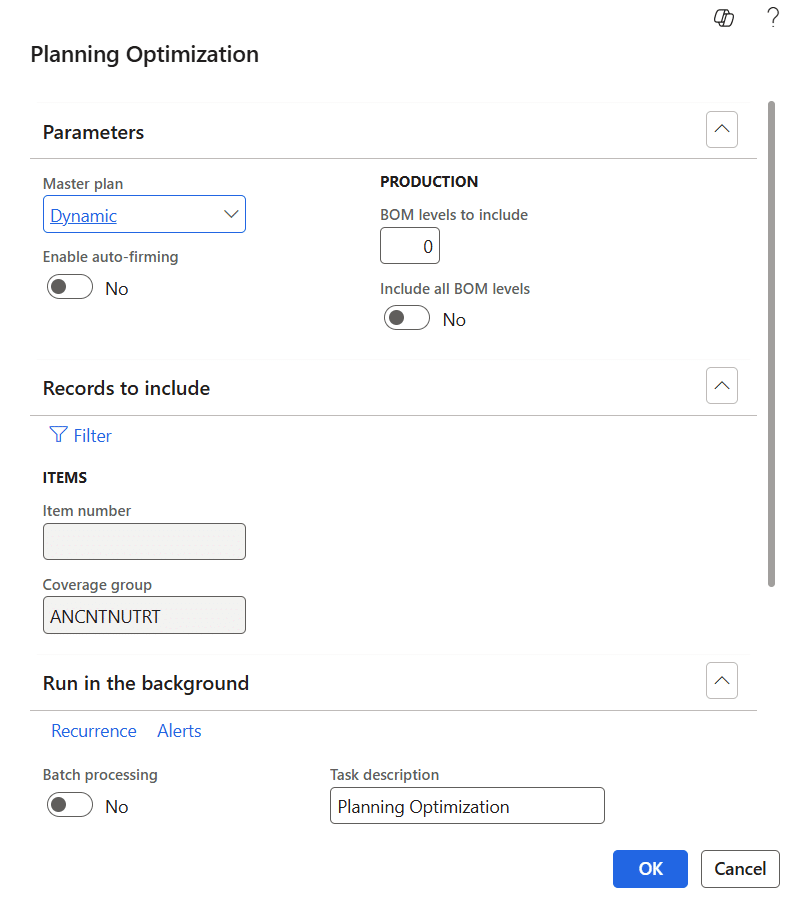
Master Planning run dialog — Dynamic plan selected, coverage group filter added
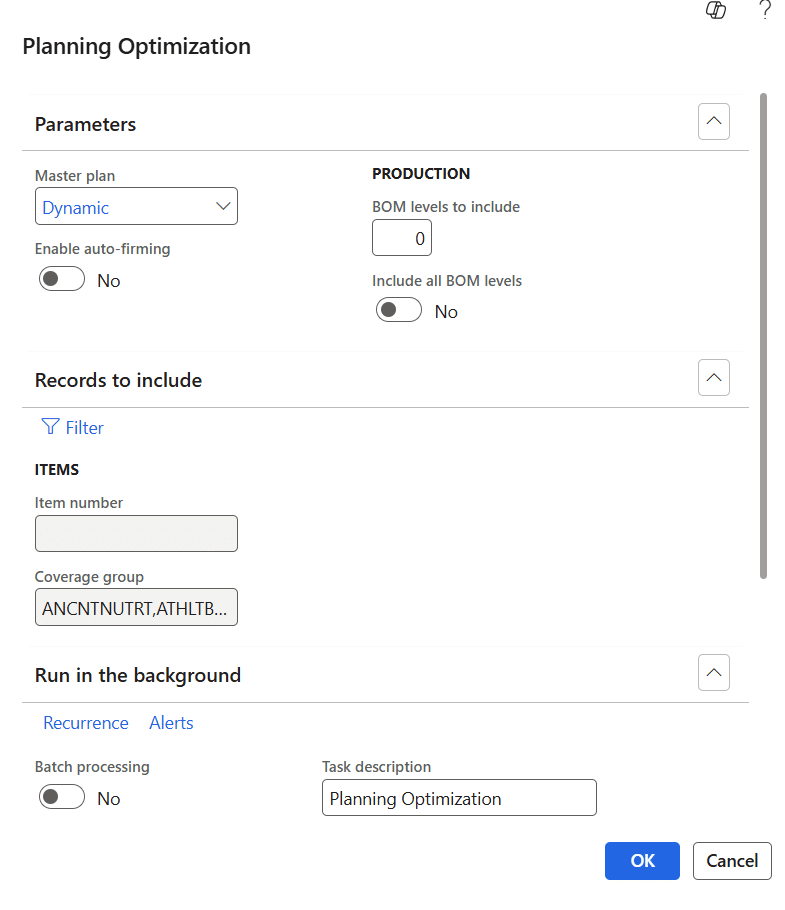
Master Planning with multiple coverage groups selected in Records to include
What the planning engine evaluates
- On-hand inventory by item and storage dimension
- Existing supply, such as open purchase orders
- Demand from sales orders, forecasts, or dependent requirements
- Minimum stock defined on item coverage
- Purchase lead time from default order settings
- MOQ and multiples from default order settings
- Approved vendor and item-vendor relationship
- Coverage group policy and planning calendar
Reviewing planned purchase orders
Once Master Planning is complete, purchase orders are created for items that require replenishment. Planners should review these recommendations before firming them into purchase orders.
Navigation: Master Planning > Planned Orders
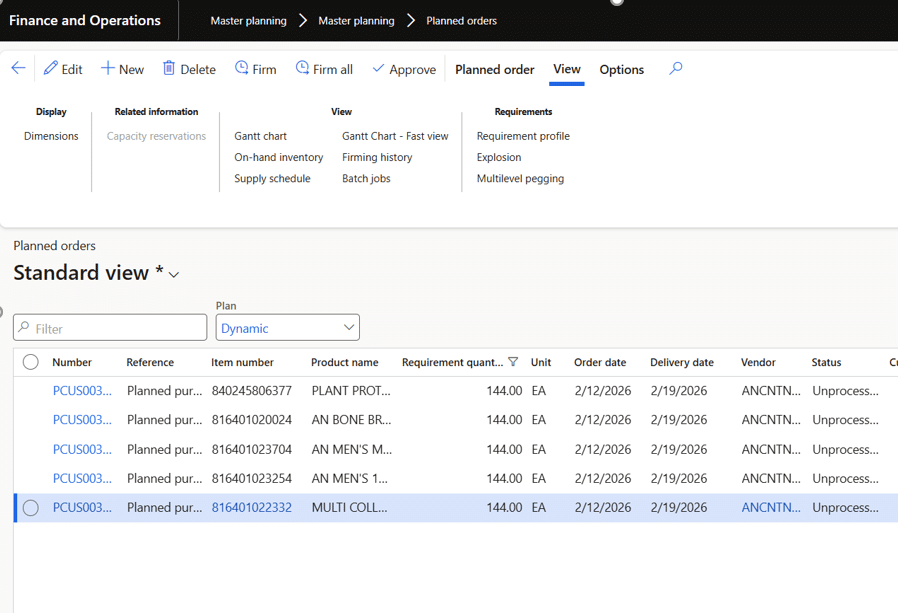
Planned orders list — item, quantity, order date, delivery date, vendor, and coverage metrics
Recommended review approach
- Filter by vendor, coverage group, item, order date, or delivery date.
- Sort by the number of days with the lowest coverage to prioritize high-risk items.
- Validate large planned quantities against MOQ, multiples, and seasonal factors.
- Check planned delivery dates against supplier lead time and planning calendar.
- Export to Excel only when offline review or approval is required.
Firming planned orders into purchase orders
Firming is the approval step where planned purchase orders are converted into actual purchase orders. Once firm, the process moves from planning to procurement execution.
- Open the Planned Orders workspace.
- Select one or more planned purchase orders.
- Click Firm.
- Confirm the firming parameters such as date, vendor, and quantity.
- Complete the firming process.
- Open Firming history (View tab) to locate the created purchase order.
- Validate the purchase order from Procurement and sourcing > All Purchase Orders.
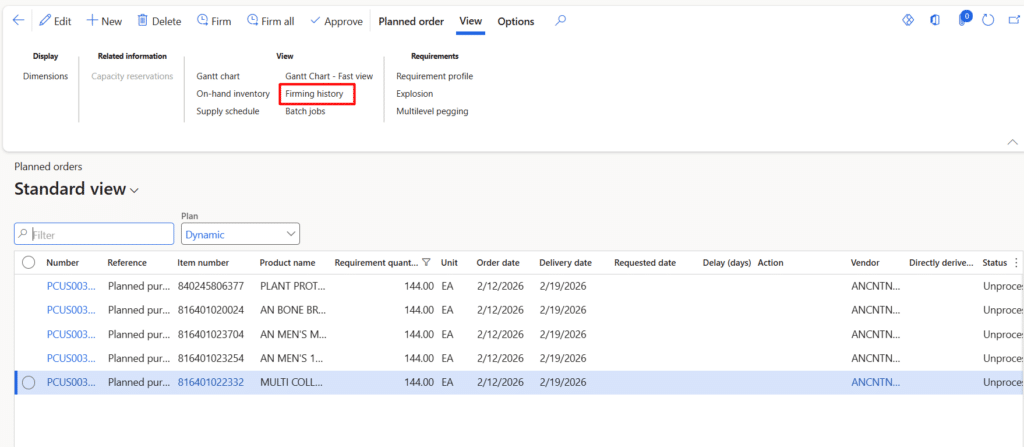
Planned orders — Firm button in toolbar and Firming history option highlighted in the View tab
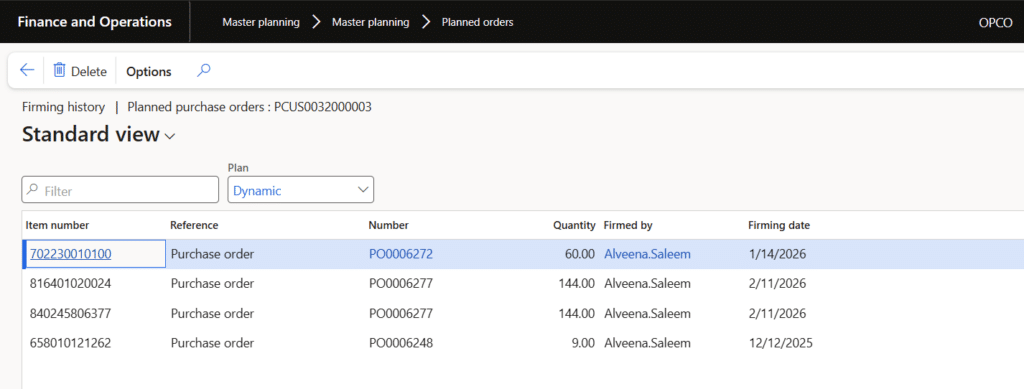
Firming history — created purchase orders with PO number, quantity, firmed by, and firming date
System behavior during firming:
- Planned orders are converted into purchase orders.
- Lines may be consolidated based on vendor and delivery date, depending on setup and business logic.
- The planned order reference can be tracked through firming history.
- Procurement users can continue with review, approval, and confirmation.
Purchase order confirmation
After purchase orders are created through firming, the procurement team reviews and formally confirms the orders with the vendor. This is the final step in the replenishment cycle before goods are received.
Navigation: Procurement and sourcing > All Purchase Orders
Confirming purchase orders
- Navigate to Procurement and sourcing > All Purchase Orders.
- Sort or filter the list to locate the newly created purchase order.
- Open the purchase order and review vendor details, line items, quantities, prices, delivery dates, site, and warehouse.
- Click the Purchase tab in the action pane.
- Click Confirmation (or use the Confirm button) to formally confirm the order.
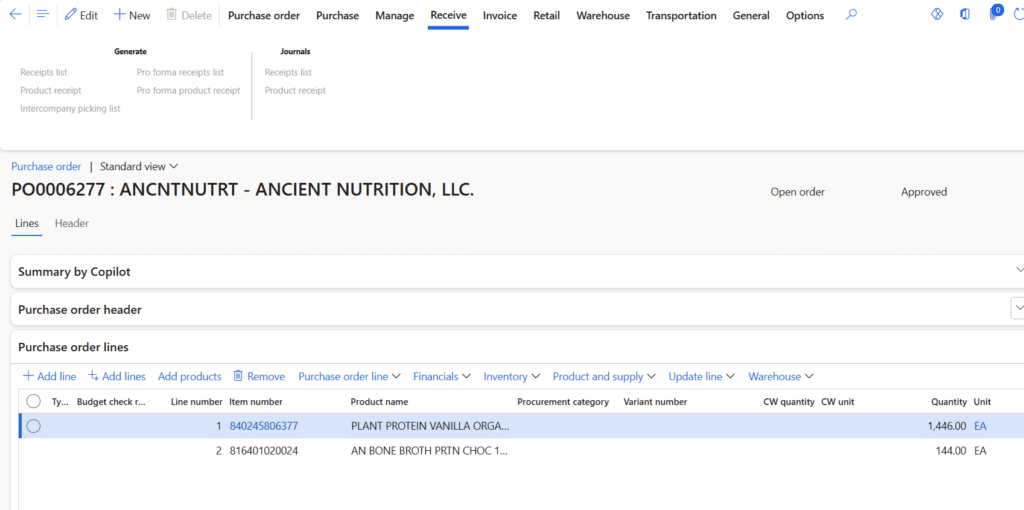
Purchase order created from firming — showing header, vendor, and purchase order lines
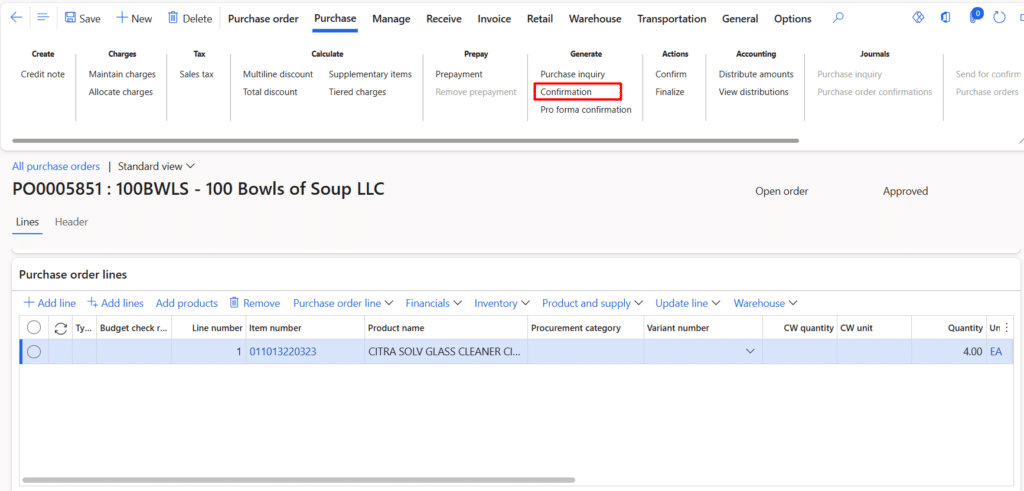
Purchase order — Confirmation button highlighted under the Purchase tab action pane
What happens on confirmation
- The purchase order status updates to Confirmed.
- The PO is formally communicated to the vendor.
- The purchasing cycle continues according to standard D365 processes, including product receipt and invoicing.
Note: Confirmation locks in the purchase order details. Any significant changes after confirmation typically require creating a change order or amendment.
Common issues and troubleshooting
| Issue | Likely Cause | Recommended Action |
|---|---|---|
| No planned orders are generated | Minimum stock not set, coverage group missing, approved vendor missing, or demand not recognized. | Review item coverage, approved vendor setup, on-hand inventory, and planning filters. |
| The planned order has the wrong vendor | Approved vendor setup is missing or incorrect. | Validate the approved vendor list and item-vendor relations. |
| Planned quantity is too high | MOQ, multiples, or safety stock value is too high. | Review default order settings and the safety stock journal proposal. |
| Planned delivery date is incorrect | The purchase lead time or calendar is incorrect. | Review default order settings and coverage group calendar. |
| The purchase order does not consolidate as expected | Different vendors, delivery dates, sites, warehouses, or firming parameters. | Compare planned order dimensions and firming settings. |
| Too many planned orders are generated | Coverage dimensions are too granular, or the minimum stock is excessive. | Review item coverage by site/warehouse and safety stock values. |
Best practices
- Keep lead times accurate and review them periodically with procurement teams.
- Maintain approved vendors for all purchased items before planning execution.
- Use consistent coverage group naming conventions.
- Review MOQ and multiples regularly to reflect supplier packaging and purchasing constraints.
- Run the Safety Stock Journal periodically instead of maintaining minimum quantities manually.
- Use growth factors carefully during seasonal periods and reset them when seasonality ends.
- Schedule Master Planning through batch jobs during off-peak hours where possible.
- Review planned orders before firming, especially for high-value or slow-moving items.
- Use firming history to trace and audit all purchase orders back to their planned order source.
- Document planning assumptions such as lead time, buffer days, and seasonal multipliers.
Conclusion
Master Planning in Dynamics 365 Finance & Operations provides a strong foundation for automated replenishment and procurement planning. However, the quality of planning recommendations depends on the accuracy of the configuration behind it. Coverage groups, approved vendors, item coverage, default order settings, and safety stock values must all work together to produce reliable planned purchase orders.
A well-designed Master Planning process helps organizations reduce stock shortages, improve inventory visibility, standardize replenishment decisions, and reduce manual spreadsheet-based planning. When combined with periodic safety stock review and disciplined planned order analysis, D365 can become a powerful planning engine for day-to-day supply chain execution.