
Managing international shipments requires more than tracking containers — it requires clear financial ownership from the moment goods leave the vendor. The Goods-in-Transit (GIT) functionality in Dynamics 365 Finance & Operations enables organizations to recognize costs earlier in the voyage, gain visibility of in-transit inventory, and take financial ownership before goods physically arrive at the warehouse.
With a dedicated GIT warehouse, costs can be captured at the start of the voyage. At the same time, confirmed delivery dates allow in-transit quantities to feed master planning even though the items remain unavailable for physical issue. This approach strengthens Landed-cost accuracy, enhances financial transparency, and supports better supply-chain decisions throughout the shipment lifecycle.
If you haven’t yet configured foundational elements such as cost type codes, journey templates, shipping companies, and voyage statuses, refer to Part 1 of this series.
Goods-in-transit process flow
The flow diagram below illustrates the inbound purchase order receipt with goods-in-transit process, how goods move through the Landed cost stages from voyage creation to purchase invoice, goods receipt, under/over delivery, and actual cost allocation.
The section below, named “Setups for goods-in-transit process”, discusses mandatory setups required for the goods-in-transit process. Mainly, when the “Goods-in-transit” option is set to “Yes” in the applicable “Terms of delivery”, the goods are placed in the goods-in-transit warehouse. This means users can no longer post a product receipt for a purchase order before an invoice is issued.
Steps in the GIT process flow:
- The “goods-in-transit” is triggered when the purchase order invoice is posted for a voyage (that is enabled for goods-in-transit).
- The GIT warehouse receives goods on “goods-in-transit orders” before they arrive at the destination warehouse. This transfer signifies the change in ownership of the goods that haven’t yet physically arrived at the destination warehouse
- Next, depending on the difference of “original ordered vs. received quantity” of item(s), the “under-delivery” warehouse will hold the difference quantity.
- The organization may either decide to “create purchase order with -ve quantity” for the short shipment by vendor or “create movement journal to post expense/loss” due to internal theft or damage etc.
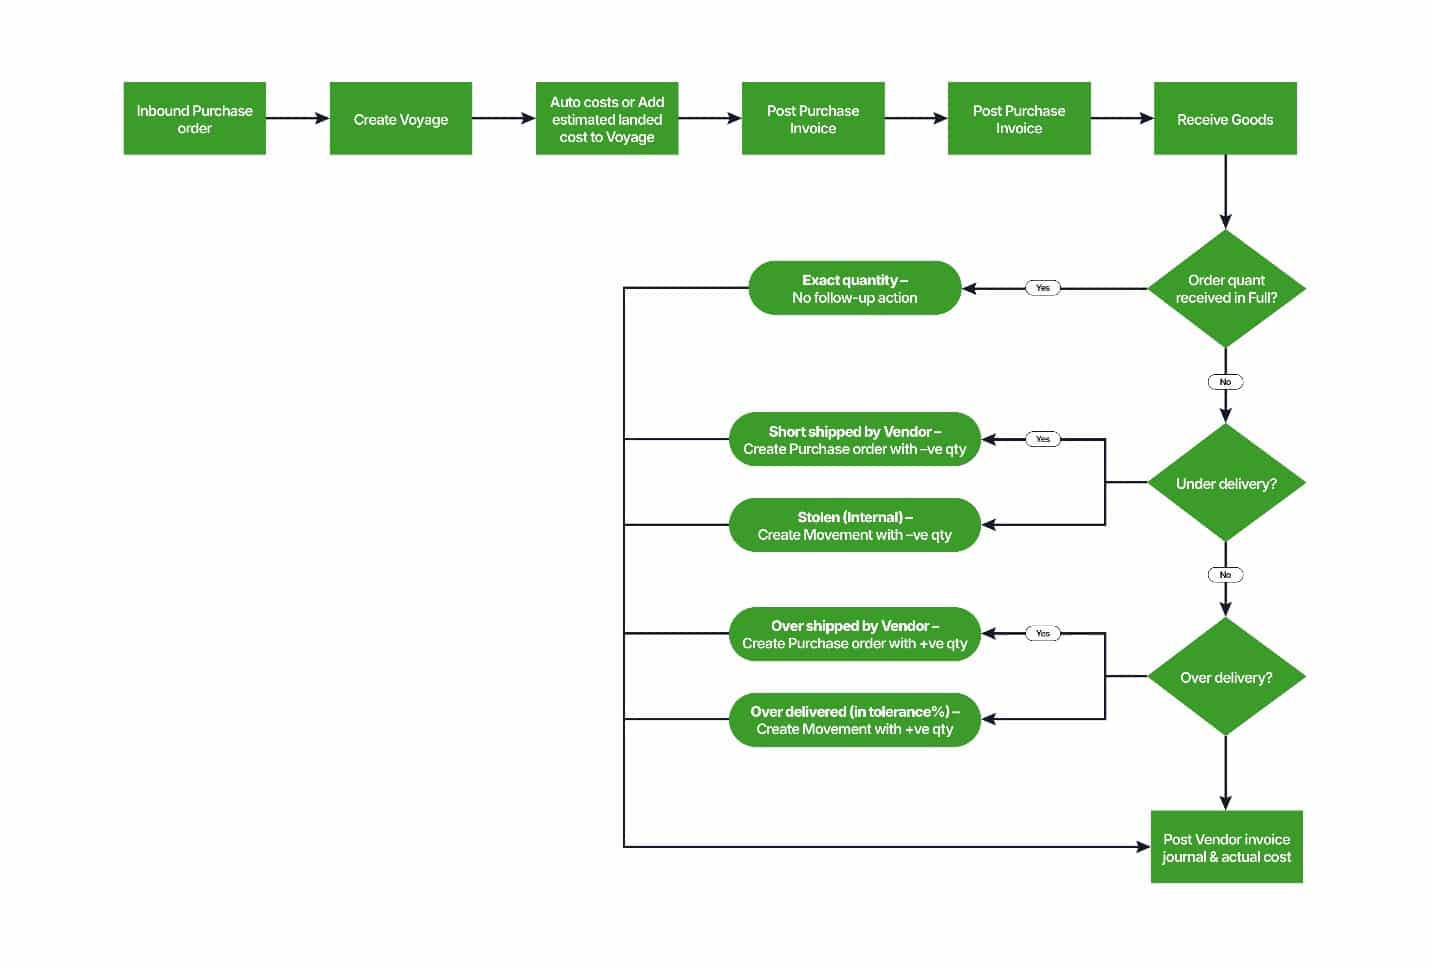
Figure 1: Showing “inbound purchase order flow with goods-in-transit process”
Setups for the Goods-In-Transit (GIT) process
In the Landed cost module, the “Goods-in-transit” process requires the following setups to work properly.
How to do steps:
- Landed cost warehouses (i.e., Goods in transit and Under delivery):
- Go to Inventory management ➜ Setup ➜ Inventory breakdown ➜ Warehouses page and set up Landed cost warehouses (1) Goods in transit (GIT) and (2) Under-delivery and set the “Default” receipt location field (see Figure X below). Successful processing of goods-in-transit orders requires both warehouses.
- Default issue/receipt location: If the “Location” inventory dimension is also used, then the “Default” destination “goods-in-transit” and “Under delivery” warehouse must specify the “default” issue/receipt location. Go to Inventory management ➜ Setup ➜ Inventory breakdown ➜ Warehouses and set the “Default” receipt location field (see Figure X below).
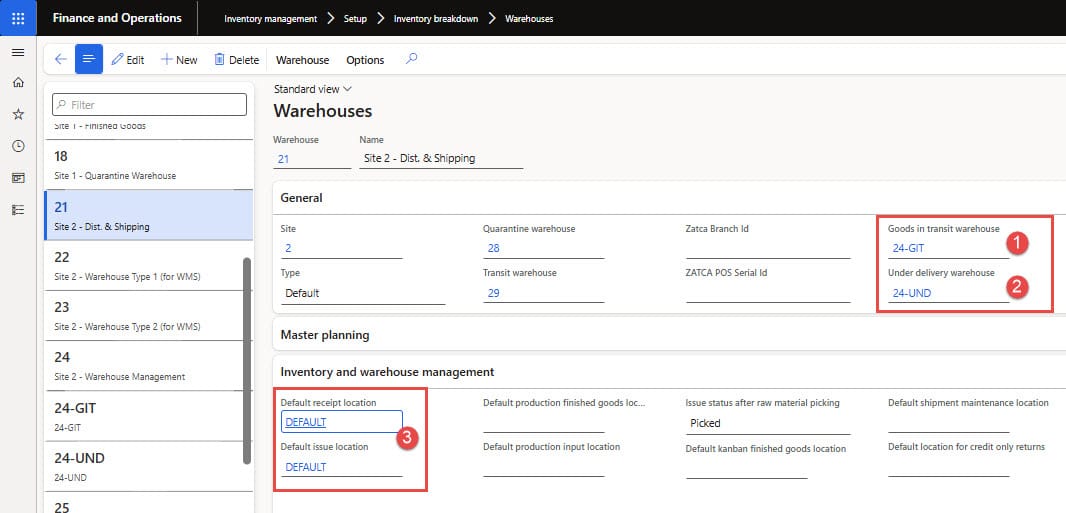
Figure 2: Showing “Goods in transit, under delivery warehouse and default issue/receipt location” setup on the warehouse page
- Terms of delivery:
- Go to Accounts payable ➜ Setup ➜ Terms of delivery, identify the applicable term(s) of delivery used for goods-in-transit, and set “Goods in transit management” to “Yes” (see Figure X below). This feature puts the goods into the “goods-in-transit” warehouse when the purchase invoice is posted. This means users can no longer post a product receipt.
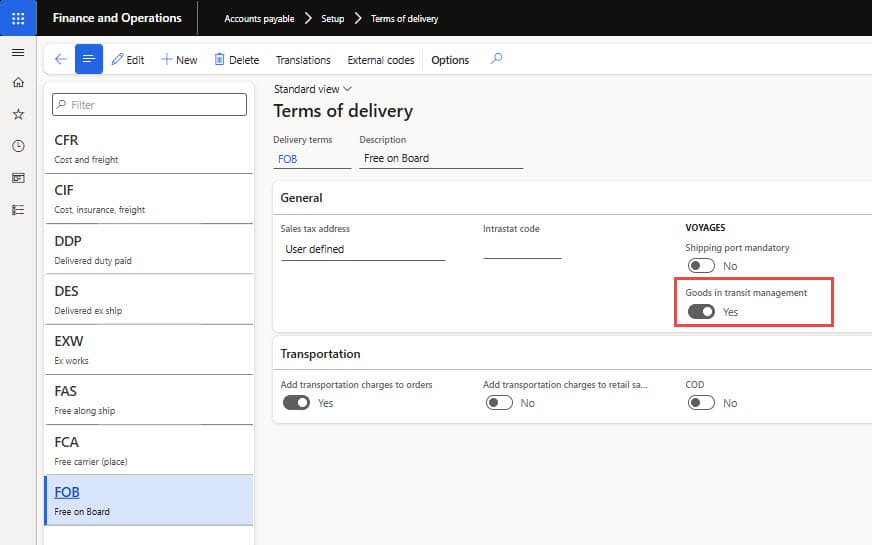
Figure 3: Showing “goods in transit management” setup in Terms of the delivery page
- Inventory Movement and Transfer journals:
- Go to Inventory management ➜ Setup ➜ Journal names ➜ Inventory, and set up inventory journals of type “Movement” and “Transfer”. The movement journal should have “Offset account” (see Figure X below) selected since the goods-in-transit process will use this journal to post under/over quantity.
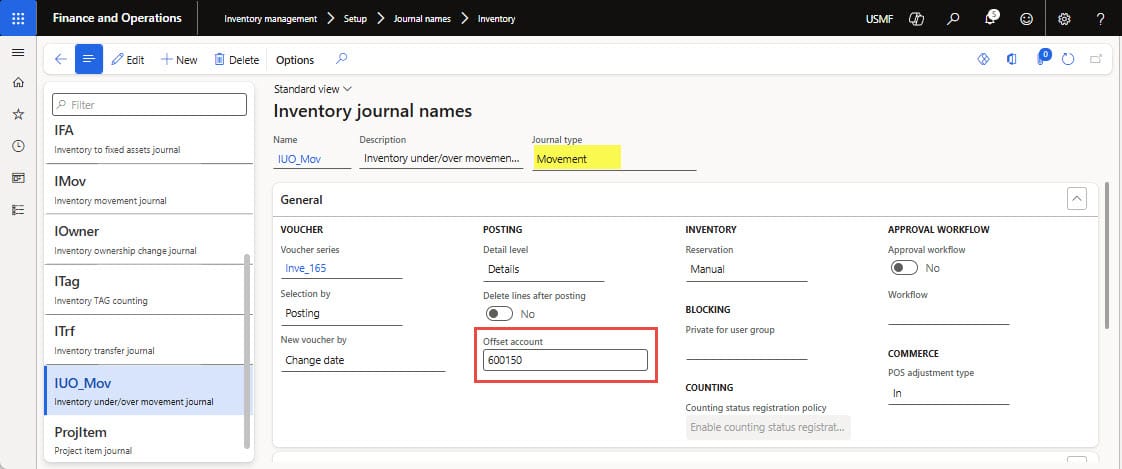
Figure 4: Showing “Inventory movement journal” with offset account
- Landed cost parameters: Next, set up the use of the newly created movement and transfer journal names under the over/under delivery options in Landed cost parameters, as shown in Figure 5 below.

Figure 5: Showing “Movement and Transfer” journals setup for over/under delivery in Landed cost parameters form
- Vendor master (auto cost group): Open the shipping company vendor master and set “EU” as the value of “Cost type group” under Voyage in the “Miscellaneous details” tab, as shown in Figure 6 below.

Figure 6: Showing “cost type group” setup with vendor master
Set up for auto costs
The “auto costs” in the Landed cost module work like trade agreements or auto miscellaneous charges. Like trade agreements, which can be for a particular item, vendor, or customer group, item group, or all, similarly, each “auto cost record” belongs to a specific cost area (such as voyages, shipping containers, folios, purchase orders, items, or transfer order lines). Therefore, users don’t have to add the costs in Voyage manually.
Based on the auto-cost setup, the system calculates costs and automatically adds them to the item, container, or voyage. For the demonstration, we will define auto costs per “Voyage” and “Shipping container”.
How to do steps:
- Go to Landed cost ➜ Costing setup ➜ Auto costs, the auto costs window will open.
- Select “Voyage” as a value in the cost area field and click the New button.
- We will set up “auto cost” for shipping companies of the “EU” group carrying cargo of “China” origin to “Australia” (as shown in Figure 7). For this purpose, create an auto cost record with the following values:
- Account code: Group
- Shipping company: EU
- From port: China Ningbo
- To port: Australia Melbourne
- In the Lines section, add two (2) cost type codes:
- Cost type code: Air, Apportionment method: Amount, Category: Fixed, Cost currency: USD, and Cost value=20,000
- Cost type code: Insurance, Apportionment method: Amount, Category: Fixed, Cost currency: USD, and Cost value=6,000

Figure 7: Showing auto costs for “Voyage” of “EU” origin
- Next, select “Shipping container” as a value in the cost area field and click the New button.
- We will set up auto cost per “40 Feet shipping container”, apportion the container freight cost by “item’s weight” and “insurance by a percentage of total freight cost” as briefed below and shown in Figure 8 below:
- Account code: All
- Shipping container type: 40FCL (i.e., 40 feet, full container load)
- From port: China Ningbo
- To port: Australia Melbourne
- In the Lines section, add two (2) cost type codes:
- Cost type code: Freight, Apportionment method: Weight, Category: Fixed, Cost currency: USD, and Cost value=11,000
- Cost type code: Insurance, Apportionment method: Amount, Category: Percentage, Cost currency: USD, and Cost value=0.100
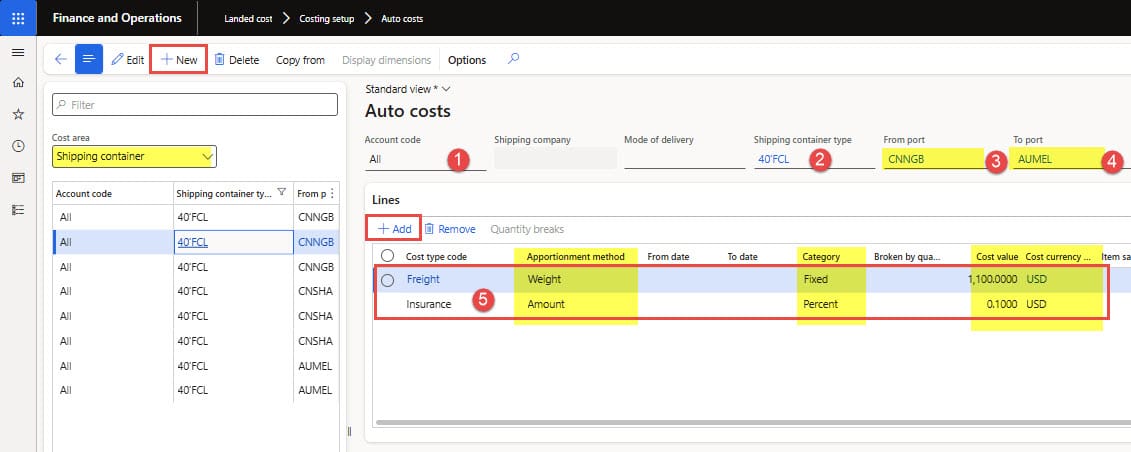
Figure 8: Showing auto costs for “Shipping container” apportioned by weights and percentage
Now the “Goods-in-transit” process is enabled, and we are all set to proceed with the GIT process flow.
How to process a Goods-in-transit purchase order in landed cost
With goods-in-transit processing in D365FO, businesses can take financial ownership of “in transit” inventory the moment it leaves the vendor, enabling invoices and cost recognition at voyage start rather than waiting for a warehouse receipt.
For simplicity and clarity, we have intentionally excluded repetitive details and focused only on the GIT process steps in the Landed cost, presenting only those steps that differ from the non-GIT inbound purchase order receipt process. Check out the blog titled “Part 1: Landed cost management in D365FO” for detailed steps in the non-GIT inbound purchase order process.
Below, we have provided brief steps for businesses to ensure ownership of goods in transit and record accurate Landed costs.
- Create a Voyage – open confirmed purchase order, create a Voyage, set the Journey template, and the shipping company
- Auto estimated costs – auto estimated costs are added automatically in Voyage
- Post-purchase invoice – goods are received in the warehouse of type Goods-In-Transit
- Received goods in transit– goods are received in the main warehouse, under/over quantity (i.e., difference quantity) will be received in the under/over warehouse.
- Post under/over quantity transaction – create a new purchase order or movement journal
- Post vendor invoice – post actual cost using vendor invoice journal
- Voyage costing report by individual Item & cost
1. Create a Voyage
The process starts with a confirmed purchase order and creates a new Voyage.
- Open the Purchase Order and create a new voyage.
- Click Create new voyage in the Landed cost section under the Purchase action tab (as Figure 9) below.
- Enter Voyage details including – “Vessel”, “Journey template”, “Airway bill”.
- To load the auto cost for the voyage, select “SeaCarieer” as the value of the shipping company since we set up the costs for it in the “Setups for auto costs” section above. Next, click the Ok button, and the system will create a voyage and navigate to the voyage staging form.
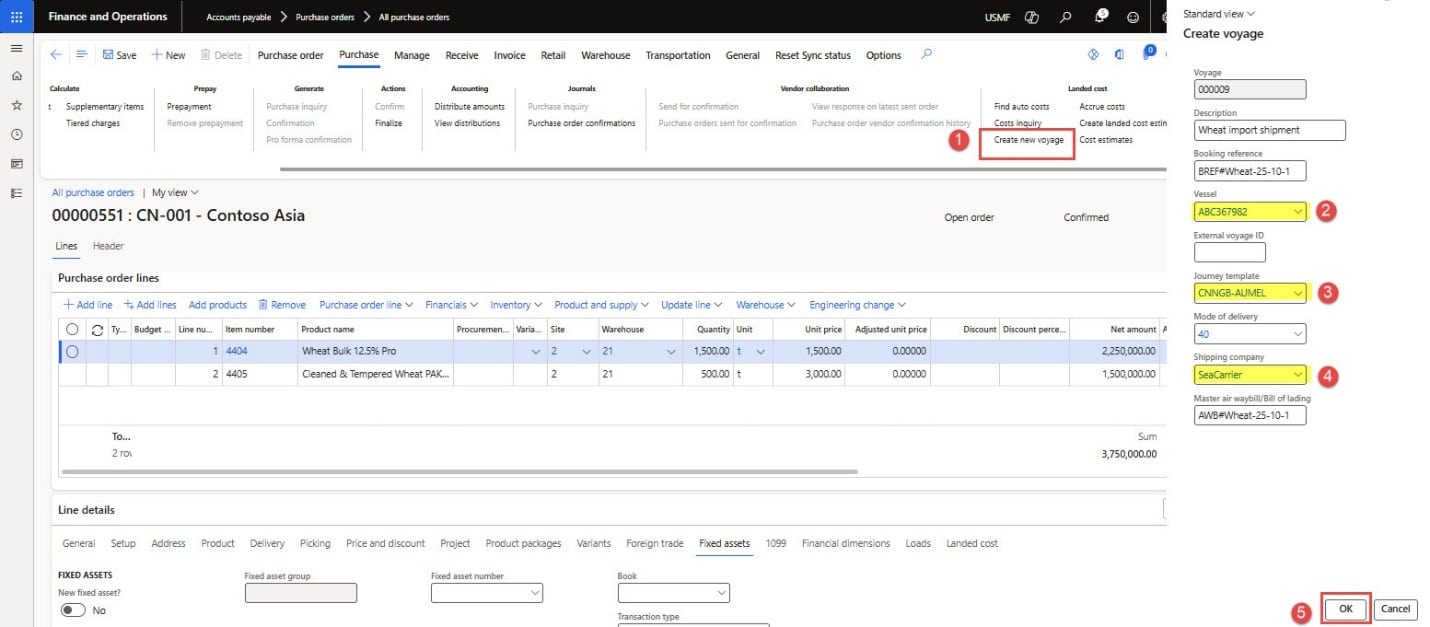
Figure 9: Showing new “Voyage creation” with Purchase order
- Next, a new voyage is created, and the Voyage editor dialog will open, showing the purchase order lines.
- Select the purchase order lines and click “Add to Staging list” (see Figure 10).
- Next, click “View staging list”, and the staging list will open. Press the “Add to new shipping container” button, fill the container-related details, and press the Ok button (see Figure 11).
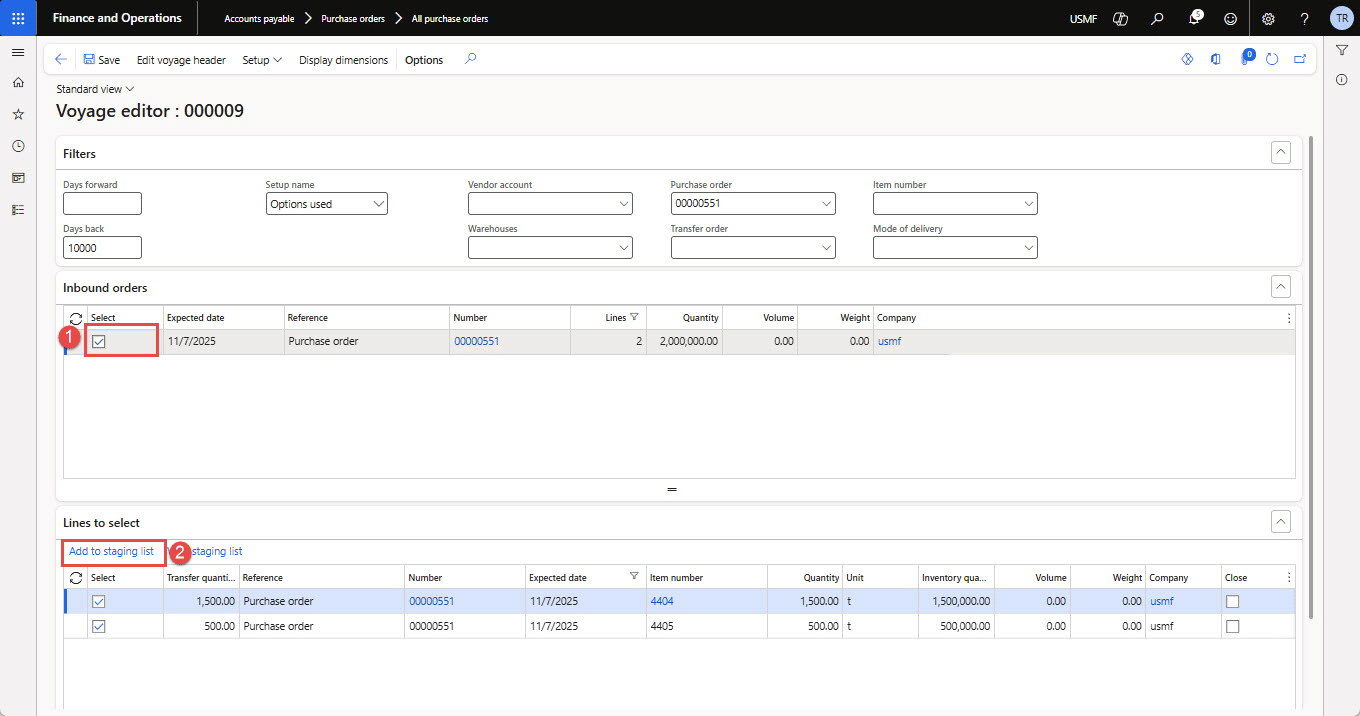
Figure 10: Showing Staging form for “Voyage creation” with selected purchase order lines
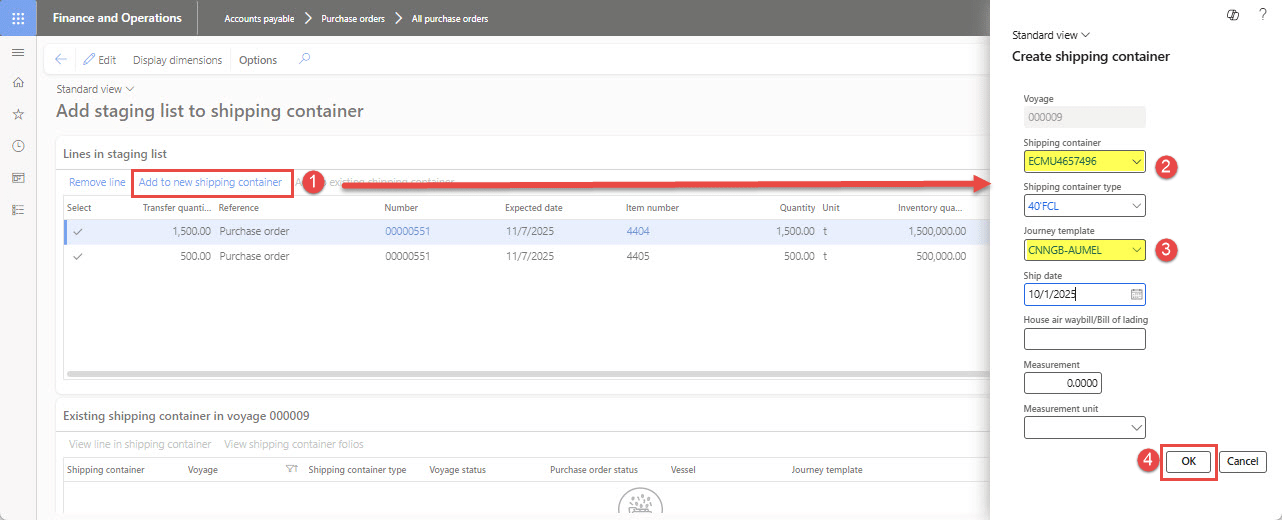
Figure 11: Showing “Shipping container” creation for the selected purchase order lines
2. Auto costs and voyage cost inquiry
The “estimated cost” is added to the Voyage automatically as soon as it is created. The user may add any missing charges manually, if needed. Recall that these “auto costs” were set up for “Voyage” and “Shipping container” in the “Setups for auto costs” section. Figure 12 below shows the cost inquiry by “Item” and “cost type codes”.
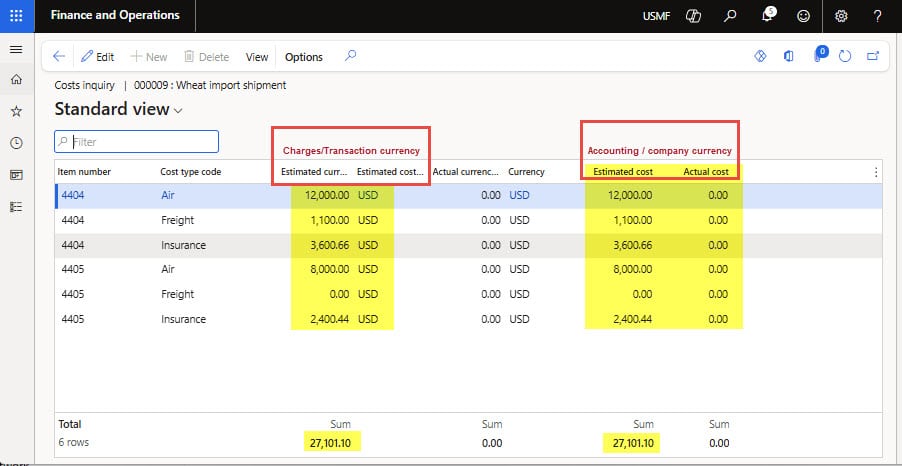
Figure 12: Showing costs inquiry for “Estimated & Actual cost” per “cost type code”
3. Post-purchase invoice
Next, we will post a purchase invoice to take “inventory ownership” and reflect financial cost recognition per the “estimated cost” attached with the voyage.
- Open Voyage (i.e., Landed cost ➜ Voyages ➜ All voyage)
- Click Post invoice under the Manage action tab, as shown in Figure 13 below. The purchase invoice window will open, enter the vendor invoice, update match status (optional), and post the invoice.
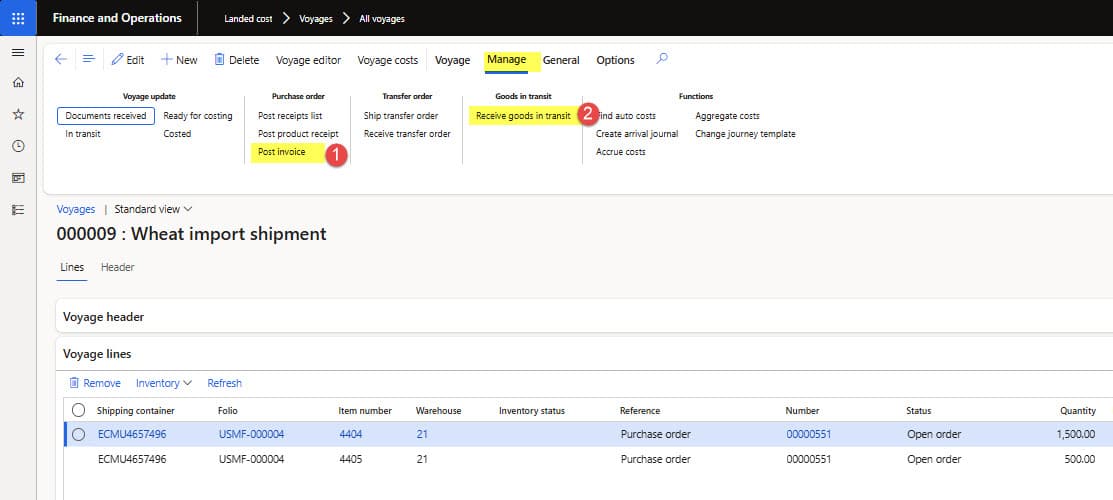
Figure 13: Showing “Purchase invoice” and “Receive goods in transit” action buttons on the Voyage form
- On successful purchase invoice posting, the purchase order status will update to “Invoiced” and the purchase lines status will be set to “In transit”, since the goods are received in the Goods-in-transit warehouse (i.e., 24-GIT) as shown in Figure 14 below.
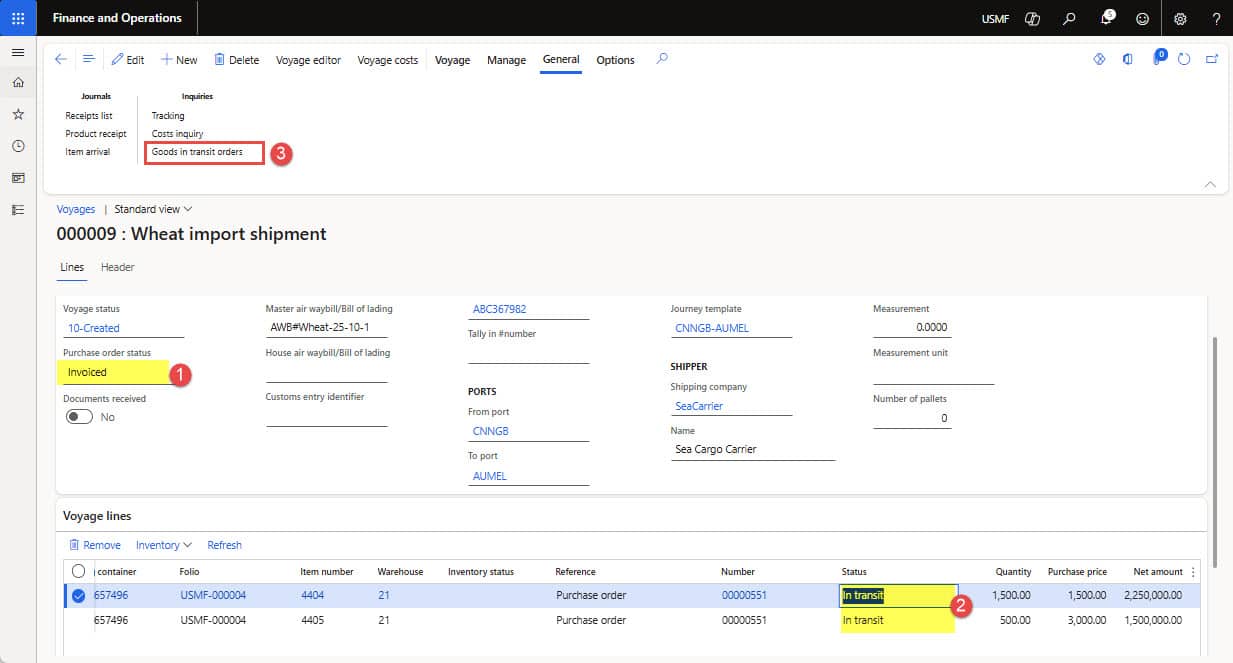
Figure 14: Showing “Purchase invoice” and “Receive goods in transit” action buttons on the Voyage form
- Now navigate to Transactions inquiry under “Inventory management ➜ Inquiries and reports ➜ Transactions”, the inventory transactions will open. Filter the “number” column by purchase order#, and you will notice that the inventory “cost amount” is updated as per the items’ purchase costs and estimated Landed costs (see Figure 15 below).
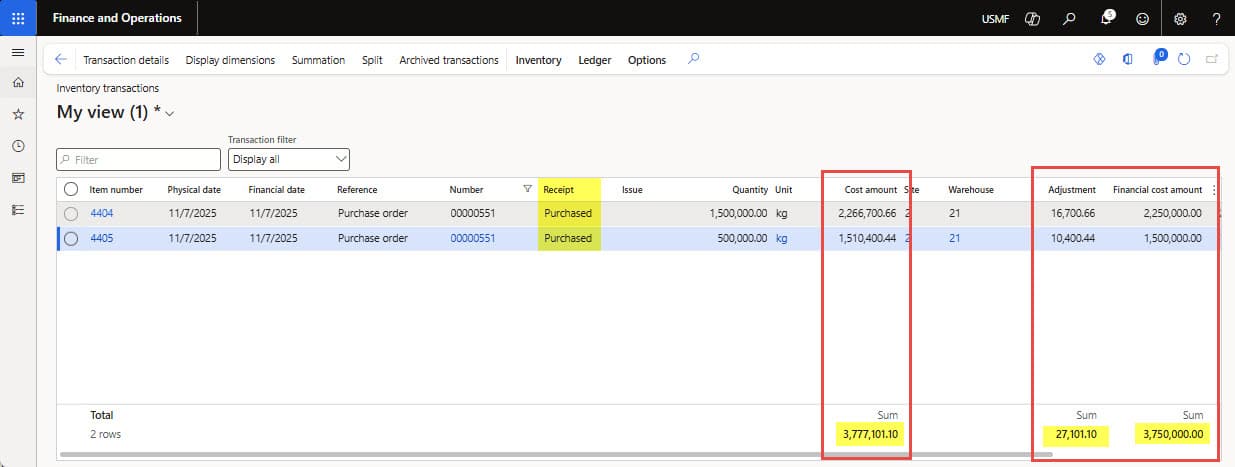
Figure 15: Showing “Cost amount” which included Financial cost (purchase cost) + estimated Landed cost added in Voyage
- You will also notice the “inventory transactions” which show receipt in the Goods-In-transit warehouse (i.e., 24-GIT), and the inventory ownership is transferred to the organization. What happens when purchase invoices are posted for the GIT process:
- The inventory is “Purchased” in Main Warehouse (i.e., 21) and then “Sold” to Transit Warehouse (i.e., 24-GIT) with document reference of “Good In transit” (see step#1 in Figure 16 below).
- Next Inventory in “24-GIT” transit warehouse is “Physical Reserved” against “Ordered” in “21” main Warehouse so that it can be received in destination on shipment arrival, (see step#2 in Figure 16 below).
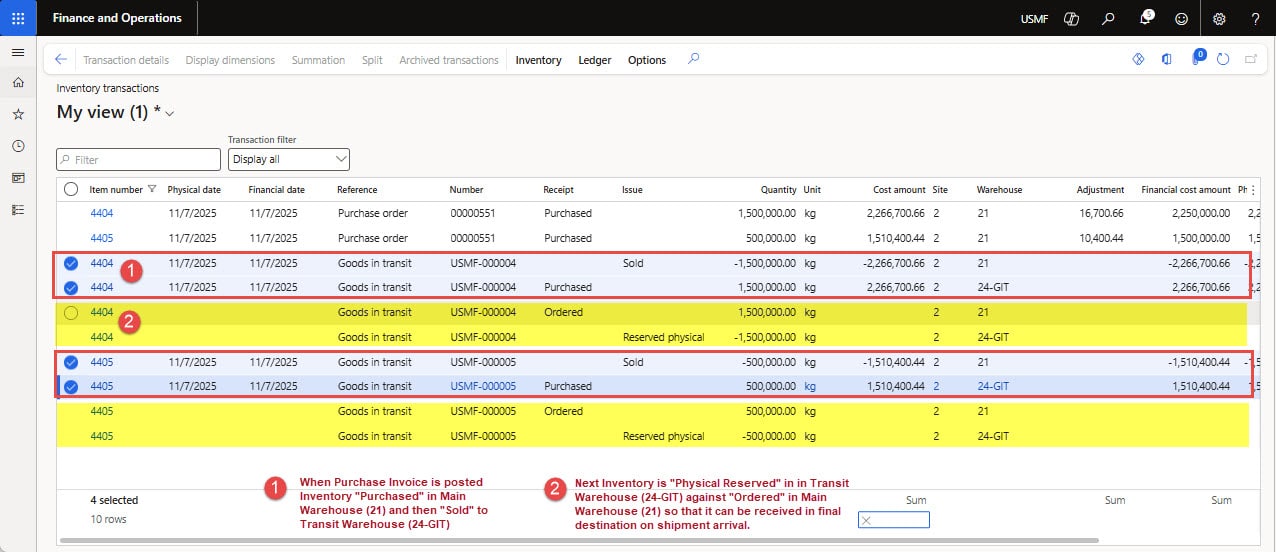
Figure 16: Showing transactions in GIT and main warehouse for invoiced purchase order/Voyage
4. Receiving goods in transit
Now the goods will move from “24-GIT” into “21” Main-warehouse on actual receipt at destination. Goods receiving for GIT is a little different from the standard purchase order receiving process.
You will use the “Receive goods in transit” functionality on Voyage under “Manage” action tab as shown in steps below:
- Open the Voyage, click “Receive goods in transit” under Manage action tab, window will open (see Figure 17).
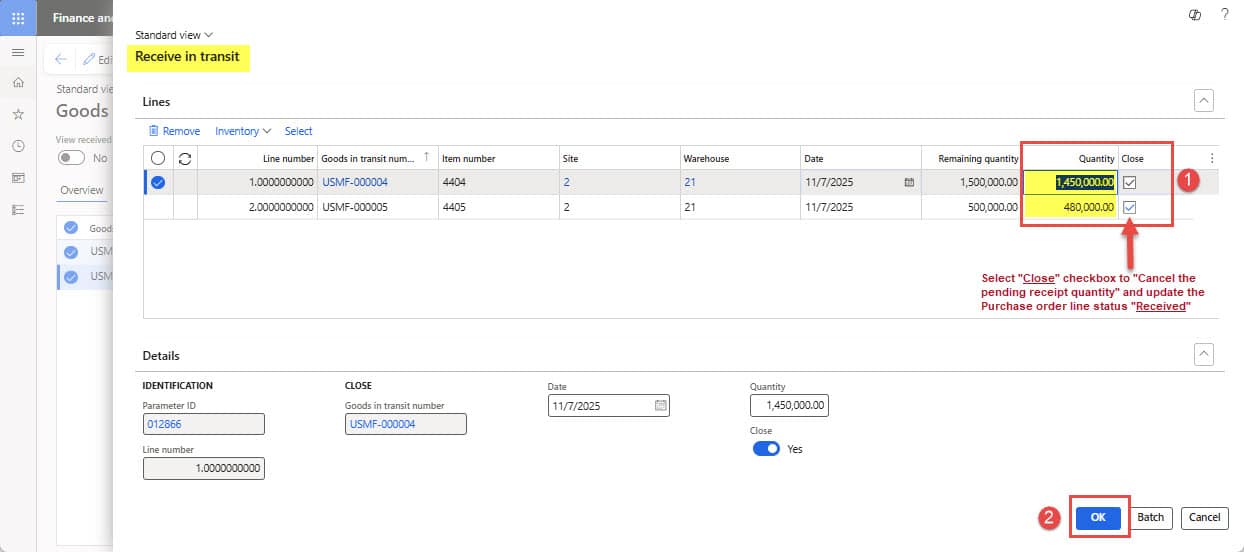
Figure 17: Showing “Receive in transit” form to receive purchase quantity in main warehouse
- Enter the physical quantity received, for example, you received a short delivery of 500 quantity, enter the quantity and select the “Close” checkbox to close the purchase line status. Click OK to post the goods receipt. The system will transfer the received quantity from “24-GIT” to the “21” main warehouse, and any over-delivered or under-delivered amount will be moved to “24-UND”, the under-/or over-delivery warehouses, as shown in Figure 18.
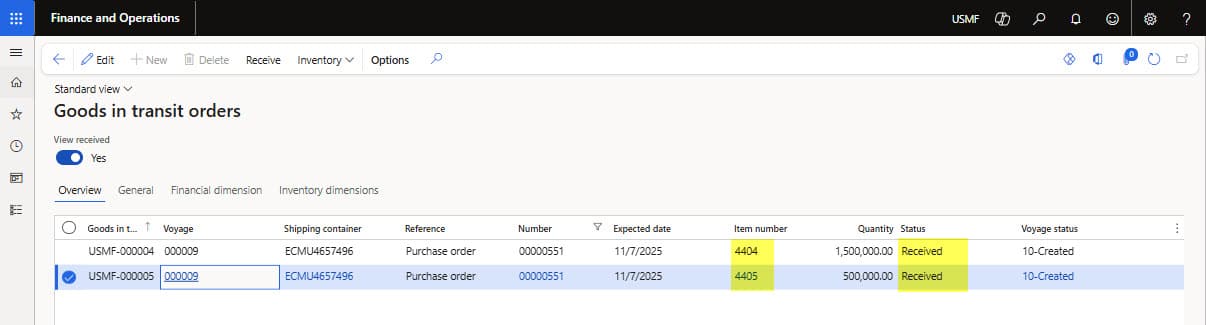
Figure 18: Showing “goods in-transit” status after posting the goods receipt
- Open the Transactions inquiry under “Inventory management ➜ Inquiries and reports ➜ Transactions”. You will also notice the “inventory transactions” which show receipt of goods in 21-Main Warehouse, and short/under-delivered quantity is received in 24-UND “under over delivery” warehouse, see Figure 19 below.
- Now the organization will decide on the treatment of under-/or over-delivered quantity that is discussed in the section below.
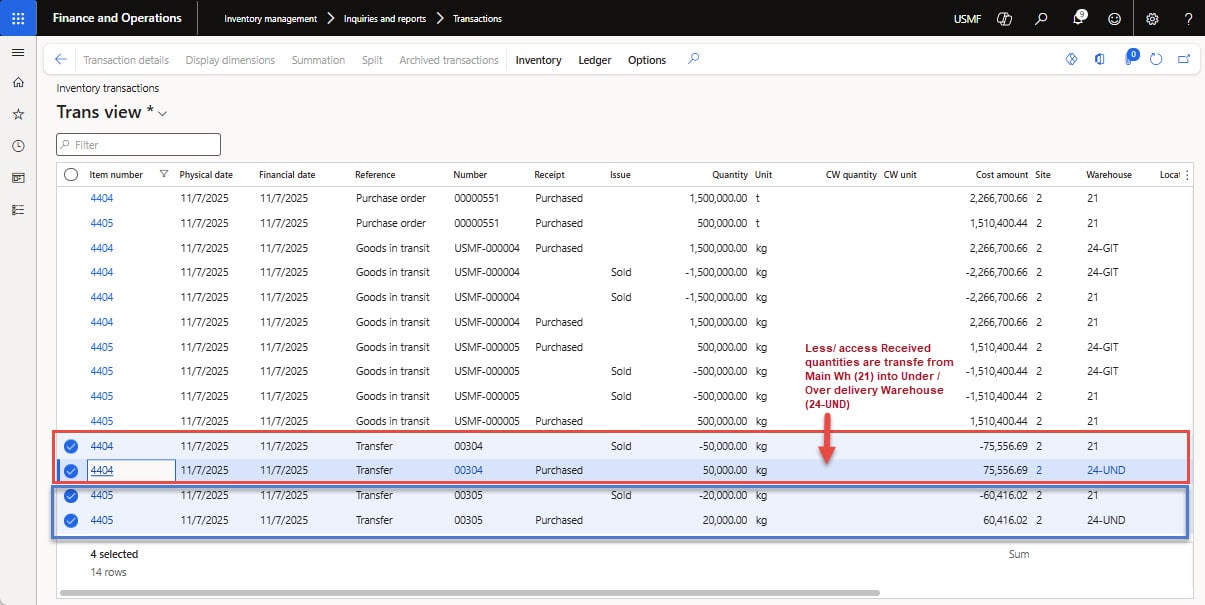
Figure 19: Showing “under/over delivery” transaction after posting of “Receive goods in transit”
5. Process under-/or over-delivered transactions
When goods are received from 24-GIT into the 21-main warehouse, the system compares the ordered quantity with the quantity received. Based on this analysis, the system determines whether over-delivery or under-delivery has occurred and records the quantity difference in the 24-UND warehouse.
In the Landed cost module, the under/over transactions page is used to track over/under transactions and create a movement journal and/or a purchase order.
How to do steps:
- Go to Landed cost ➜ Inquiries ➜ Under over/transactions
- The over/under transactions form will open, showing the purchase difference quantity in the under/over delivery warehouse. In case the system takes any automatic action for the under-delivery quantity, the organization must decide whether to create a movement journal or a purchase order (see Figure 20).
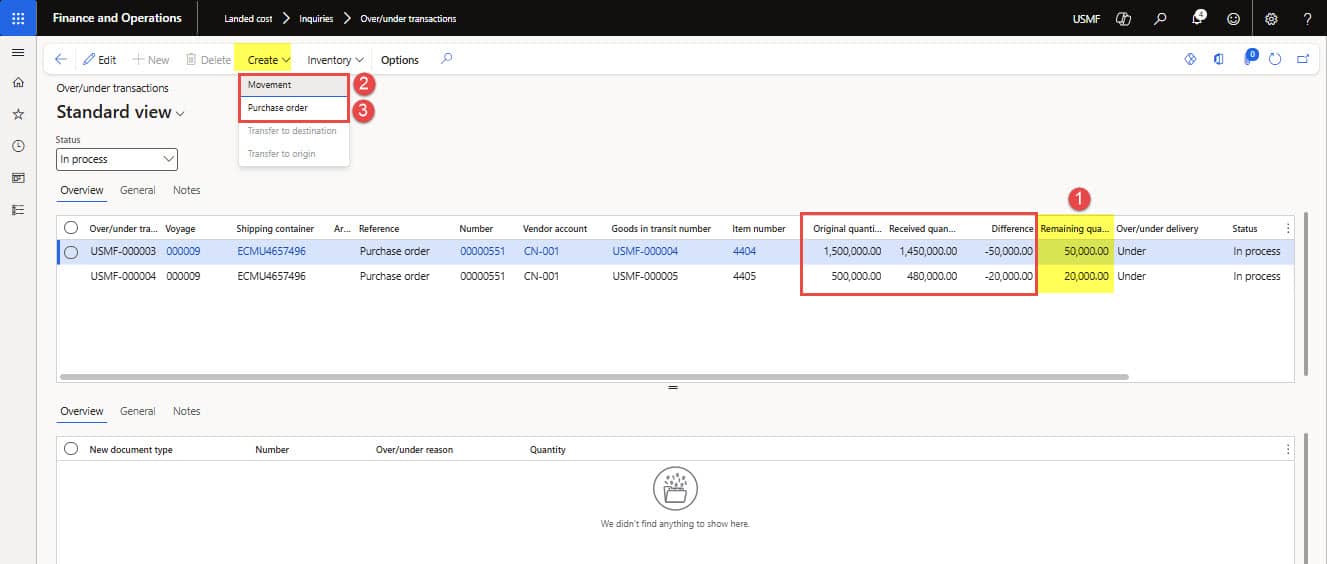
Figure 20: Showing “under/over transaction form” for auto posting option of purchase order and movement journal
- Issue Debit note (return purchase order): In case the organization decides to create a purchase return for the short-shipment quantity by the vendor.
- Select the under-delivery item line and click Purchase order under the Create menu item. The purchase order dialog will open, showing the difference in quantity. Change the amount if needed, then click the OK button (see Figure 21).
- On successful processing, a purchase order is created & received automatically with -ve quantity (see Figure X below). For an over-delivery, the new purchase order records the additional amount (+ve) that was received. This credits the vendor for the missing goods.
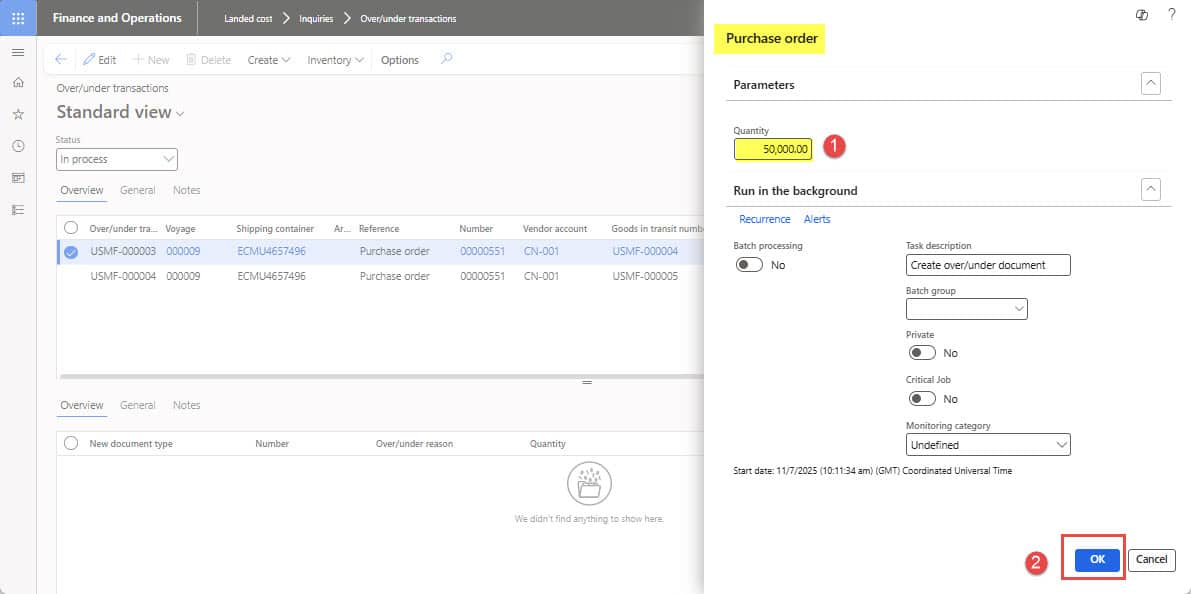
Figure 21: Showing automatic “Purchase order” creation option for under-delivery quantity
- Movement journal: In case the organization decides to write off or absorb the difference between ordered and actual received quantities.
- Select the under-delivery item line and click Movement under the Create menu. The Movement journal dialog will open, showing the difference quantity, change the amount if needed, enter a reason for the under/over quantity, and click the OK button (see Figure 22).
- A movement journal is automatically created & posted as per over-delivery or under-delivery quantity (see Figure 23). This movement journal shall have a pre-defined offset account; otherwise, the system will throw an error.
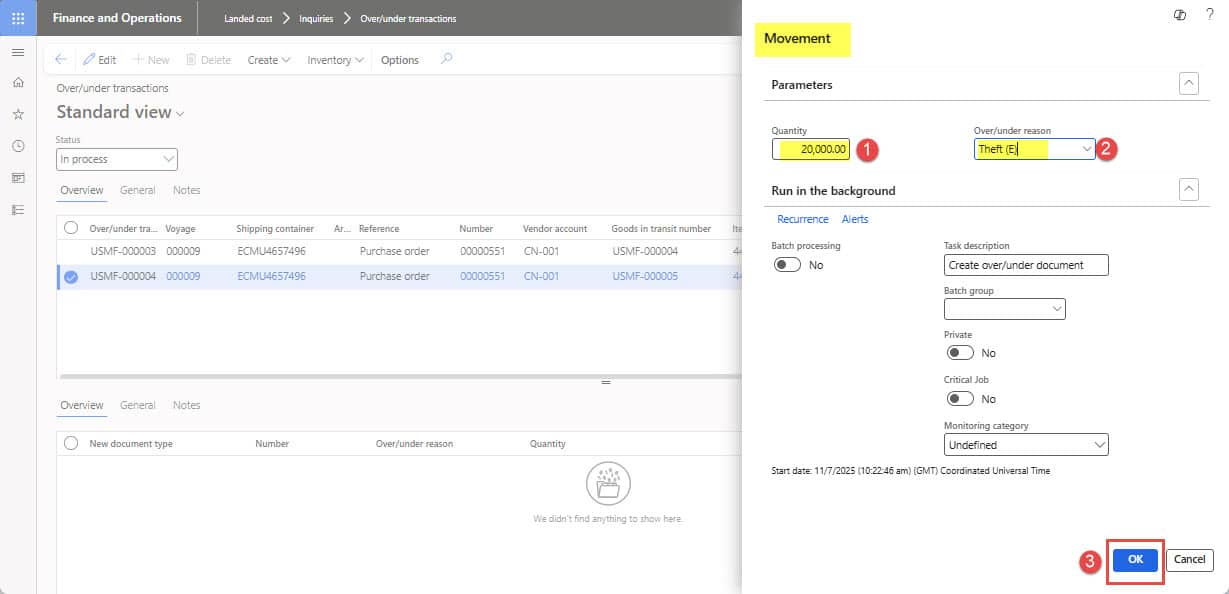
Figure 22: Showing “under over delivery” transaction after posting of “Receive goods in transit”
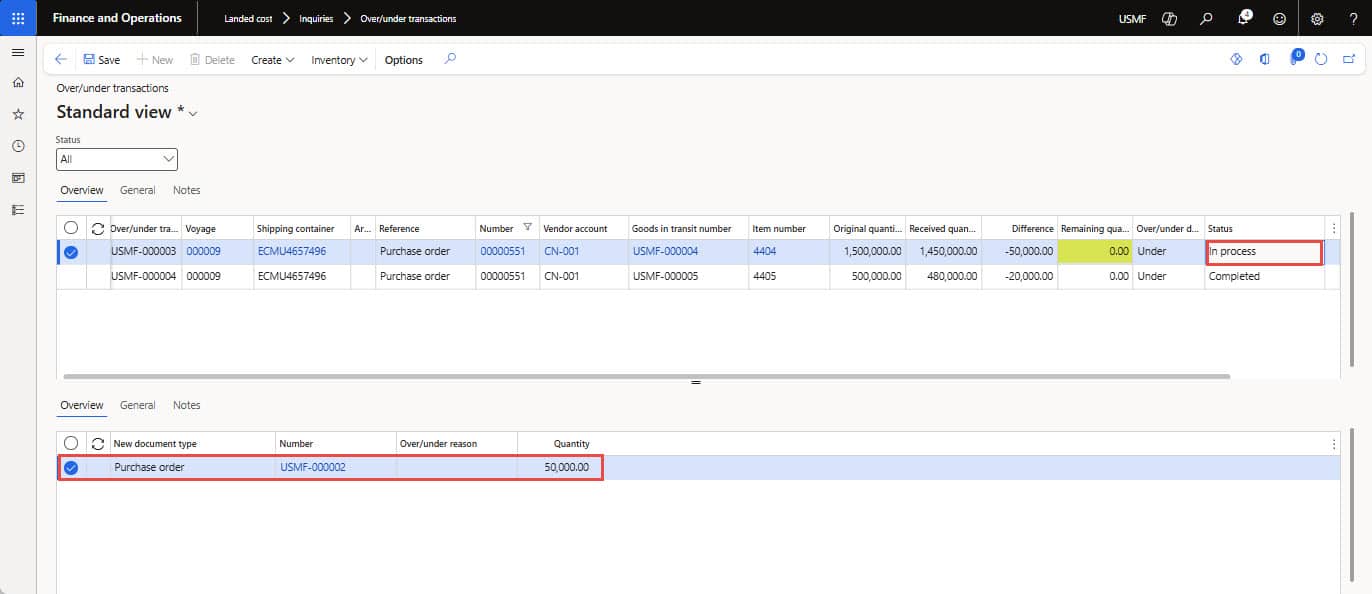
Figure 23: Showing “Purchase order” status (In process, pending for invoice) whereas movement journal line is Completed
- The “Inventory transactions” resulted in an automatic Purchase order and a Movement journal created by under/over transactions, as shown in Figure 24. Now you are all set to post the actual vendor Landed cost invoices, which we will discuss in the next section.
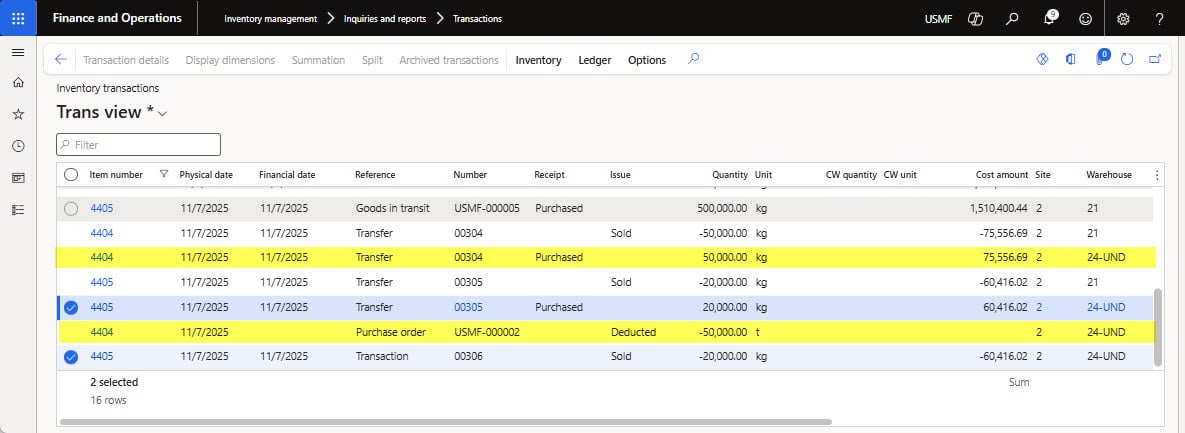
Figure 24: Showing “Inventory transactions” for Purchase order and Movement journal created by under/over transactions
6. Post vendor invoice and actual cost
This step reflects an invoice received from the vendor for the actual cost of the journey. To post a vendor invoice journal against a Voyage, follow the steps shown:
How to do steps:
- Create a new Invoice Journal (path: Accounts payable ➜ Invoices ➜ Invoice journal)
- Click the “Lines” button to add voucher lines and enter the following details.
- Account: select a vendor account
- Invoice date and number: enter invoice date and invoice number
- Credit value: enter “invoice value”
- Currency: select invoice currency
- Next, select the “Select voyage cost” option under the Functions menu. The voyage selection dialog will open (as shown in Figure 25). Select the appropriate voyage, then click OK to display the cost codes and the estimated amount posted.
- Select the “cost type code” for which actual cost is received and mark the “Selected” as checked, the cost code will be selected for “Allocation”.
- Click OK to copy the selected “cost code types” lines and values into the voucher lines, and the invoice journal is ready for posting. The “Description” column in the voucher will reflect the Voyage number.
- Click the “Post” button to post the journal. After successful posting of the invoice journal, the selected charge codes will be marked as invoiced against the vendor invoice, and the inventory transaction will reflect the actual cost (as shown in Figure 26).
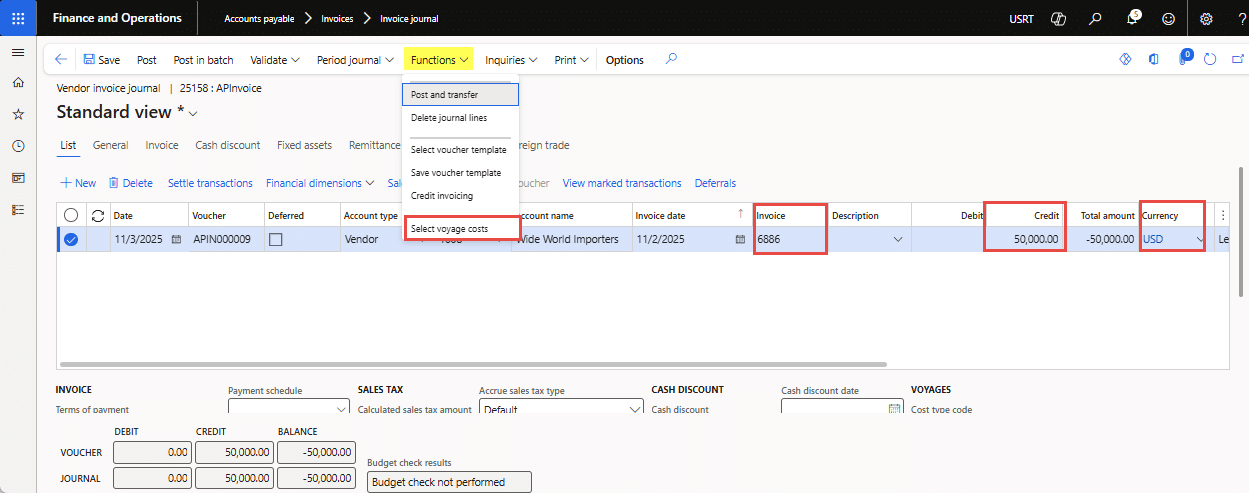
Figure 25: Showing “Inventory transactions” for Purchase order and Movement journal created by under/over transactions
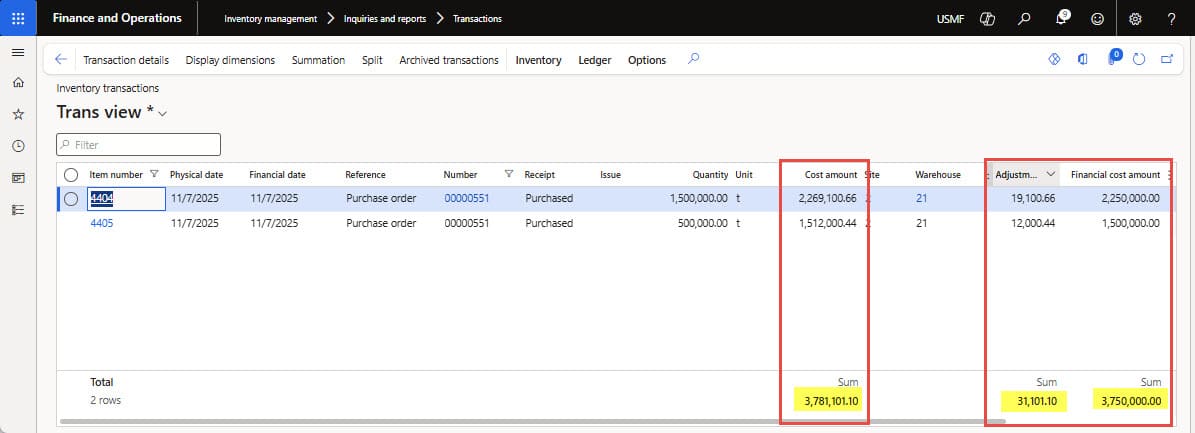
Figure 26: Showing “Inventory cost” reflects actual cost after vendor invoice posting
7. Voyage costing by individual item report
The “invoice journal” posting will post actual costs in inventory costing under the “Adjustment” column (see Figure 38). Now you can view the landed cost of an item by shipment, by item, or per item (the cost per purchase unit).
How to do steps:
- To get Voyage costing by individual cost code in D365FO, use the Landed cost report under Landed cost ➜ Reports ➜ Costing > Voyage costing by individual cost.
- The Voyage costing by the individual cost report dialog box will open. Do as follows:
- Select, View Shipment” to Yes, then you will see costs per Voyage/shipment (see Figure 27).
- And select the “Item” option to Yes to see the cost for each item (see Figure 28). If you choose both “Item” and “Shipment,” then the item cost will also show voyage details.
- Else if you want to get the per-item unit cost, then select “Per item”; the report will show the item cost per purchase UOM (see Figure 29).
- Click OK to generate the report. This step reflects cost(s) in the estimated currency (e.g., USD) as well as in company or accounting currency (e.g., PKR).
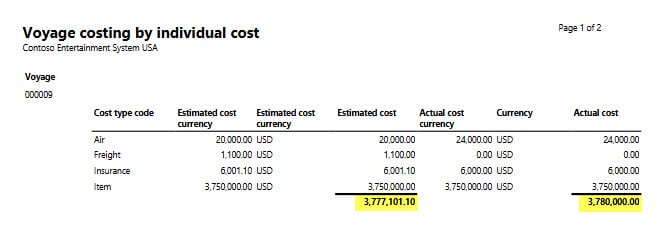
Figure 27: Voyage costing by Voyage/shipment showing “Estimated and Actual cost” in estimated and accounting currency
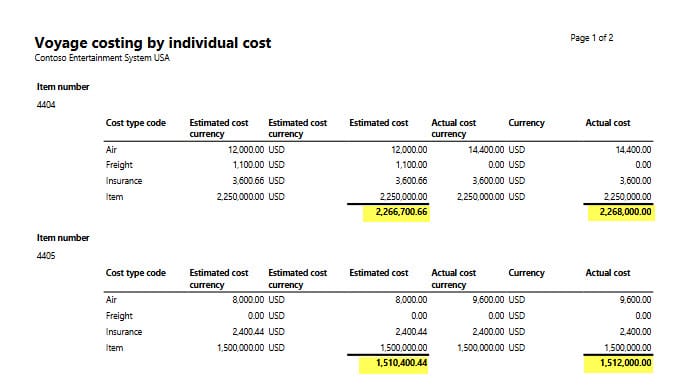
Figure 28: Voyage costing showing “item cost” in estimated and accounting currency
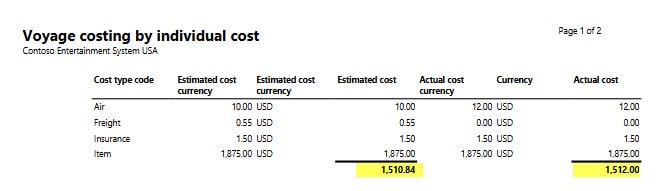
Figure 29: Voyage costing report showing “Per item/unit cost” in estimated and accounting currency
Conclusion
The Landed cost and goods-in-transit functionality in Dynamics 365 Finance & Operations provides a clear and controlled way to manage the financial impact of overseas shipments. By correctly applying GIT warehouses, voyage invoicing, under-delivery handling, and master planning integration, organizations can ensure that cost ownership aligns with shipping terms and that Landed cost is calculated accurately throughout the import process.
These capabilities help finance and supply chain teams maintain consistent cost visibility, reduce discrepancies at receipt, and support more accurate planning and reporting across all inbound shipments.
If you need support implementing or optimizing Landed cost and GIT processes in D365 F&O, contact us at marketing@confiz.com.