
Accurately determining the true cost of imported goods is essential for financial control, pricing decisions, and supply chain visibility. The Landed cost module in Dynamics 365 Finance & Operations helps organizations calculate and manage all expenses associated with international shipments, including freight, insurance, customs duties, handling fees, and other import-related charges.
This blog series explores how the Landed cost module streamlines the entire import process by providing transparent cost tracking, automated cost allocation, and full logistical oversight from shipment initiation to final receipt.
What is Landed cost?
The Landed cost module helps businesses streamline shipment tracking & overhead Landed cost for imported goods, giving users complete financial and logistical control.
The screenshot below illustrates the inbound purchase or transfer order process flow, showing how goods move through the Landed cost stages from voyage creation to receipt and cost allocation.

Businesses can use Landed costs to complete the following tasks:
- Estimate Landed costs at the time of voyage creation.
- Apportion Landed costs to multiple items in a single voyage
- Transfer of goods between physical locations by recognizing Landed costs
- Logistic visibility and accurate cost estimates for overhead Landed costs
- Helps reduce the administration of costing and costing errors
- The Landed cost is added to the total cost of each item.
This post is the first in a two-part blog series exploring the purpose and core capabilities of the Landed cost Management module in Dynamics 365 Finance and Operations (D365FO).
In this first part, we’ll cover the fundamental concepts, key setups, and configurations of the Landed cost module, along with a walkthrough of the complete import purchase process from voyage creation and goods tracking to receiving and invoicing.
Let’s begin our learning journey into how Landed cost enables greater visibility and accuracy in managing import operations.
Landed cost basic concepts
In Dynamics 365 Finance & Operations, the Landed cost module enables businesses to accurately calculate the total cost of imported goods, including freight, insurance, customs duties, and other related charges, from the point of origin to the final destination.
“Table 1” below summarizes the core concepts used in Landed cost and serves as a foundation to help users understand the complete import purchase flow comprehensively.
Concept | Description |
Voyage |
A voyage typically represents either a cargo or a vessel used for inbound or outbound shipment.
There are no system limitations on the combination or number of orders that can be associated with a voyage. |
Shipping containers | Shipping containers are the physical units used to transport goods. Typically, purchased items are packed or shipped together in a container. Each voyage must be assigned to containers, and it’s useful for apportioning Landed costs (e.g., freight, insurance, or handling) at the container or item level. |
Folio |
A folio represents a logical grouping of goods within a shipment, typically used for customs or regulatory purposes. It can include:
|
Cost type codes |
Cost codes are set up within the Landed cost module and added to a Voyage. Each cost (for example, customs, freight, handling, and insurance) can be allocated on a Voyage or container basis, or apportioned at the item level, using rules that support quantity, volume, weight, amount, and defined volumetric divisors and fixed amounts or percentages. These estimated costs provide an accurate total for a voyage and are posted with the purchase order invoice. Actual costs are posted when the vendor invoice journal is posted. Actual costs are reverse-estimated costs posted at the time of cost invoicing using clearing accounts set up for each cost type. |
Auto cost | Auto Costs are predefined rules that automatically allocate additional charges (such as freight, insurance, customs, handling, etc.) to voyages, shipments, containers, or PO lines during Landed cost processing. |
Shipping company |
A shipping company attached to a voyage can be used to determine auto costs. |
Vessel |
A vessel is the medium that is used to transport goods, such as a ship or an airplane. |
Activity |
Activities represent the steps of the journey between two ports (i.e., origin to destination). They can be used to update dates. |
Journey template |
Journey templates are physical paths/routes that goods take from origin to destination ports. Each voyage must be assigned to a journey. |
Legs |
Each journey can have multiple legs, each representing a step in the journey. For example, transportation, duty handling, customs clearing, or another activity. |
Table 1: Landed cost basic concepts
Landed cost setup and configurations
The Landed cost requires the following setups and configurations to add additional cost charges with the purchase and transfer of goods:
- Landed cost parameters setup
- Configurations including
- Voyage status
- Shipping containers
- Cost type codes
- Vessels
- Activities
- Legs
- Journey templates
Landed cost parameters
The Landed cost Parameters page is used to define the general settings and configurations that control how the Landed cost module functions across your organization.
Follow the guidelines below to correctly configure these parameters and enable the use of Landed cost features for managing import processes effectively.
Path: Landed cost ➜ Setup ➜ Landed cost parameters
- Enable Landed cost features (see Fig. #1). The Landed cost feature is added to several pages in Microsoft Dynamics 365 F&O, including vendor master data, released products, purchase orders, transfer orders, and warehouse setup. Note: Features must be enabled to make it visible everywhere and to benefit.
- Status updates (see Fig#2)– status values to indicate the status of each voyage, e.g., Goods in transit, ready for costing, Costed. These statuses can be updated automatically with Voyage journey step/leg or manually by selecting a status in the Voyage update group on the Manage tab of the Action Pane (we will shortly see how to set up status).
- General tab (see Fig#3) – Values indicate setup for “exchange rate” and inventory journals for “good arrival”, “transfer”, and “under/over delivery”.

Figure 1: Showing “Feature visibility” for Landed cost
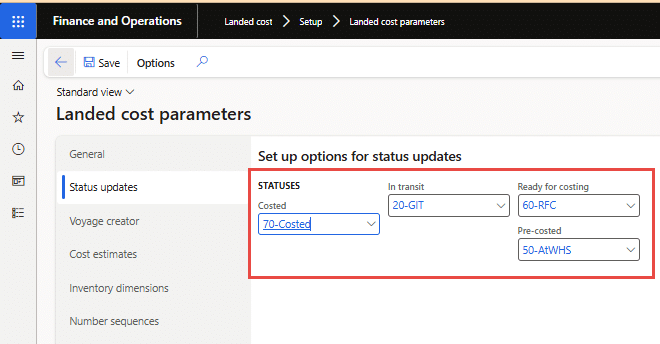
Figure 2: Showing “Voyage status updates”
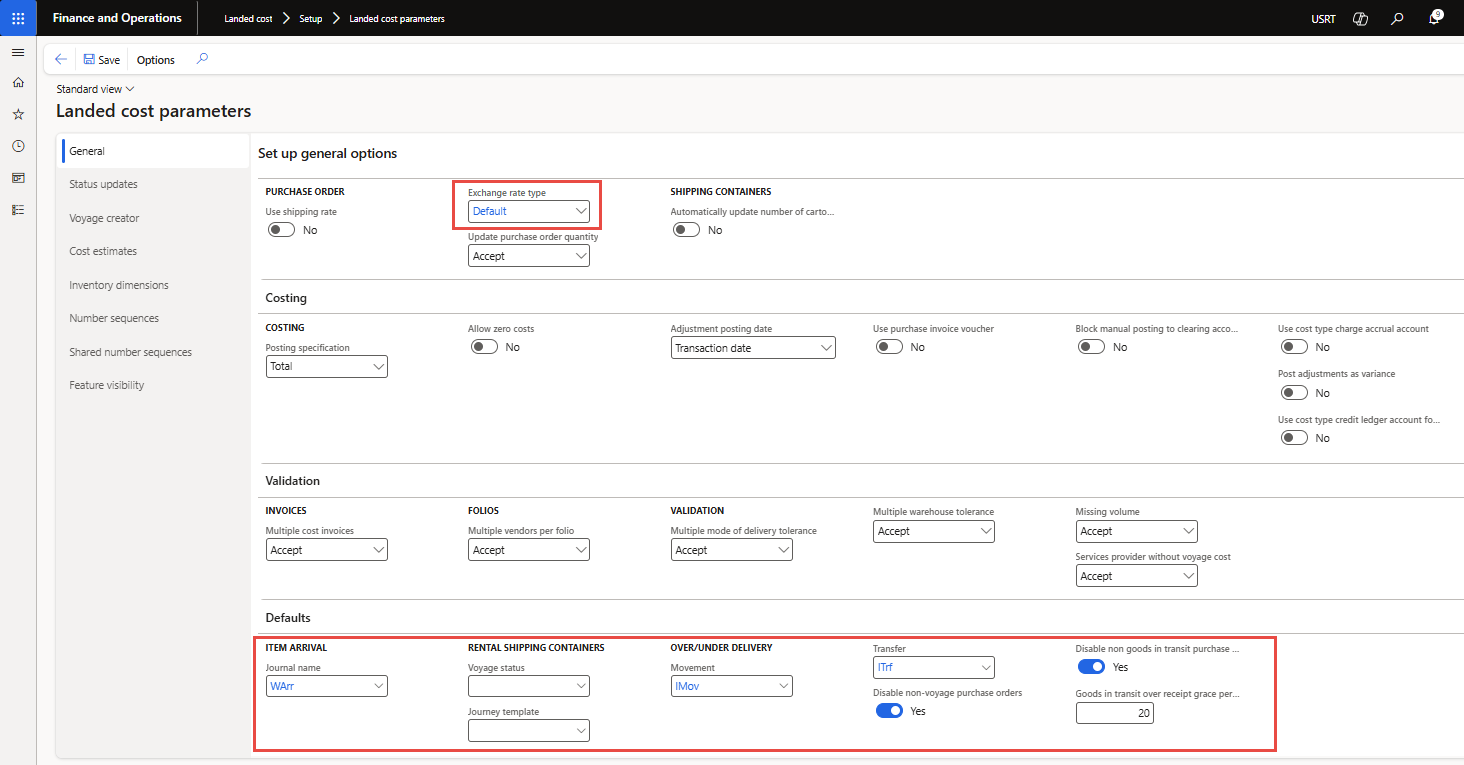 Figure 3: Showing “General setup” for Landed cost
Landed cost configurations
The following configurations are required to control the Landed cost module functions and add estimated & actual costs to import purchases and transfers.
1. Voyage status setup
In Landed cost, Voyage status is set up per “Cost area” (that is, Voyage, Shipping container, Folio, Purchase order, Item, and Transfer order line.
Path: Landed cost ➜ Setup ➜ Voyage statuses
In Figure 5, the voyage status flow (such as Created, Sailing, GIT, At Warehouse, Costed, and Closed) is illustrated for the cost area “Voyage”, demonstrating how statuses can be updated per cost area.
Repeat the configuration steps shown in Figure 5 for other cost areas such as Purchase Order, Shipping Container, Item, Folio, and Transfer Order Line.
You will learn more about how Cost Areas are used in voyage cost allocation in the upcoming section titled “Voyage cost allocation.”

Figure 4: Cost areas in Voyage statuses
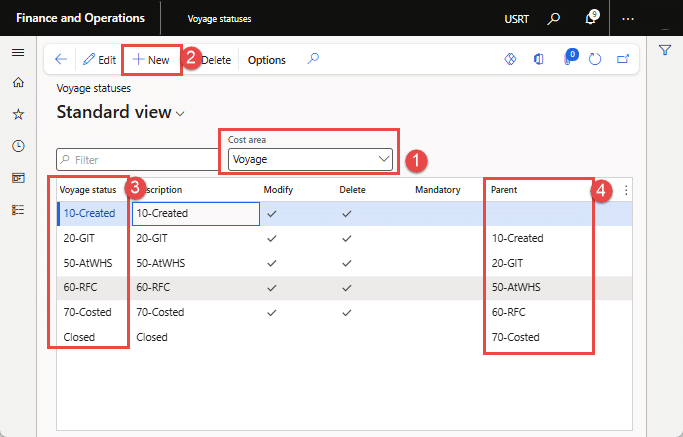
Figure 5: Showing voyage statues for “Voyage” area. Similarly define status for Folio, Purchase order, Transfer
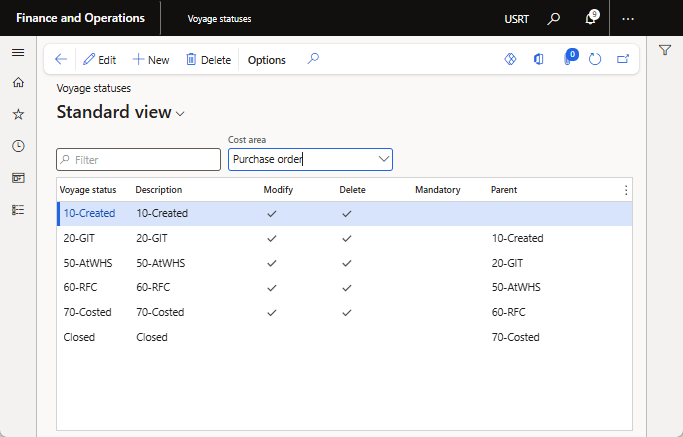
Figure 6: Showing voyage statistics for “Purchase order” area
2. Shipping container
To represent the packaging of physical goods in a cargo or shipment, you will define “Shipping containers”. Together with the container definition, you will also define the “Shipping container type,” i.e., its size and whether it is Full container load (FCL), Half container load (HCL), or Truck load (TL). The shipping container is mandatory while creating a voyage.
Path: Landed cost ➜ Containers setup ➜ Shipping containers
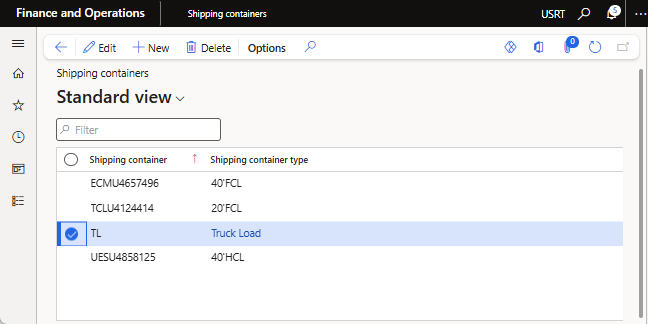
Figure 7: Showing Shipping containers and their types
3. Cost type codes
The primary purpose of the Landed cost module is to manage the additional costs associated with the shipment of goods, beyond the purchase price. These additional charges are defined using Cost Type Codes. Users from the import or logistics team apply these cost type codes to a voyage when entering estimated Landed costs such as freight, insurance, customs duties, or handling fees.
Path: Landed cost ➜ Costing setup ➜ Cost type codes
Each Cost Type Code added to the estimated item cost must be configured individually, as illustrated in Figure 8 below. Each cost type has its own posting setup, which determines how the cost is recorded in the general ledger.
Repeat the configuration steps outlined below for each cost type required in your Landed cost setup:
- Cost type code: Enter a code & description for the cost type
- Debit, Type: Select “Item”
- Credit, Type: Select “Vendor”
- Clearing account: Select a “Main account” to post the estimated costs charges. After you post the actual invoices, the system debits the estimated costs out of the clearing account.
Note: In case a cost type will not be charged to “item cost”, then select “Ledger account” in Debit type, Credit to “Vendor” and setup a clearing account so that cost should be charged to a GL account, as shown in Fig#9.
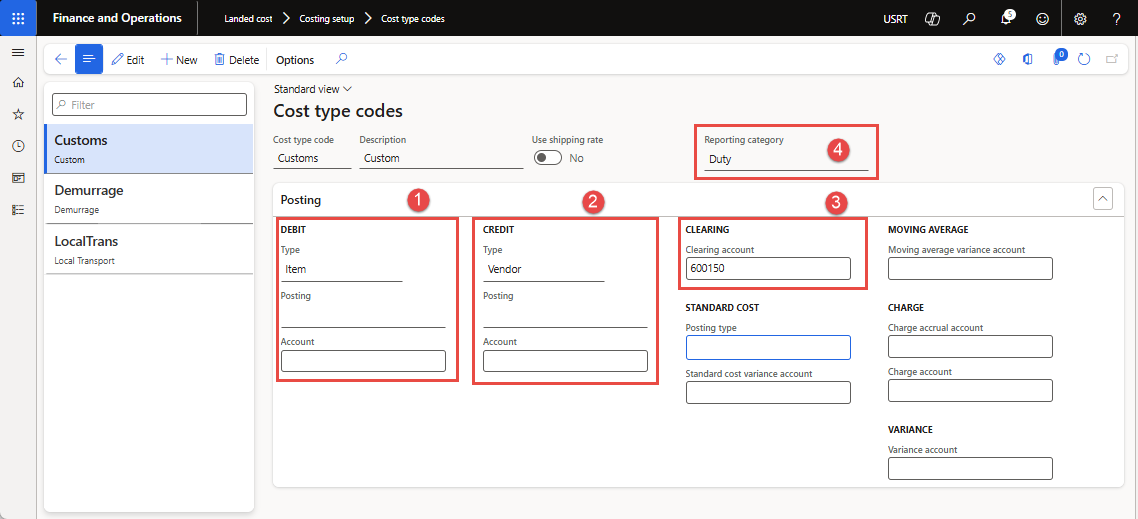
Figure 8: Showing the Cost type codes setup form
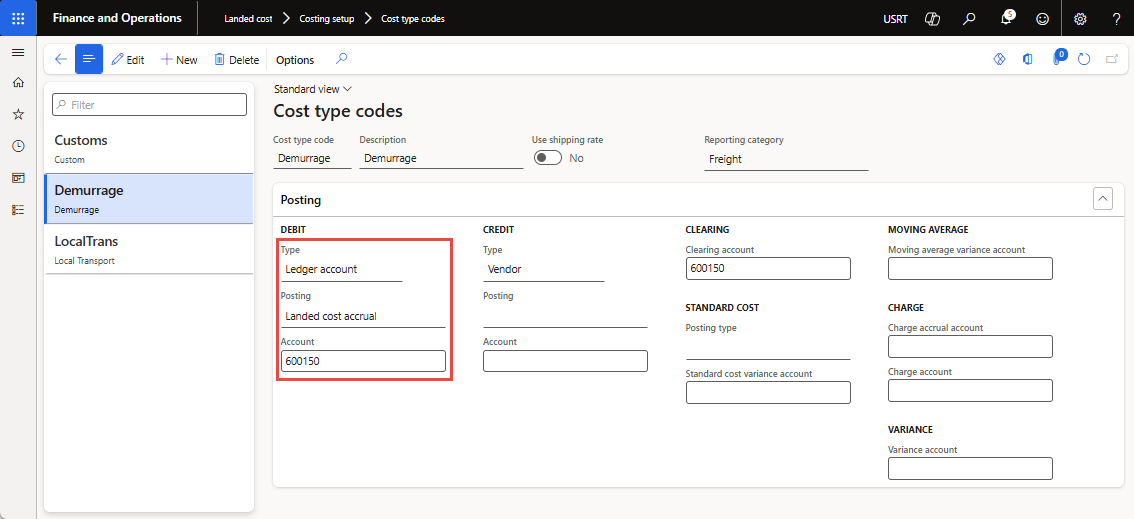
Figure 9: Showing Cost type codes setup for charging to “Ledger account.”
4. Vessels
For tracking and analysis purposes, “Vessels” will help define the medium of goods transportation, which can be sea, air, or land. Figure 10 below shows the definition form for vessels.
Path: Landed cost ➜ Shipping information setup ➜ Vessels
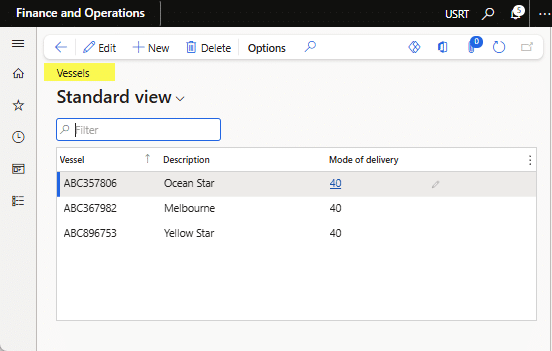
Figure 10: Showing “Vessels” and delivery mode
5. Activities
In the activities master, you will define “Activities” that represent steps in a shipment journey. If a particular activity is specific to a shipping company, you may select the shipping company.
Path: Landed cost ➜ Multi-leg journeys ➜ Activities
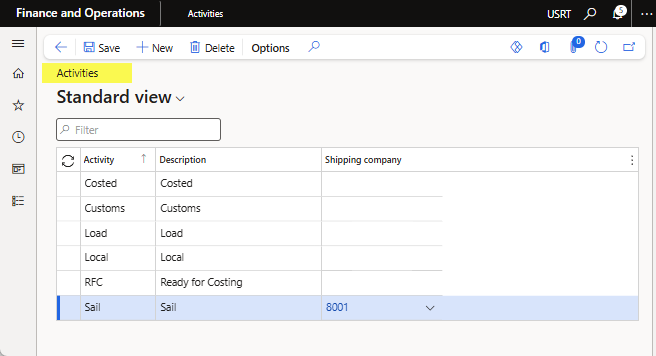
Figure 11: Showing “Activities”
6. Leg
Each journey can have multiple legs, each representing a step from the origin to the destination ports. Similarly, each leg may have an estimated completion or “Lead time” and a corresponding “Voyage status” for the voyage. This also means that as the journey progresses, the status and estimated receipt dates will be updated automatically on the respective purchase order and transfer order.
Path: Landed cost ➜ Multi-leg journeys ➜ Legs
- Click New, define leg code or transfer order. For example, loading, transportation, custom clearing, or another activity.
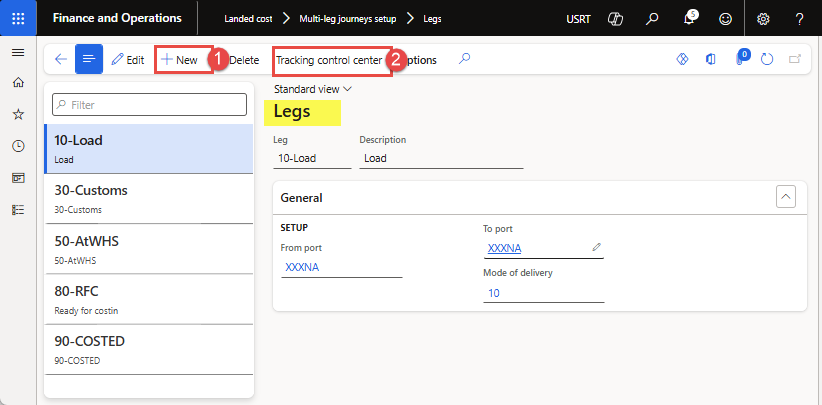
Figure 12: Showing “Vessels” and delivery mode
- Next, click the “Tracking control center” button to open the tracking control center to set “Lead time” and the corresponding “Voyage status” for the voyage leg. You will select “Lead time” under Create type to set up lead time for leg activity completion, loading, custom clearing, inland transport, etc. Similarly, you will define the “Voyage status” for each leg, which will help update the Voyage status automatically when the user marks the completion of a leg in the shipment journey.
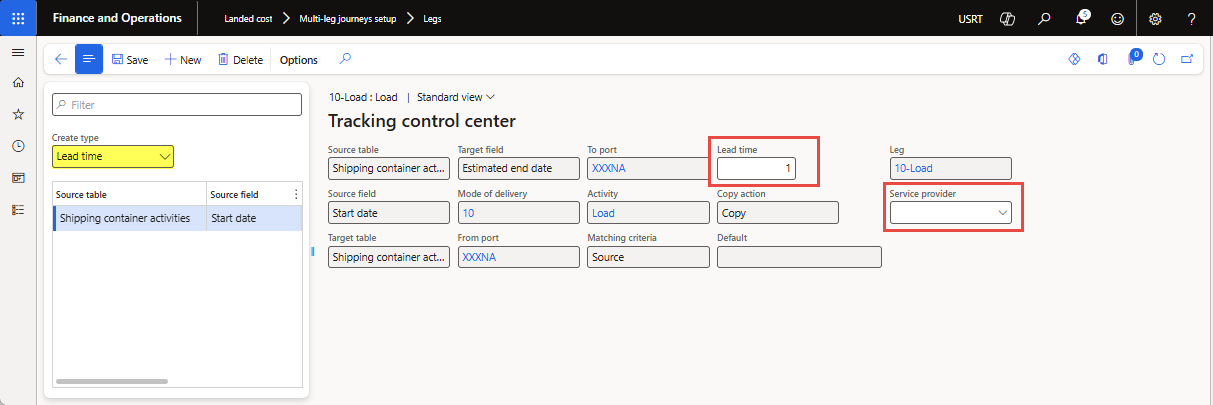
Figure 13: Showing “Lead time” added with the leg
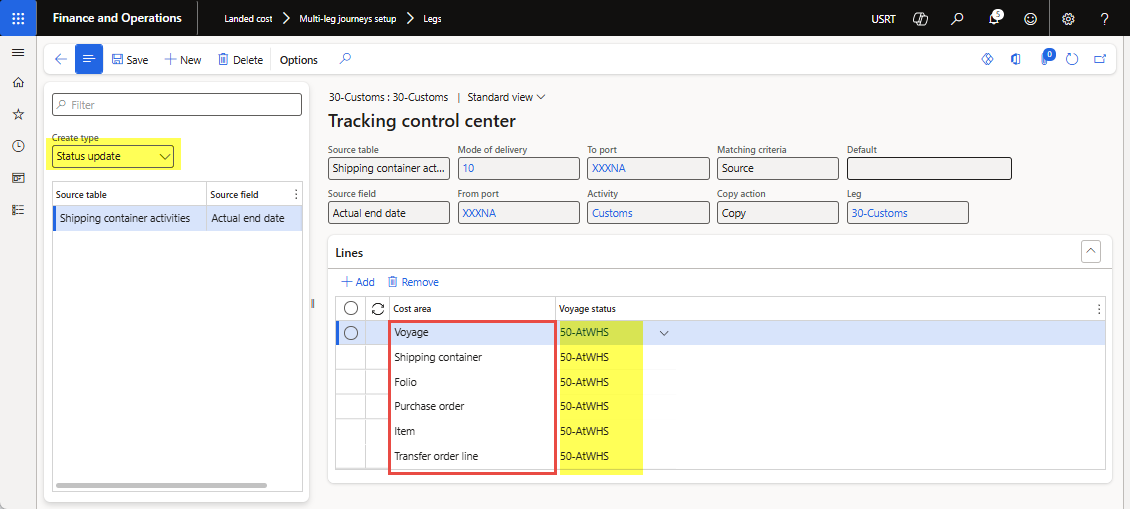
Figure 14: Showing “Voyage Status” with Leg for each cost area.
7. Journey template
Journey templates are physical paths/routes that goods take from origin to destination ports, for example, from Dubai Port to Karachi Port. Each journey would have its own leg details (with associated lead times and voyage statuses), which help track the estimated and actual dates of the journey’s progress.
Path: Landed cost ➜ Multi-leg journeys ➜ Journey template

Figure 15: Showing “Journey Templates” having route steps or legs
Purchase orders import flow in Landed cost:
The purchase process can be run once a Voyage is created for the source document, e.g., a purchase order. Journey is tracked, estimated costs are loaded as incurred, and actual vendor invoices are posted to build the Landed cost of items.
Here is a brief list of steps of the import process flow, which will be explained and elaborated on in the sections below.
- Create a Voyage for a confirmed Purchase Order
- Tracking inbound journey – record completion date of each leg and attach support documents
- Add estimated costs agreed with service providers
- Post goods receipt and purchase invoicing
- Post the actual vendor invoice
- Voyage costing report by individual Item & cost
1. Create Voyage for confirmed Purchase order
The process starts with a confirmed purchase order and proceeds as follows to create a new Voyage.
- Open the Purchase Order and create a new voyage.
- Click Create new voyage in the Landed cost section under the Purchase action tab (as Figure 16) below.
- Enter Voyage details, including “Vessel”, “Journey template”, “Airway bill”, and “Shipping company” to load auto cost for the voyage (optional), and click the Ok button.
Note: The “shipping type=Shipping company” should be set up in the Vendor master so that vendors are listed as a list of values in the shipping company (see Figure 17).
- Next, a new voyage is created, and the Voyage editor dialog will open, showing the purchase order lines.
- Select the purchase order lines and click “Add to Staging list” (see Figure 18).
- Next, click “View staging list”, and the staging list will open. Press the “Add to new shipping container” button, enter the container-related details, and press the OK button (as shown in Figures 19 and 20).

Figure 16: Showing “Voyage Status” with Leg for each cost area
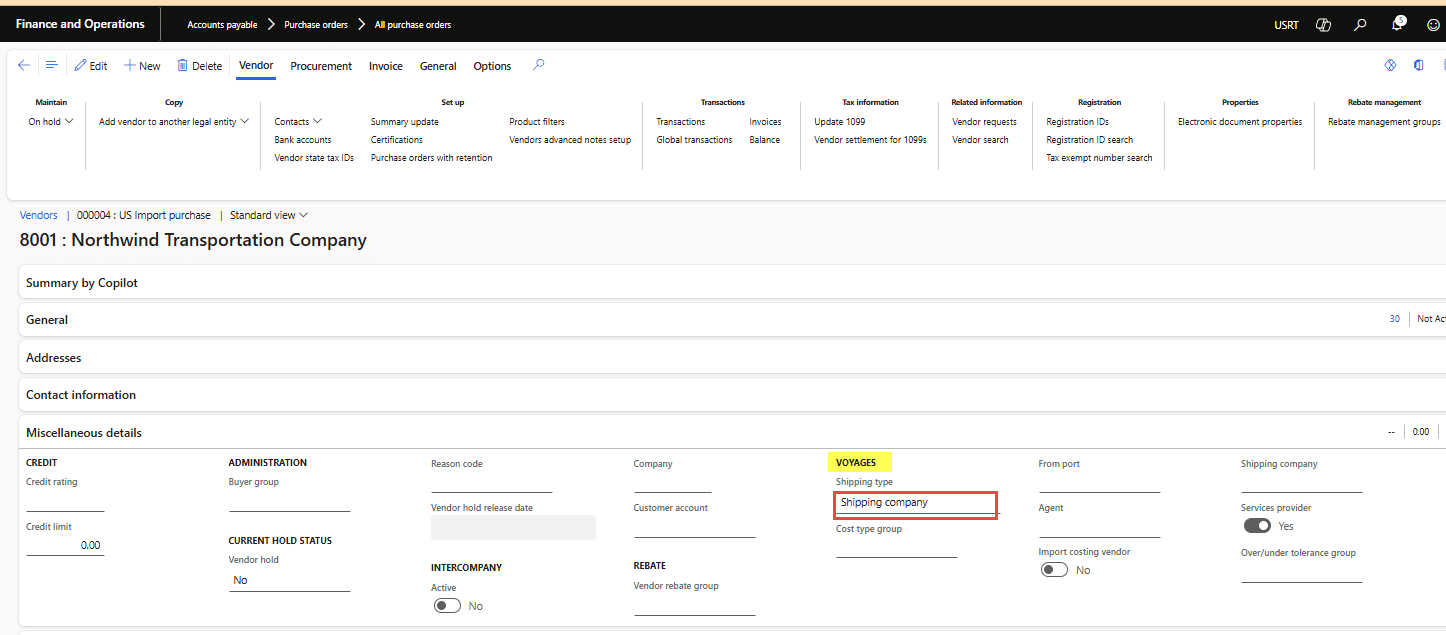
Figure 17: Showing “Shipping company” type setup with Vendor master under Miscellaneous details fast tab
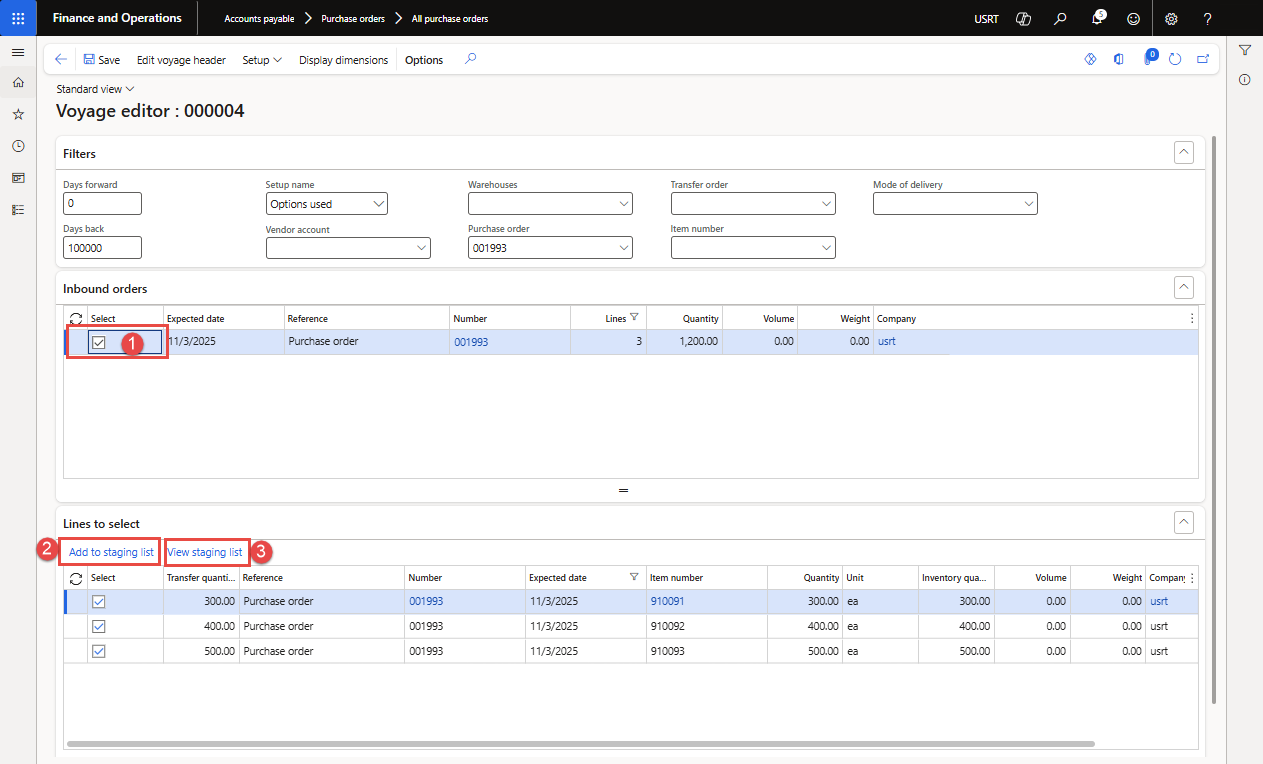
Figure 18: Showing “Voyage Status” with Leg for each cost area
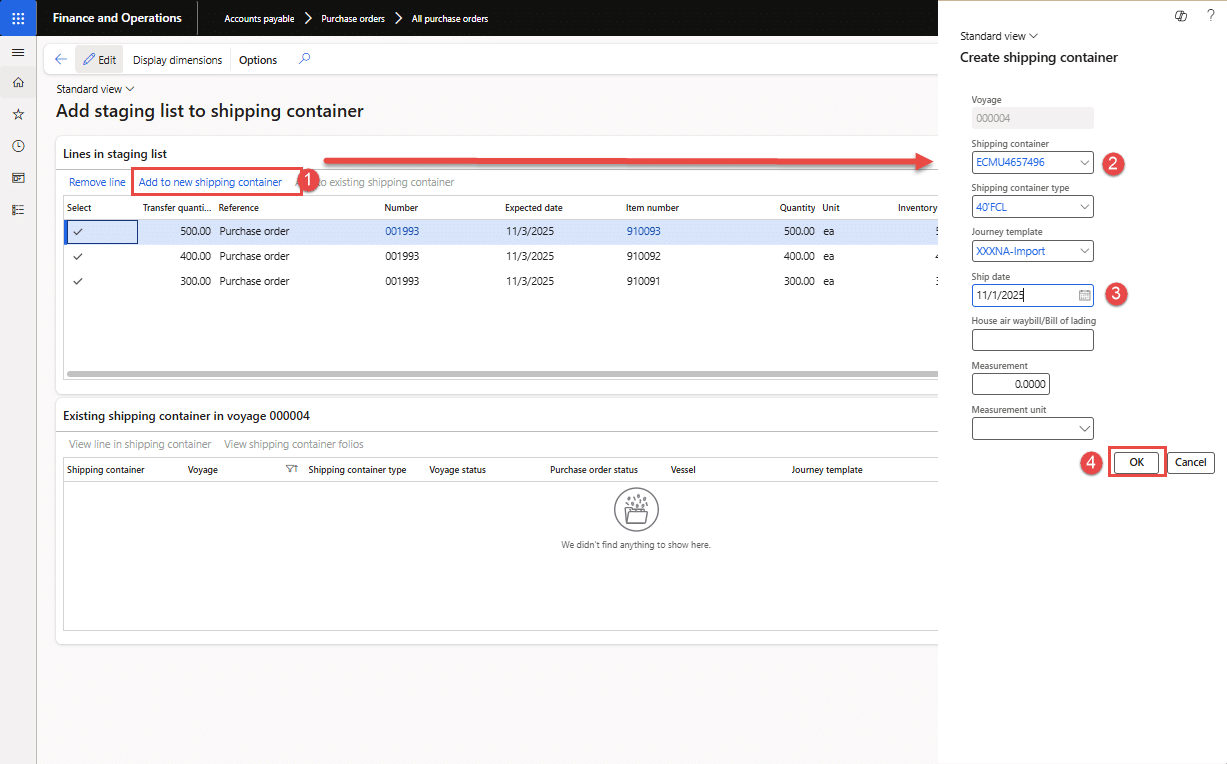
Figure 19: Showing “Shipping container” creation for the selected purchase order lines
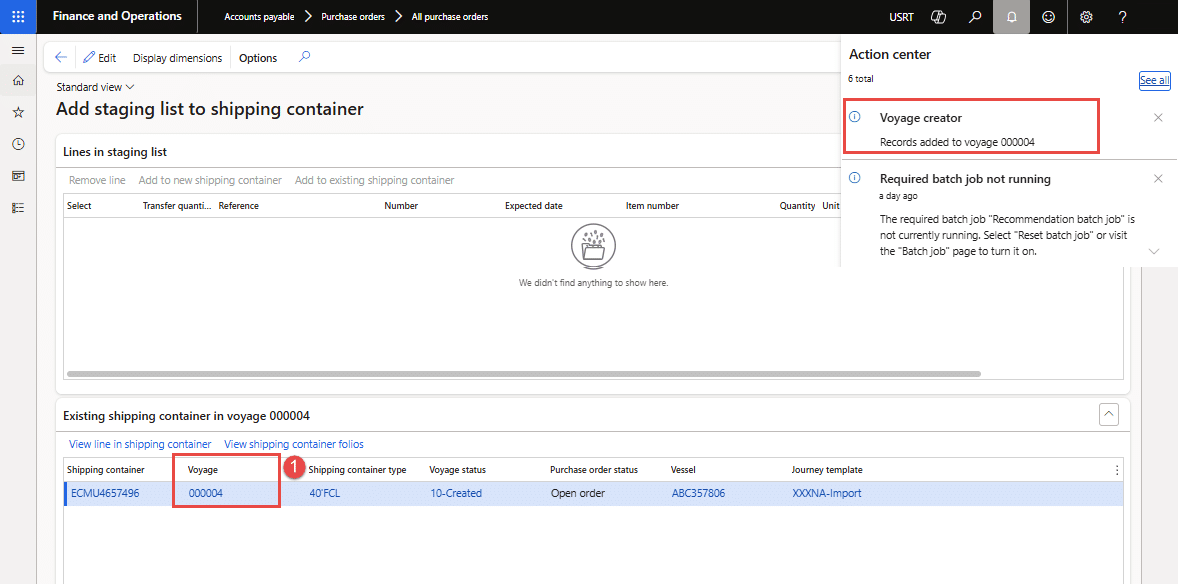
Figure 20: Showing “Voyage Status” with Leg for each cost area.
2. Tracking Inbound journey
As a voyage moves from the originating outbound location to the destination warehouse, users can update actual completion dates of each leg. The Voyage journey tracking process follows the steps shown:
- Open Voyage (i.e., Landed cost ➜ Voyages ➜ All Voyages)
- Click Tracking under the General action tab, and the Inbound tracking window will open.
- Together, based on the lead times and legs of the journey, an estimated delivery date of the goods is automatically updated in purchase order lines. This provides visibility and control over logistics and the warehouse team for goods in voyage and vessel available before actual receipt of the goods.
- Next, the logistic team users can track shipments and update the completion of each leg. For each leg, a lead time and a shipment status are updated. Based on the confirmed receipt dates for a leg, movement to the next leg of the journey is also identified.
- Click the “Update start date” button, and the “Start date & Estimated days” for each leg will be updated based on the lead time defined in the journey template.
- Next, the logistics team will update the “Actual end date” to update the completion of the leg, and the system will calculate the “Actual days” spent on that leg.
- Once the Voyage clears the customs process and is loaded on trucks for inland transportation, the estimated costs are available and can be recorded with Voyage. Meanwhile, the goods will be received at the warehouse for receiving, which is discussed in the next sections.

Figure 21: Showing the “Tracking” option for inbound tracking of a Voyage
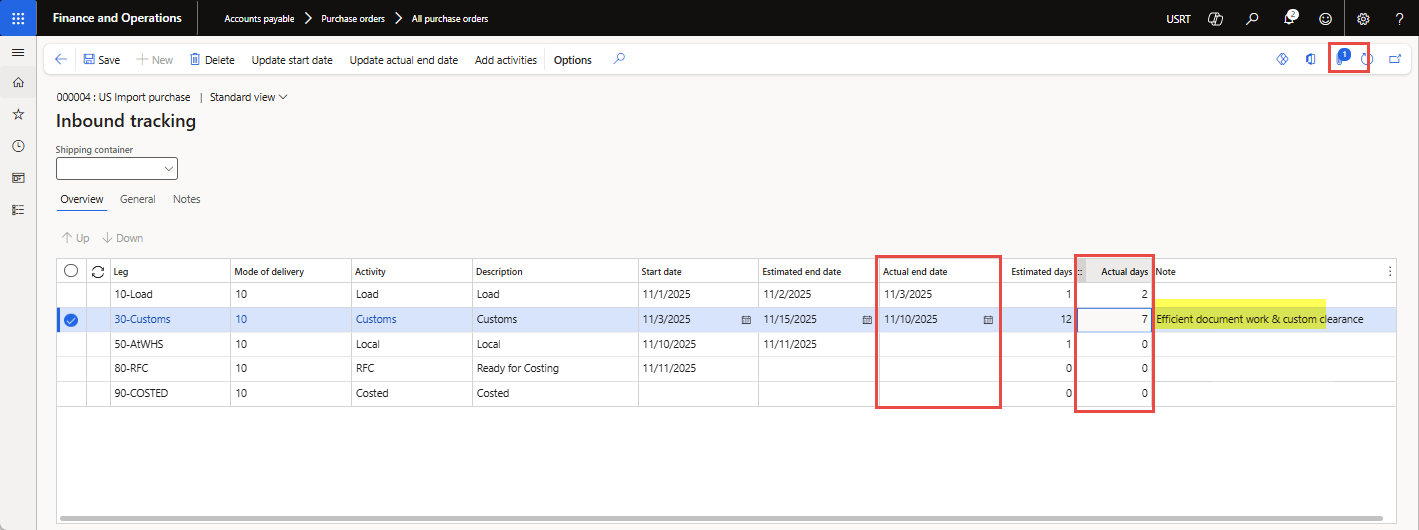
Figure 22: Showing “Estimated days (based on Lead time) and Actual days” for each Leg
3. Voyage costs allocation
The “estimated cost” added to Voyage will affect “inventory costing” when posting a product receipt or invoice. The “Actual costs” are posted when the vendor invoices are received, and the “Invoice journal” is posted.
Actual costs posting will reverse estimated costs posted at the time of invoicing by using “clearing accounts” set up for each cost type code, and will post inventory cost adjustments that we will discuss in the “Actual vendor invoices” section.
Follow the steps below to add an estimated cost for the Voyage:
- Open the Voyage, click the “Voyage costs” button to open the form (as seen in Figure 23), where you will add the estimated cost per “Cost type code” in the Voyage.
- Click the “New” button to add an estimated cost for a cost code.
- Cost type code: select a cost code from the list (e.g., customs)
- Application method: select “Amount” as the value that will allocate the “cost value” to the item’s cost and apportion based on the item’s amount
- Category: select “Fixed” as value
- Cost value: enter “estimated cost amount”
- Currency: select “USD” as value
- Repeat steps a-to-e for new cost type code.
- After cost allocations, you may view the apportioned estimated amount by clicking the “Cost inquiry” button under the General action tab on the Voyage page (as seen in Figure 26). You may use View options to break the cost by item, source document, cost type code, shipment, etc. (as seen in Figure 27).
- Now you can proceed to post the goods receipt.
Cost Application Methods – When defining an auto cost, you choose how the system should apply it:
Method | Description | Use Case |
Amount |
Applies a fixed cost per selected level (e.g., per Voyage, per container). |
A flat fee per Voyage/shipment. |
Percentage (of item value) |
Applies a cost as a percentage of the item value. |
The import duty or insurance rate is calculated as a percentage. |
Quantity |
Distributes cost based on the per-item quantity. |
Freight charges are based on the number of units shipped. |
Weight |
Distributes cost based on the total item weight. |
Air freight or ocean freight, where charges depend on gross weight. |
Volume |
Allocates cost based on volume (cubic measure). |
Shipping costs are based on container space utilization. |
Value |
Allocates cost based on item value (monetary amount). |
Insurance or customs duties are based on the item’s cost value. |
Table 2: Brief of cost application methods
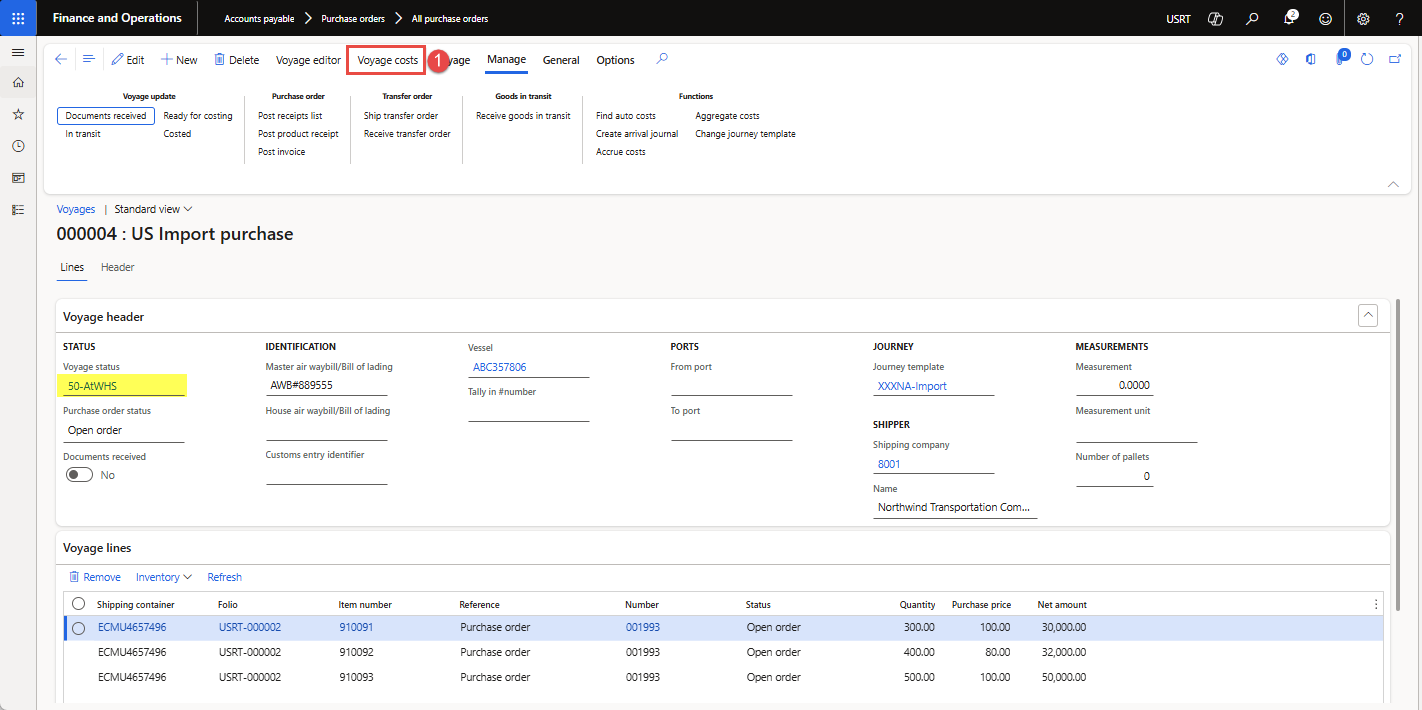
Figure 23: Showing “Voyage costs” option on the Voyage page
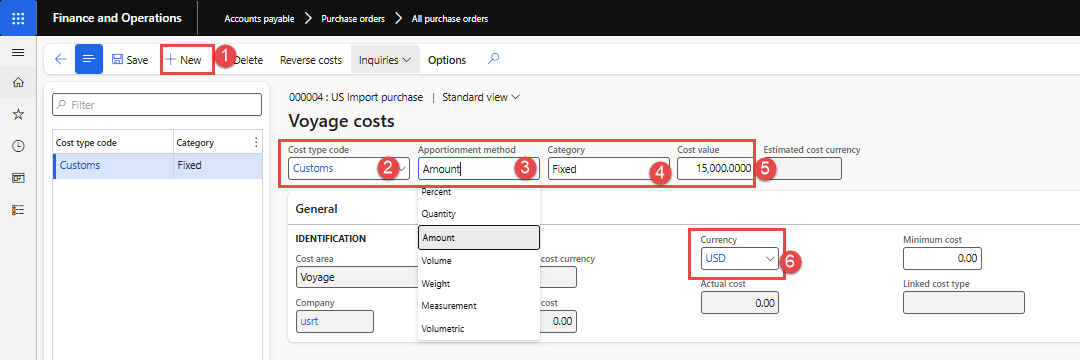
Figure 24: Showing estimated cost for “Customs-Cost code” for the Voyage

Figure 25: Showing the estimated cost for “Local Transport” for the Voyage
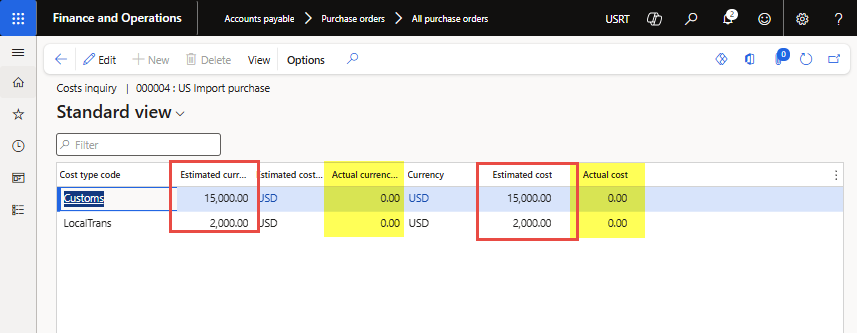
Figure 26: Showing costs inquiry for “Estimated & Actual cost” per “cost type code”
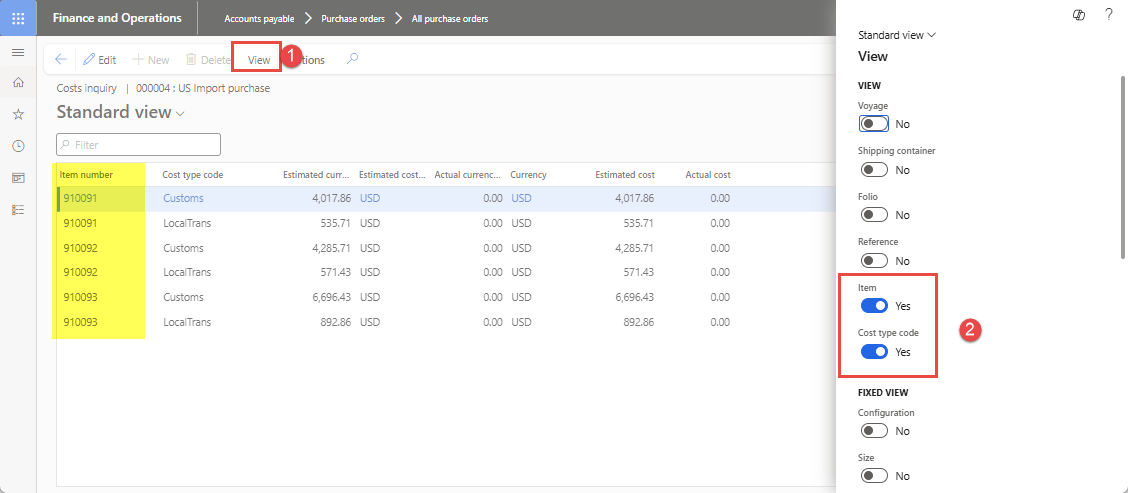
Figure 27: Showing costs inquiry for “Estimated & Actual cost” per “Item and cost type code”
4. Post goods receipt
The goods receiving process resembles the standard purchase order receiving process. You can use the “Post product receipt” functionality on Voyage under the “Manage” action tab, as shown in the steps below:
- Open the Voyage, click “Post product receipt” under “Manage” action tab, and the “Posting product receipt” window will open (as shown in Figure 28).
- Enter vendor “Delivery note or invoice number” and received quantity and click OK to post the goods receipt in warehouse location (as shown in Figure 29).
- Successful posting of product receipt will update the purchase order status as “Received”, as shown in Figure 30.
- When a product receipt against a purchase order is posted. The estimated amounts per cost type from Landed cost appear in the Account distributions page in the product receipt. Figure 31 shows “accounting distributions” that include Landed cost for each purchase order line.
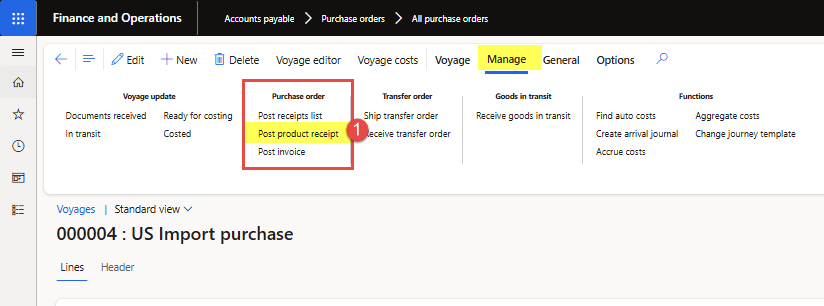
Figure 28: Showing “Post product receipt” button on Voyage
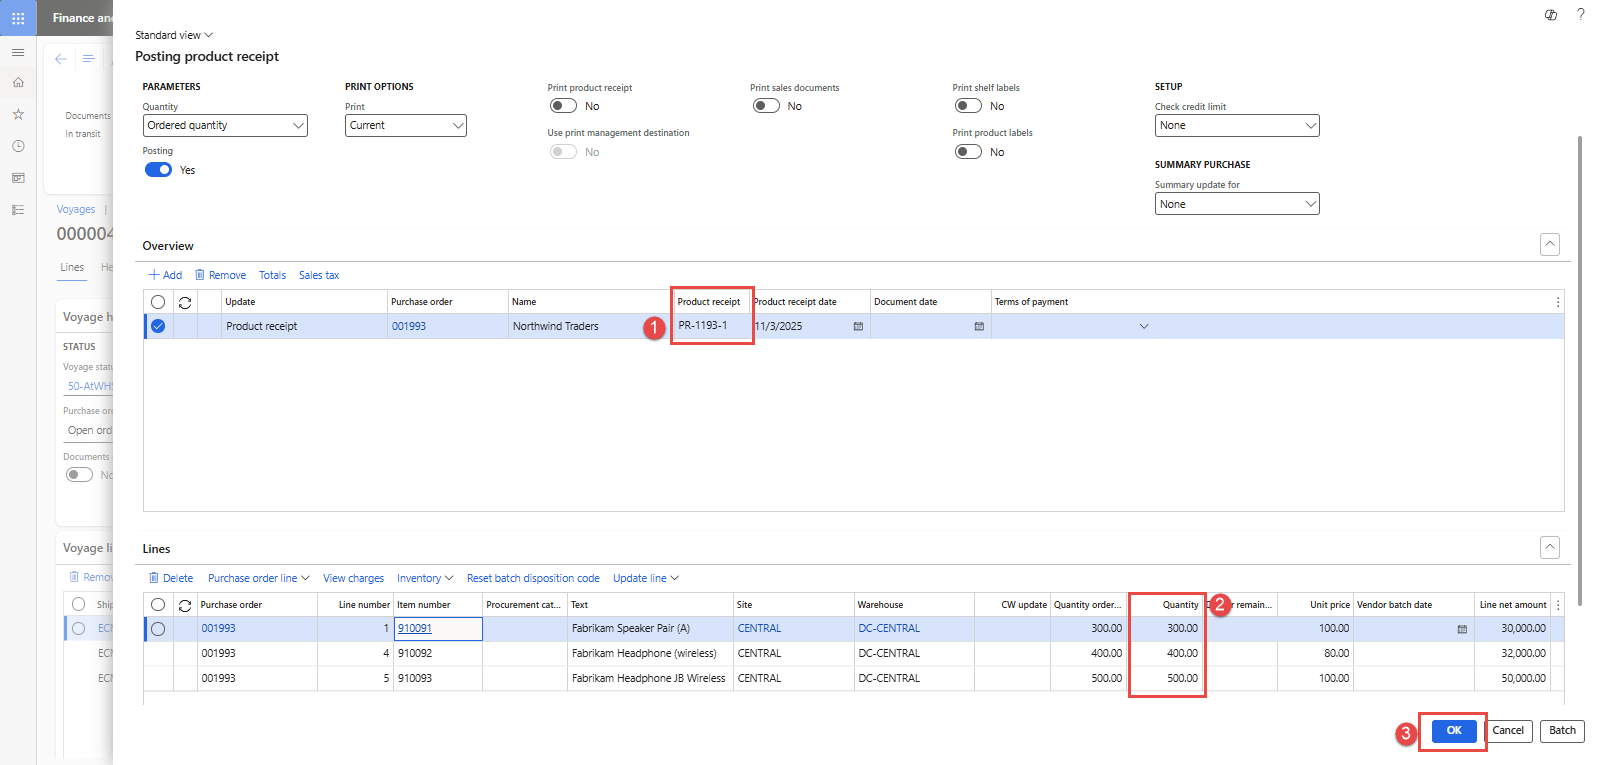
Figure 29: Showing “Posting product receipt” for the Voyage
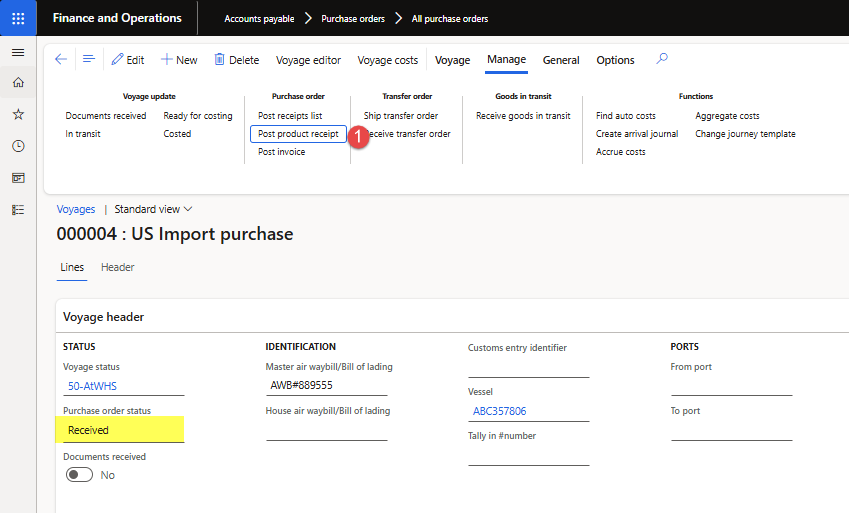
Figure 30: Showing purchase order status updated to “Received” after goods receipt posting
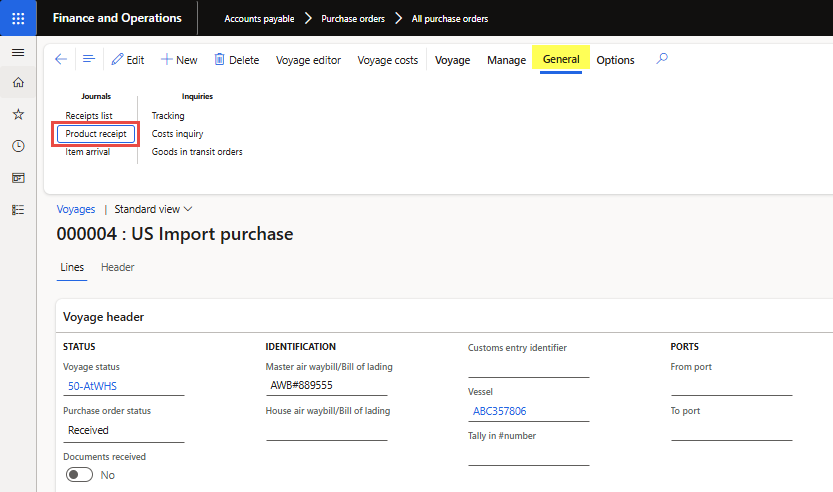
Figure 31: Showing “Estimated days (based on Lead time) and Actual days” for each Leg
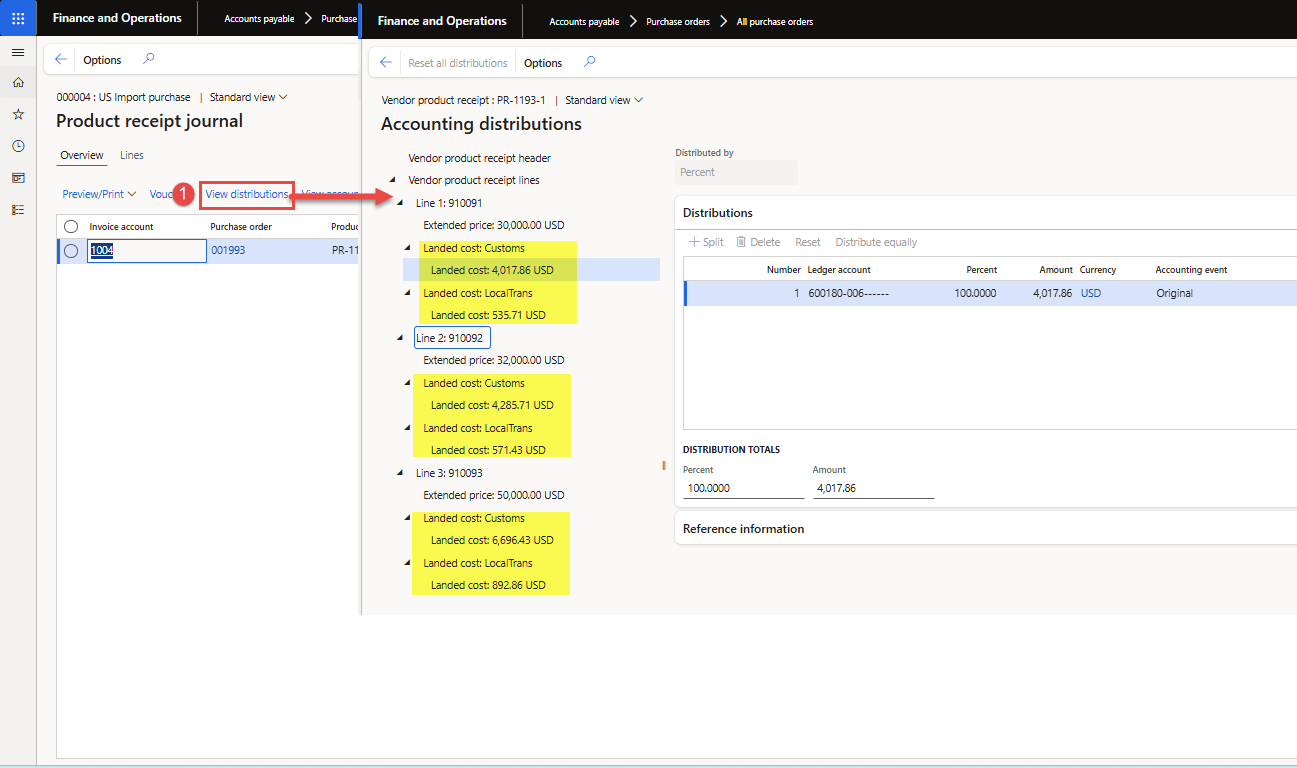
Figure 32: Showing “Estimated cost amount code allocation” to each product or each Leg
5. Post the vendor invoice
This step reflects the receipt of an invoice from the vendor. To post a vendor invoice journal against a Voyage, follow the steps shown:
- Create a new Invoice Journal (path: Accounts payable à Invoices à Invoice journal)
- Click the “Lines” button to add voucher lines and enter the following details as shown in Figure 34.
- Account: select a vendor account
- Invoice date and number: enter invoice date and invoice number
- Credit: Enter “invoice value”
- Currency: Select invoice currency
- Next, select the “Select voyage cost” option under the “Functions” menu. The voyage selection dialog will open (as shown in Figure 35). Select the appropriate voyage, then click “OK” to display the cost codes and the estimated amount posted.
- Select the “cost type code” for which actual cost is received and mark the “Selected” as checked; the cost code will be selected for “Allocation” (see Figure 36).
- Click OK to copy the selected “cost code types” lines and values into the voucher lines, and the invoice journal is ready for posting. The “Description” column in the voucher will reflect the Voyage number (see Figure 37).
- Click “Post” button to post the journal. After successful posting of the invoice journal, the selected charge codes will be marked as invoiced against the vendor invoice.

Figure 33: Showing “Estimated days (based on Lead time) and Actual days” for each Leg
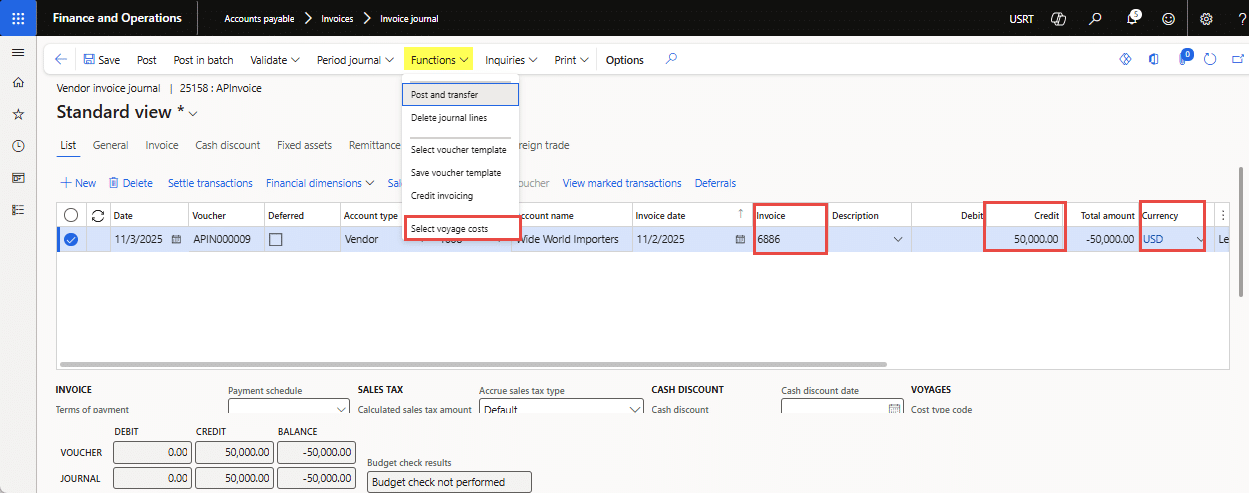
Figure 34: Showing “select Voyage costs” option under Functions in Invoice Journal
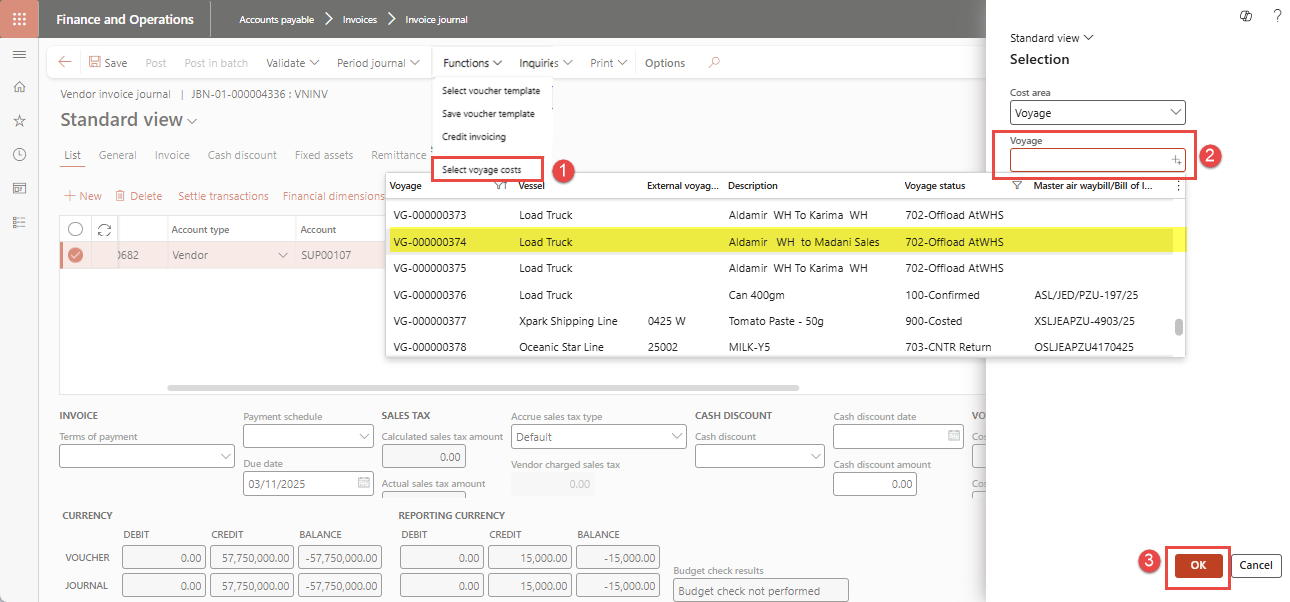
Figure 35: Showing Voyage dialog to “Select voyage” and record actual cost against estimated costs
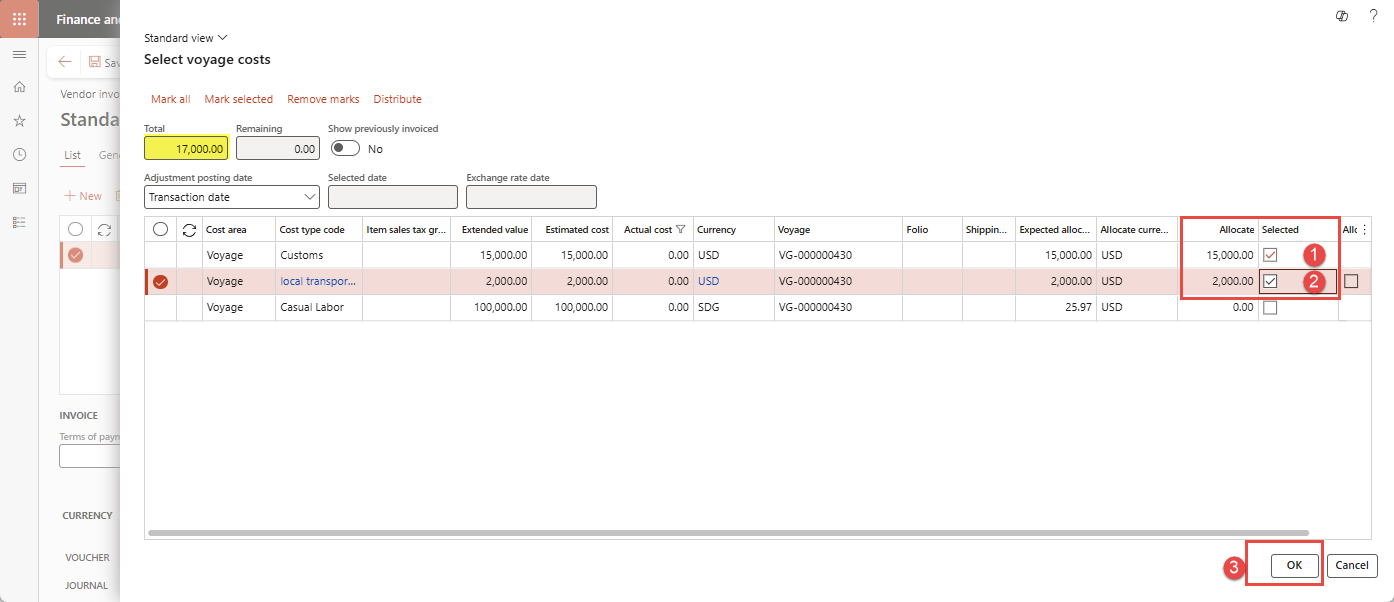
Figure 36: Voyage costs form showing “Cost type codes” selected for actual cost allocation
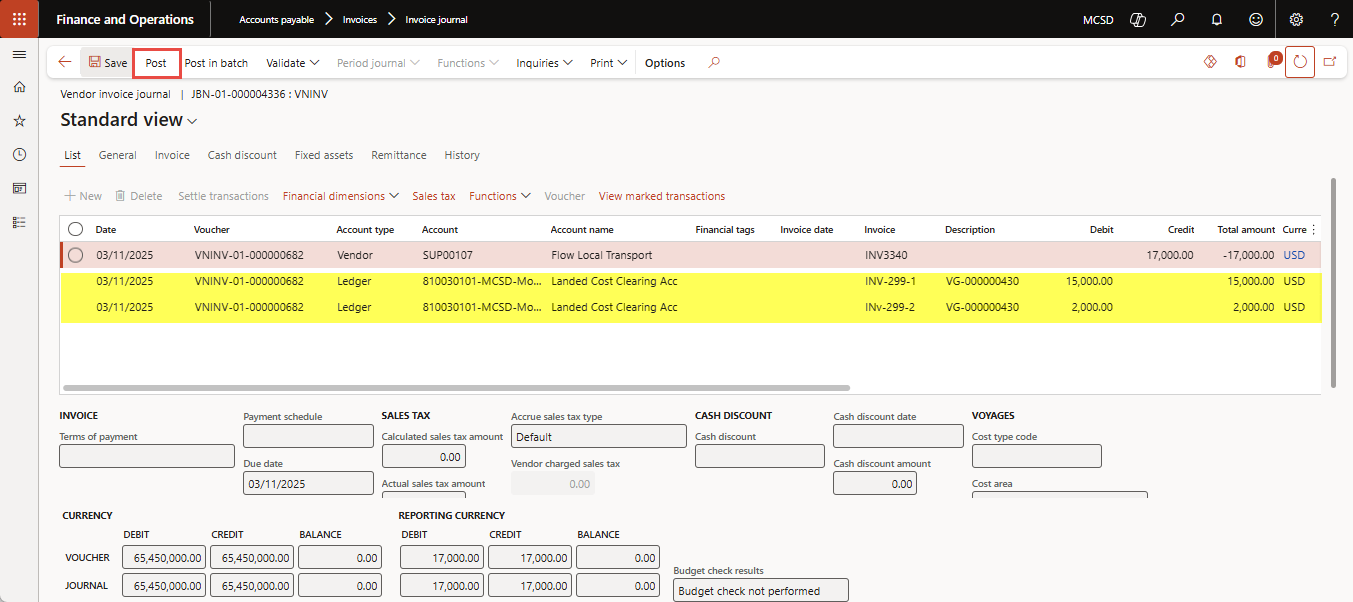
Figure 37: Invoice journal showing “actual voyage costs” applied for vendor invoice
6. Voyage costing by individual item
The “invoice journal” posting will post actual costs in inventory costing under the “Adjustment” column (see Figure 38).
- To get Voyage costing by individual cost code in D365FO, use the Landed cost report from Landed cost ➜ Reports ➜ Costing > Voyage costing by individual cost.
- The Voyage costing by the individual cost dialog box will appear.
- Select the “Item” option to Yes to see the cost for each item. If you also set the view “Shipment” to Yes, then you will see expenses per Voyage/shipment and item instead.
- Click OK to generate the report. This step reflects cost(s) in the estimated currency (e.g., USD) as well as in company or accounting currency (e.g., PKR), as shown in Figure 39.
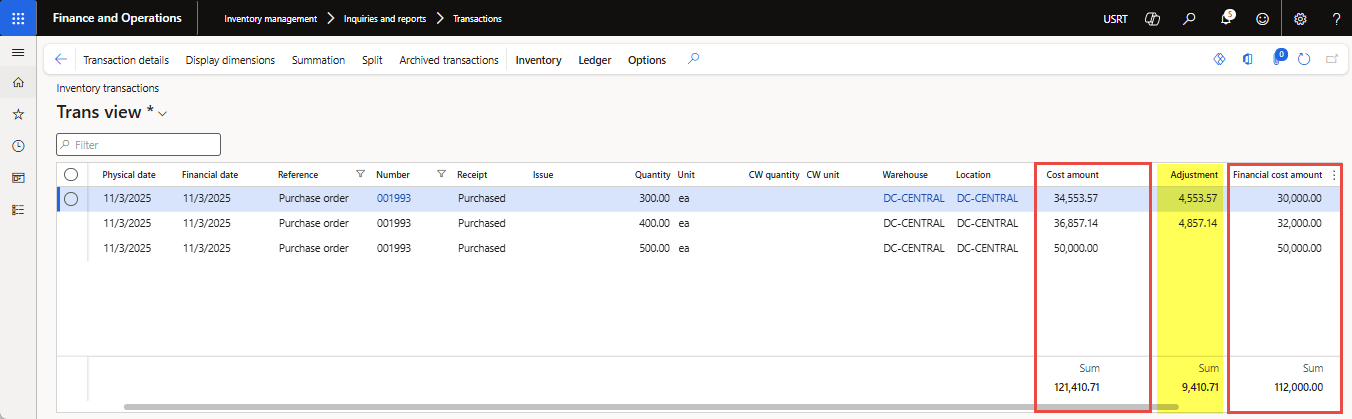
Figure 38: Transaction form showing “Individual item cost” after Landed cost adjustment
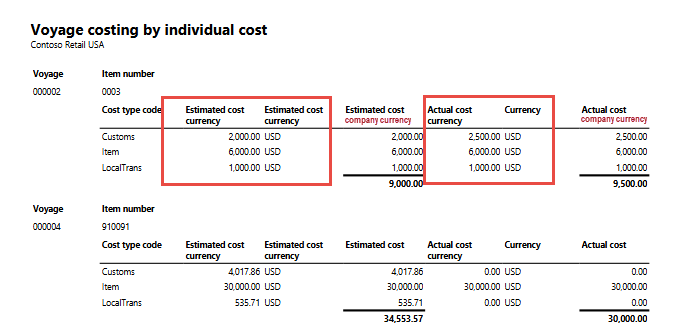 Figure 39: Voyage costing by individual cost report showing “Estimated and Actual cost” in estimated currency as well as accounting currency
Conclusion
The Landed cost module in Dynamics 365 Finance & Operations provides a centralized, reliable way to manage all expenses associated with imported goods, ensuring accurate product costing from shipment initiation through warehouse receipt. By using voyages, cost types, and journey templates, organizations improve cost transparency, reduce manual tracking, and gain consistent control over freight, duties, and other import-related charges.
If you need support implementing or optimizing the Landed cost module in D365 F&O, contact us at marketing@confiz.com.