Software updates, new deployments, and configuration changes are inevitable, but they also introduce uncertainty. Even the smallest change can impact critical business processes, disrupt workflows, or introduce risks that go unnoticed until it’s too late. That’s where the Regression Suite Automation Tool (RSAT) comes in.
This guide explores the complete, end-to-end testing process using RSAT, Microsoft’s purpose-built tool for automating test case execution in Dynamics 365 Finance and Operations environments. By validating key business functions through automation, RSAT helps ensure system reliability, functional integrity, and uninterrupted business continuity.
Whether you’re preparing for an upgrade or rolling out customizations, automating regression testing with RSAT enables teams to quickly identify issues introduced by changes, reducing risk and maintaining confidence in every release.
What is Regression Suite Automation Tool (RSAT)?
The Regression Suite Automation Tool (RSAT) is a powerful Microsoft utility designed to automate the testing of business processes in Dynamics 365 Finance & Operations (F&O). It allows functional users to validate scenarios without needing advanced coding skills. By automating regression tests, RSAT minimizes the risk of disruptions caused by code changes or new releases.
This tool is Microsoft’s solution for seamless and scalable test automation, integrating with Azure DevOps and Lifecycle Services (LCS) to accelerate delivery cycles while maintaining system stability.
Why use RSAT?
The primary goal of using the Regression Suite Automation Tool (RSAT) in Dynamics 365 Finance & Operations is to ensure that all critical business functions perform reliably in any target environment.
By running a complete suite of automated test cases, RSAT enables organizations to:
Identify regressions early in the development or release cycle
Ensure accuracy and stability across integrated modules
Reduce manual testing effort and increase operational efficiency
Deliver auditable, traceable results for compliance and quality assurance
Automation not only speeds up testing but also strengthens confidence in system updates and deployments.
Configuring RAST in Dynamics 356 F&O: The prerequisites
Before beginning the configuration of the Regression Suite Automation Tool (RSAT), ensure the following prerequisites are in place:
Access to Microsoft Dynamics 365 Finance & Operations (F&O)
An active Azure DevOps organization and project
Defined test plans and test suites within Azure DevOps
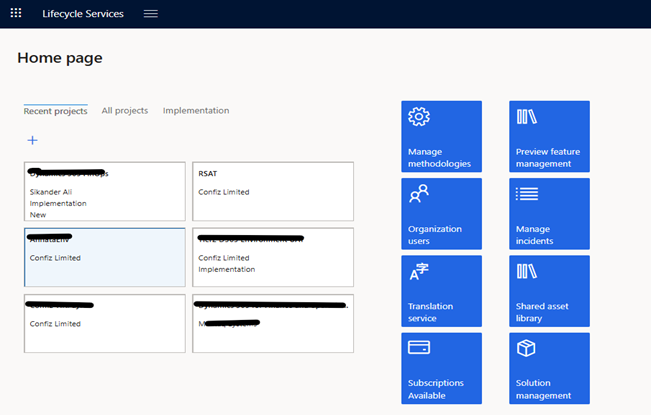
Access to Microsoft Lifecycle Services (LCS)
Permissions to download, install, and configure RSAT on a compatible machine
Having these components ready ensures a smooth setup and integration process across your testing environment.
Take control of your business operations
Discover how Confiz services can simplify your complex workflows and improve decision-making.
Step-by-step guide: Installation and configuration of RSAT
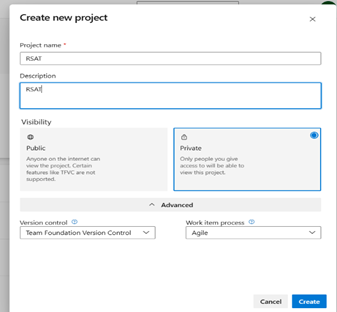
Step 1: Setting up Azure DevOps for RSAT
Configure your Azure DevOps project to store test cases and parameters. This includes creating a test plan, organizing suites, and mapping recorded tasks to test cases. This step is a key part of the regression suite automation tool installation and configuration process.
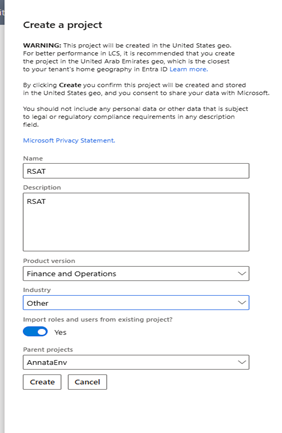
Step 2: Configuring Lifecycle Services (LCS) for RSAT
To enable RSAT functionality, Lifecycle Services (LCS) must be configured to connect your environment with Azure DevOps. This involves linking the project to the correct Azure DevOps account, selecting the appropriate branch, and ensuring the test automation tools are deployed to the target environment. Proper RSAT configuration enables the execution of automated tests directly from RSAT, facilitating efficient management of test artifacts and results.
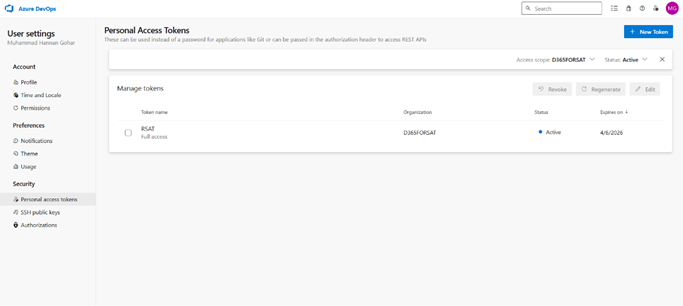
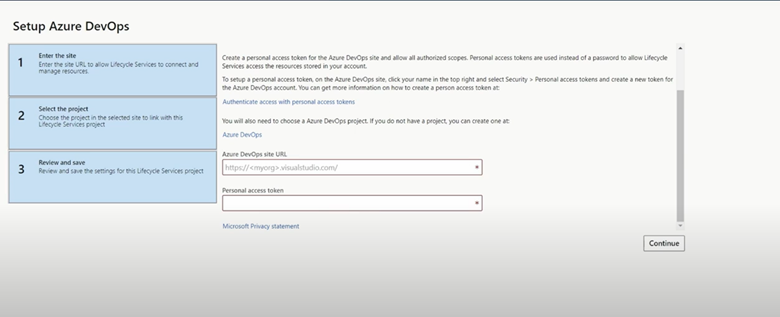
Step 3: Creating an access token in Azure DevOps
To enable secure communication between RSAT and Azure DevOps, a Personal Access Token (PAT) is required. This token serves as a secure authentication mechanism, allowing RSAT to interact with Azure DevOps services. The token is generated from the Azure DevOps portal, where appropriate scopes and expiration settings can be configured based on project requirements and security policies. This step is crucial in the installation and configuration process of the regression suite automation tool.
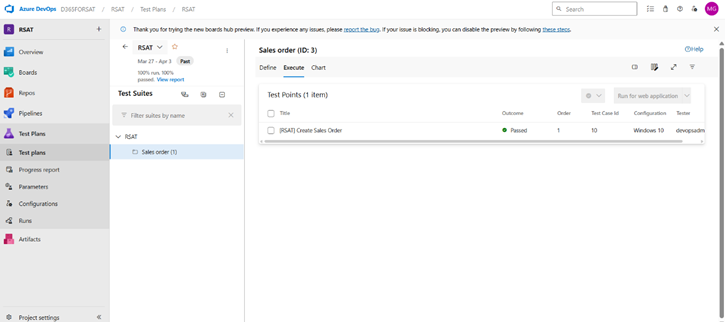
Step 4: Creating and managing test cases in Azure DevOps
Test cases in Azure DevOps serve as the foundation for executing the regression suite automation tool (RSAT). They are created within the Test Plans section, where each case includes detailed steps, expected outcomes, and relevant attachments if needed.
Step 5: Setting up Azure DevOps for LCS
Integrating Azure DevOps within Lifecycle Services (LCS) is a crucial step in enabling automated test management with RSAT. This setup involves linking your LCS project to an Azure DevOps organization and selecting the corresponding project and branch. This integration allows LCS to synchronize test cases and results with Azure DevOps, ensuring a unified testing and deployment pipeline for Dynamics 365 environments.
Step 6: Installing and setting up RSAT
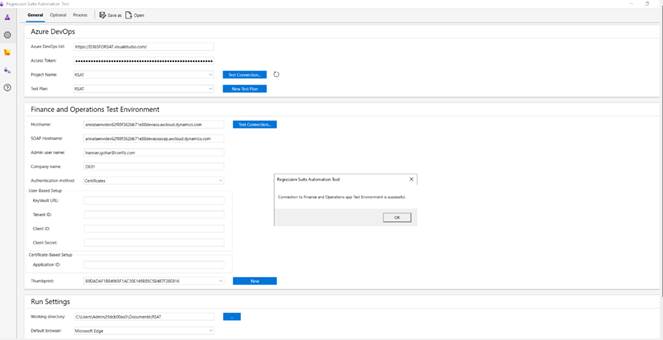
To begin using RSAT, the tool must first be downloaded from Microsoft Dynamics Lifecycle Services (LCS) and installed on a compatible machine. Once installed, RSAT needs to be configured with environment-specific details, such as the Azure DevOps URL, Personal Access Token (PAT), and test project settings. Proper setup ensures that RSAT can communicate seamlessly with both LCS and Azure DevOps, enabling the execution of automated test cases and collection of results.
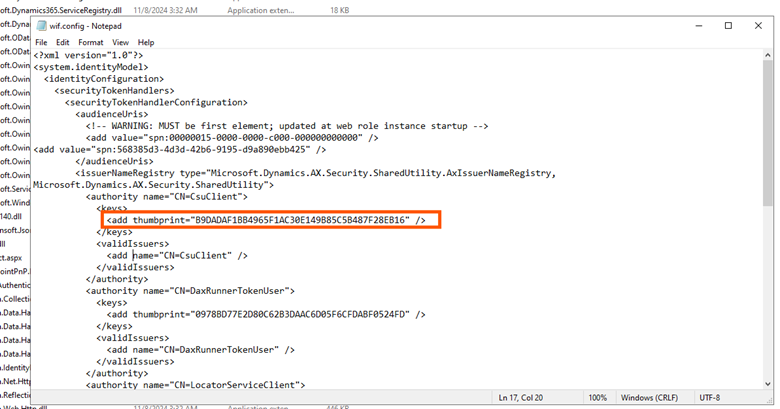
Step 7: Wif.Config thumbprint
The WIF.config thumbprint is a critical security element used by RSAT to authenticate with the target Dynamics 365 environment. This thumbprint corresponds to the certificate installed on the environment and must match the one specified in the RSAT configuration. Ensuring the correct thumbprint is set in the WIF.config file enables RSAT to access the environment securely during test execution.
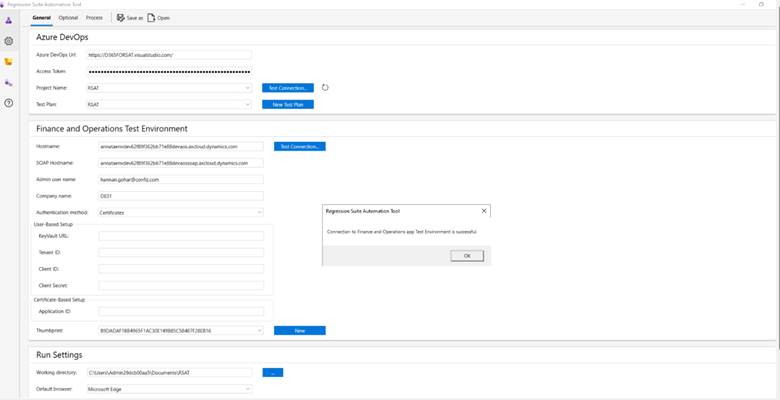
Your RSAT configuration is now a success!
Once all necessary settings are applied, such as the Azure DevOps connection, environment URL, and certificate thumbprint, RSAT will validate the configuration. A successful configuration confirms that RSAT is ready to execute automated tests, with all integrations between Azure DevOps, LCS, and the test environment functioning correctly.
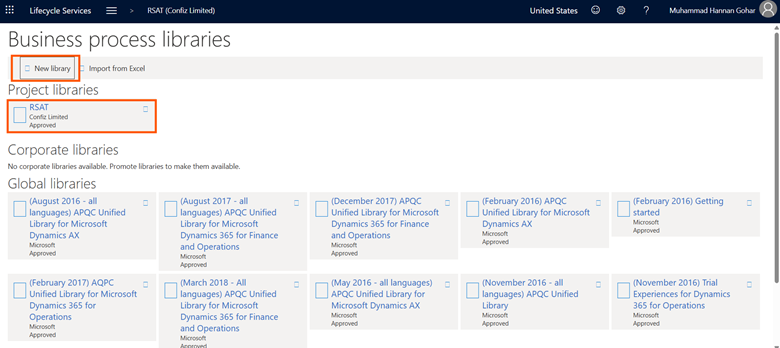
A Business Process Modeler (BPM) library in LCS serves as a repository for business process recordings that can be converted into automated test cases using RSAT. To create a new BPM library, navigate to the BPM section in LCS, initiate a new library, and organize it by functional areas or business scenarios. This structure allows for efficient management of test cases and aligns them with real-world business processes.
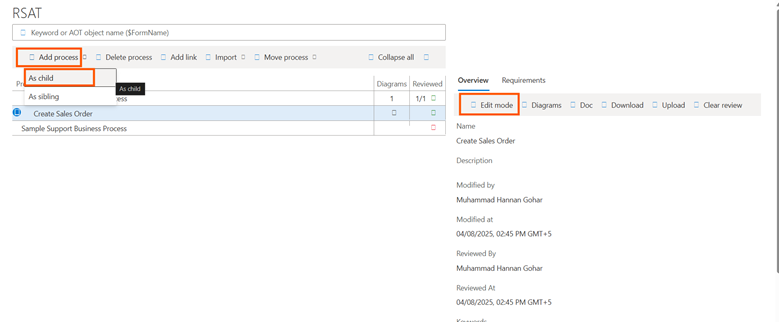
Adding a child process
In the BPM library, processes can be structured hierarchically for better organization. You can add a process as a child under a parent node to represent a sub-process or a detailed step in the overall workflow. Once added, the child process name can be edited directly to provide a more descriptive or relevant title, helping maintain clarity and alignment with business terminology.
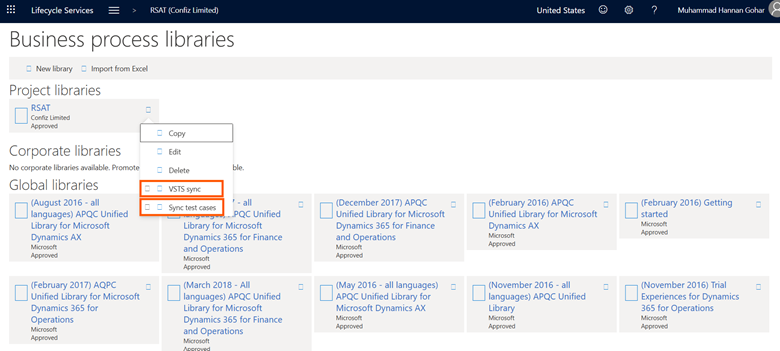
Syncing project library with VSTS & test cases
Synchronizing the BPM library with Azure DevOps (formerly VSTS) ensures that business process recordings are converted into test cases and made available for automation through RSAT. This sync operation pushes the structured processes and their corresponding test cases into the connected Azure DevOps project. Keeping the libraries and test cases in sync is crucial for maintaining consistency between business process documentation and the execution of the regression suite automation tool.
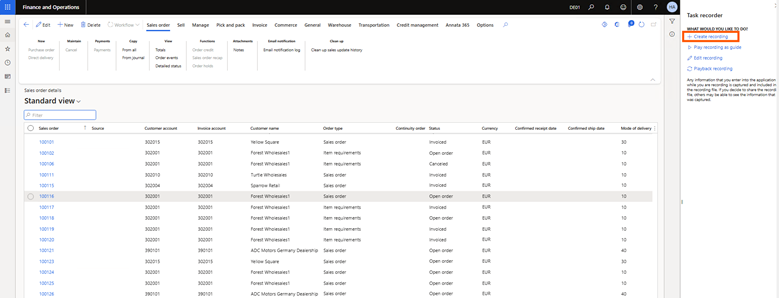
The “Task Recorder/Create recording” step comes at the very beginning of the RSAT (Regression Suite Automation Tool) configuration process. It is the first step because RSAT relies on Task Recorder recordings to generate test cases.
The Task Recorder in Dynamics 365 is a tool used to capture user interactions within the application, step by step. To create a recording, initiate the Task Recorder, perform the desired business process, and stop the recording once it is completed. These recordings can then be saved and uploaded to the BPM library, where they serve as the basis for generating automated test cases in the Microsoft regression suite automation tool.
Accelerate growth at an unprecedented pace
Discover how Confiz can help you take control of your daily operations, increasing growth and revenue.
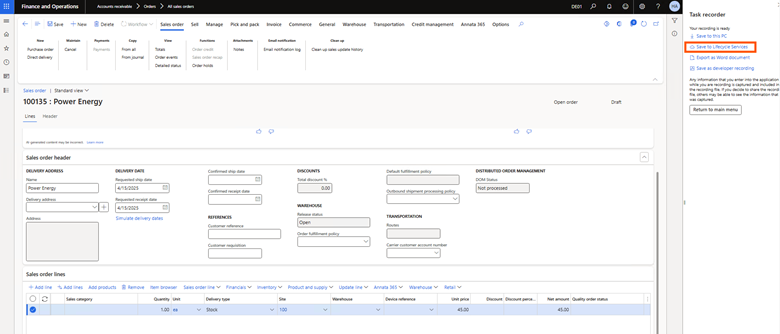
Once you’ve created a task recording, the next step is to integrate it into your testing and documentation workflows. This begins by saving the recording to Lifecycle Services (LCS), where it becomes accessible for test automation through the Regression Suite Automation Tool (RSAT).
Step 1: Save the task recording to Lifecycle Services (LCS)
After completing a task recording, it can be saved directly to Lifecycle Services (LCS) for use in test automation or process documentation. When saving to LCS, the recording is uploaded to the selected BPM library, where it becomes part of the structured business process hierarchy. This allows teams to maintain centralized access to process flows and supports automated test case generation through RSAT.
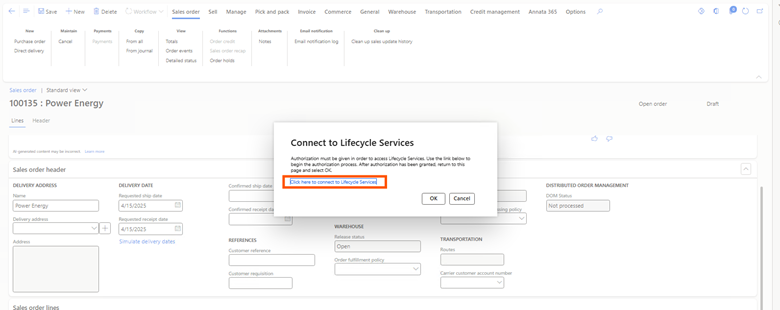
Step 2: Configure RSAT connection to LCS
To enable test automation and synchronization of BPM libraries, RSAT must be connected to Lifecycle Services (LCS). This connection is established within the RSAT configuration settings by providing the appropriate LCS project details and credentials. Once connected, RSAT can access BPM libraries, download test cases, and upload test execution results, creating a seamless flow between LCS and the testing framework.
Step 3: Create a test case in Azure DevOps (ADO)
To add a test case in Azure DevOps (ADO), navigate to the Test Plans section, where you can create a new test case by specifying the test steps, expected results, and necessary attachments. Once created, the test case can be linked to relevant work items or business processes. These test cases are essential for automating testing workflows and can be executed using RSAT once the connection between ADO and LCS is established.
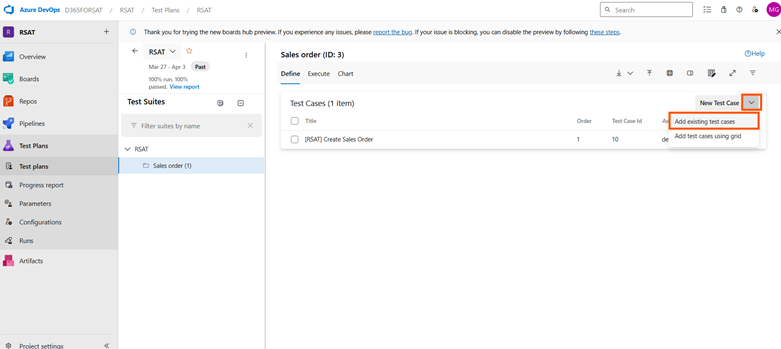
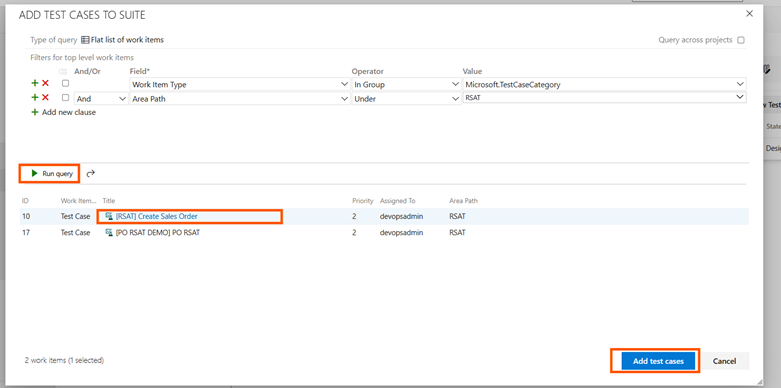
Step 4: Organize test cases into test suites
In Azure DevOps, test cases can be organized into test suites to streamline test management and execution. To add test cases to a suite, open the desired test suite and select the option to add existing test cases. This process allows for logical grouping of test cases based on project requirements, functional areas, or business processes. Adding test cases to a suite makes it easier to execute multiple tests as a group and track their results in a structured manner.
Step 5: Load test plan in Azure DevOps
Loading a test plan in Azure DevOps allows you to view and manage all the test cases associated with a specific testing initiative or release. To load a test plan, navigate to the “Test Plans” section and select the desired plan from the list. This will display the test cases, test suites, and any related configurations. Once loaded, you can organize, execute, and track the progress of the tests in alignment with your project timelines and goals.
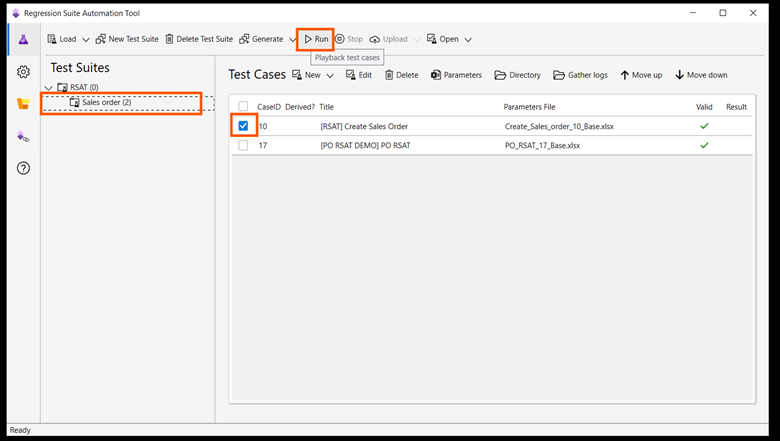
Step 6: Run automated test cases with RSAT
In the context of RSAT and Azure DevOps, the “RUN” action initiates the execution of the selected test cases or test suite. Once the test plan is loaded and the test cases are configured, clicking “Run” triggers the automation process, which executes the tests in the defined environment. Test results are then captured and reported back to Azure DevOps, where they can be reviewed for success, failure, or any issues that arise during execution.
Step 7: Parameterize test data and map to Excel
Customize your test cases by parameterizing inputs and mapping them to Excel files. This allows the same test to run with different data, covering more scenarios with fewer test scripts.
Step 8: Execute tests and capture results
Execute test cases using RSAT directly or via Azure DevOps pipelines. Monitor the execution, gather logs, and export results for review and validation.
Step 9: Analyze test results and debug failures
Once automated tests are executed, analyze the results in RSAT or Azure DevOps to assess their outcomes. If a test fails, use the available execution logs, task recording steps, and screenshots to identify the root cause and resolve issues efficiently.
Thorough result analysis is a critical part of effective RSAT configuration, ensuring that your testing process is reliable and actionable.
Best practices for RSAT configuration
To maximize the impact of your regression suite automation tool (RSAT) setup, follow these best practices:
Organize test plans based on business processes or functional areas
Version-control task recordings to maintain accuracy over time
Keep test data files updated and aligned with production scenarios
Integrate RSAT into your CI/CD pipeline for automated validation during deployments
Following these practices helps maintain a robust and scalable test automation framework.
Just as AI demands intentionality and responsibility, so does test automation. Organizations must treat the RSAT configuration not as a one-time effort, but as an ongoing commitment to quality, efficiency, and process integrity. From creating test plans to syncing environments and managing data-driven test cases, every step should align with your broader goals for digital transformation.
At Confiz, we help enterprises implement and scale RSAT solutions with clarity and control, ensuring your regression suite automation tool installation and configuration supports long-term agility and compliance.
Looking to elevate your testing strategy? Contact us at marketing@confiz.com to explore how we can help you automate intelligently, reduce risk, and accelerate business value with RSAT.
Muhammad Hannan Gohar is an experienced Dynamics 365 Technical Solution Architect with a strong track record in designing scalable, enterprise-grade...
New to implementation guide?
Start here to understand how it’s reshaping the future of intelligent systems.