
Lifecycle Services (LCS) is a comprehensive suite of tools provided by Microsoft to help manage the lifecycle of Dynamics 365 Finance and Operations applications. LCS offers a range of features that support the development, deployment, and maintenance of these applications. In this blog post, we will explore some of the key LCS tools and provide practical examples to illustrate their use.
Key tools in Lifecyle Services for Dynamics 365
1: Projects
Projects in Lifecycle Services (LCS) are essential for organizing and managing your Dynamics 365 implementation, upgrade, or maintenance activities. They allow you to create tasks, assign resources, and monitor progress in a structured way.
Usage
Projects are used to:
- Plan and Organize: Define the scope, milestones, and tasks for your project.
- Collaborate: Invite team members, assign roles, and track their progress.
- Monitor progress: Use dashboards and reports to keep an eye on project status and address any issues promptly.
Practical example of using projects
Let’s walk through a practical example of using projects for a new ERP implementation project for a retail client:
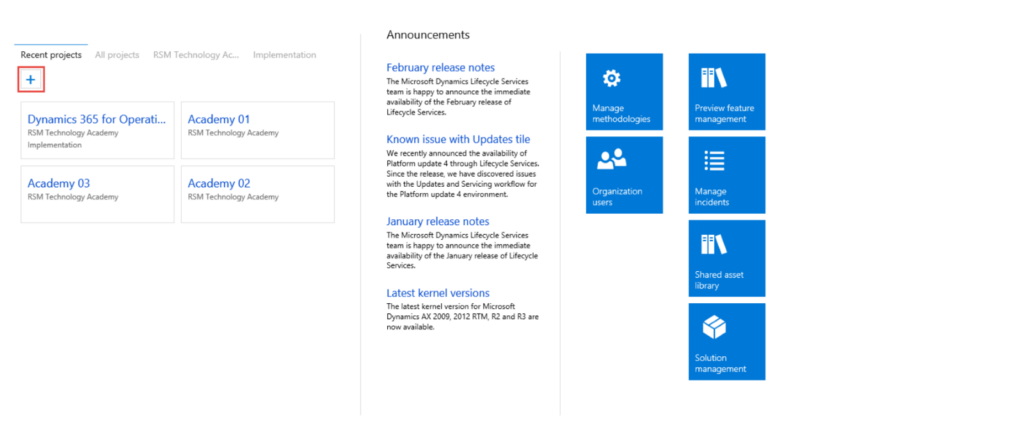
How to create a project?
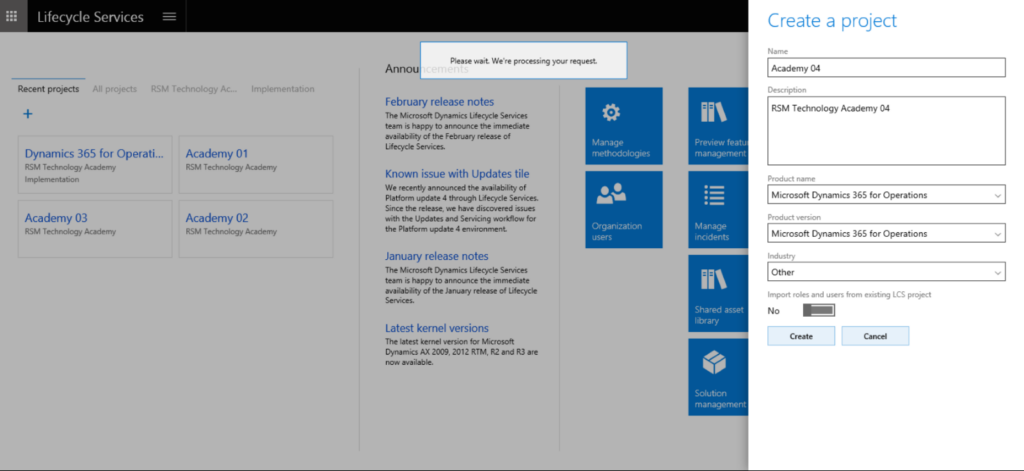
- Log in to LCS and click on “Create Project.”
- Name the project “Academy 04.”
- Provide a brief description of the project’s objectives.
- Select the appropriate industry (e.g., Retail).
Define scope and milestones
- Outline the project scope, including key deliverables and goals.
- Set milestones such as requirements gathering, system configuration, testing, and go-live.
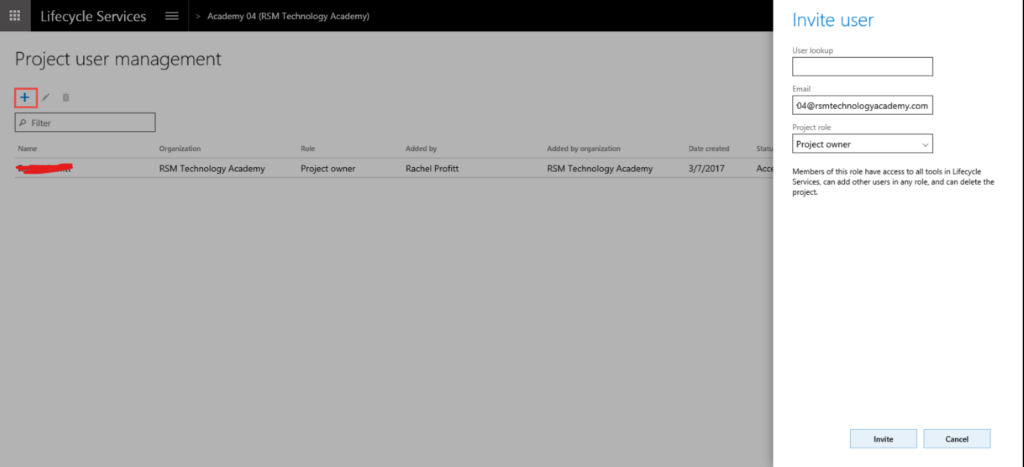
Invite team members
- Invite relevant team members to join the project.
- Assign roles and responsibilities to each team member.
Create tasks
- Break down the project into smaller tasks for each phase.
- Assign tasks to team members and set deadlines.
Monitor progress
- Use the project dashboard to track the progress of each task.
- Monitor any issues or risks that arise and take corrective actions as needed.
Benefits of using projects
- Improved organization: Helps in structuring the project and ensuring all tasks are accounted for.
- Enhanced collaboration: Facilitates teamwork by clearly defining roles and responsibilities.
- Better visibility: Provides a comprehensive view of project progress, helping to identify and address issues promptly.
2: Methodologies
Methodologies in Lifecycle Services (LCS) provide structured approaches to ensure repeatable and predictable implementation projects. They guide the project through various phases, from initial planning to post-go-live support.
Usage
Methodologies are used to:
- Structure projects: Define clear phases, tasks, and milestones.
- Track progress: Monitor and report on the progress of each phase.
- Ensure consistency: Follow best practices and standards to minimize risks and errors.
Practical example of using methodologies
Let’s walk through a practical example of using methodologies for a Dynamics 365 upgrade project:
Select a methodology
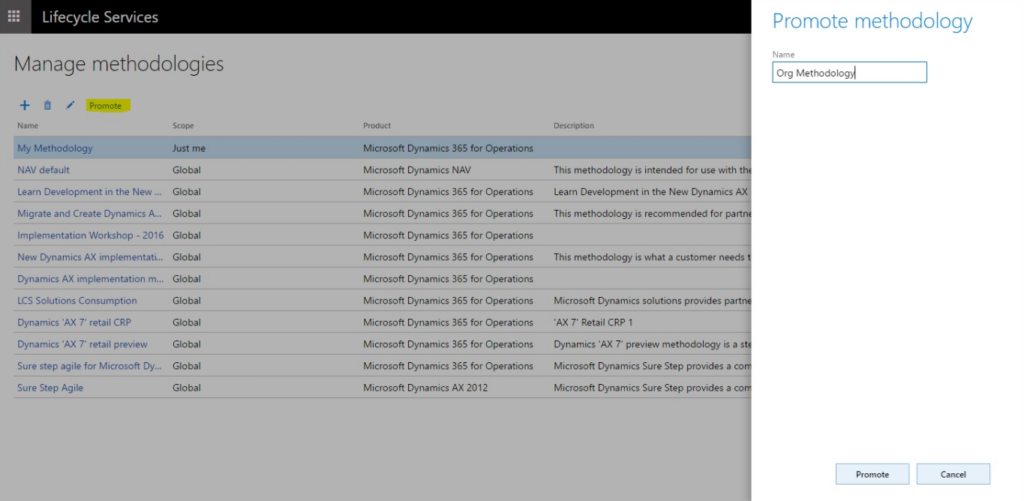
- Log in to LCS and navigate to the “Methodologies” section.
- Choose a predefined methodology like “Upgrade from Dynamics AX to Dynamics 365.”
- Review the methodology to understand the phases and tasks involved.
Customize the methodology
- Review the predefined tasks and phases in the selected methodology.
- Add or remove tasks based on your specific project requirements.
- Customize the methodology to fit the unique needs of your project.
Assign tasks
- Assign tasks to team members and set deadlines for each phase.
- Ensure that each team member understands their responsibilities.
- Use LCS to track task completion and monitor progress.
Guide the project
- Use the methodology to guide the project through planning, data migration, testing, and go-live.
- Monitor progress and ensure tasks are completed on time.
- Adjust the methodology as needed to address any changes or challenges.
Benefits of using methodologies
- Improved project management: Provides a clear roadmap for project execution, ensuring all tasks are completed systematically.
- Enhanced visibility: Allows for better tracking and reporting of project progress.
- Reduced risks: Minimizes the chances of missing important tasks or encountering unexpected issues.
3: Business Process Modeler
The Business Process Modeler (BPM) tool in Lifecycle Services (LCS) allows you to create, view, and modify standard process flows. It helps standardize processes, align them with industry standards, and identify gaps between user requirements and default functionality.
Usage
BPM is used to:
- Standardize processes: Ensure consistency and alignment with industry standards.
- Document processes: Create detailed documentation and training materials.
- Identify gaps: Compare modeled processes with default functionality to identify customization needs.
Practical example of using Business Process Modeler
Let’s walk through a practical example of using BPM to model and document the order-to-cash process for a retail client:
Create a new process model
- Log in to LCS and navigate to the Business Process Modeler tool.
- Click on “Create New Model” and name it “Retail Order-to-Cash Process.”
- Provide a brief description of the process and its objectives.
Define process steps
- Define each step of the order-to-cash process, such as order entry, credit check, invoicing, and payment collection.
- For each step, provide detailed descriptions and any necessary screenshots or attachments.
- Use the drag-and-drop interface to arrange the steps in the correct sequence.
Generate documentation:
- Once the process model is complete, generate documentation and training materials.
- Export the process model to a Word document for easy sharing and reference.
- Use these materials to ensure consistency and clarity for end-users.
Identify gaps
- Compare the modeled process with the default functionality in Dynamics 365.
- Identify any gaps or areas where customization may be needed.
- Document these gaps and plan for necessary customizations.
Benefits of using Business Process Modeler
- Improved process standardization: Ensures that business processes are consistent and aligned with best practices.
- Enhanced documentation: Provides detailed documentation and training materials for end-users.
- Gap analysis: Helps identify gaps between user requirements and system functionality, facilitating necessary customizations.
4: Cloud-hosted environments
Cloud-hosted environments in Lifecycle Services (LCS) allow you to deploy Dynamics 365 environments on Microsoft Azure. These environments can be used for various purposes, such as development, testing, and production. LCS provisions the necessary virtual machines (VMs) and configurations to support your specific needs.
Usage
Cloud-hosted environments are used to:
- Deploy development and test environments: Set up environments for development and testing purposes.
- Create demo environments: Provision environments to demonstrate Dynamics 365 capabilities to stakeholders.
- Deploy production environments: Set up live environments for day-to-day business operations.
Practical example of deploying a development environment
Let’s walk through a practical example of deploying a development environment using LCS:
Create a project
- Log in to LCS and navigate to the Projects section.
- Click on “Create Project” and fill in the necessary details, such as project name, description, and industry.
- Invite team members to the project and assign roles.
Add a new environment:
- Navigate to the Cloud-Hosted Environments tool in your project.
- Click on “Add Environment” and select the type (e.g., developer/test).
- Choose the appropriate configuration options, such as the size, region, and number of virtual machines.
- Click “Deploy” to provision the environment.
Configure the environment:
- Once the environment is provisioned, access it using the provided credentials.
- Install necessary development tools and software.
- Set up user accounts and permissions.
- Configure network settings and any required integrations.
Test and validate
- Test the environment to ensure it meets your project requirements.
- Make any necessary adjustments or configurations.
- Validate that the environment is functioning as expected.
Benefits of using cloud-hosted environments
- Scalability: Easily scale your environments up or down based on project needs.
- Flexibility: Deploy environments for various purposes, such as development, testing, and production.
- Cost-Effective: Pay only for the resources you use, optimizing costs for your organization.
5: Cloud-powered support
The Cloud-Powered Support tool in Lifecycle Services (LCS) helps manage support incidents by creating a virtual machine (VM) in Azure that mirrors your local environment. This allows you to reproduce and record incidents accurately, making it easier for the support team to investigate and resolve issues.
Usage
Cloud-Powered Support is used to:
- Reproduce issues: Create a VM with the same hotfixes and configurations as your local environment to replicate issues.
- Submit incidents: Record and submit detailed incident reports to Microsoft support.
- Collaborate with support: Work closely with the support team to resolve issues efficiently.