How to perform bank reconciliation in Dynamics 365 Finance using excel bank statement import?

May 21, 2025

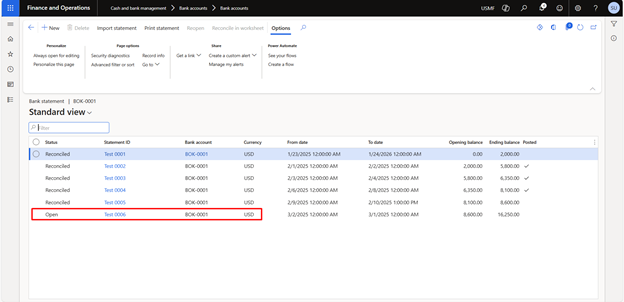
Advanced bank reconciliation setup in D365 Finance allows you to import electronic bank statements and automatically match them with bank transactions recorded in the system, streamlining the reconciliation process.

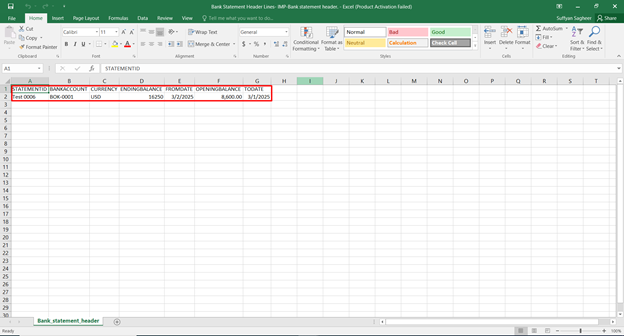
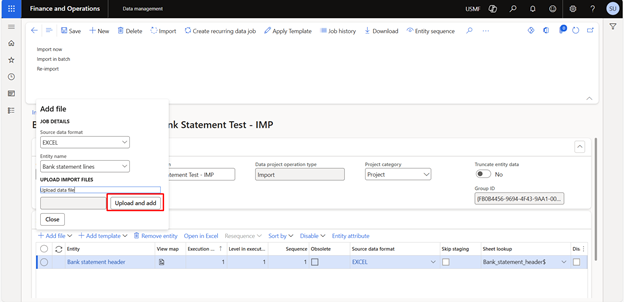
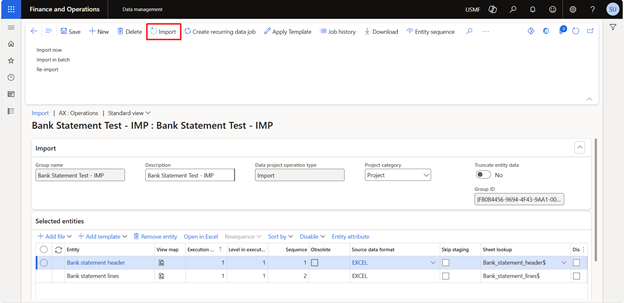
Microsoft Dynamics 365 Finance simplifies this task with its Data Management Framework, allowing seamless Excel-based bank statement imports. Traditionally, businesses relied on the MT940 format, but with recent advancements in the 10.0.40 version and onwards, Dynamics 365 supports Excel imports, offering greater flexibility and ease of use.

This article outlines the reconciliation process in Dynamics 365 Finance, highlighting best practices and the benefits of improving your banking operations.

What is bank reconciliation?

Bank reconciliation is the process of comparing and matching the transactions recorded in a company’s accounting records with the transactions shown on its bank statement. This helps ensure accuracy by identifying discrepancies, errors, or missing entries, and confirms that the cash balances are correct.

How to do bank reconciliation in Dynamics 365 Finance?

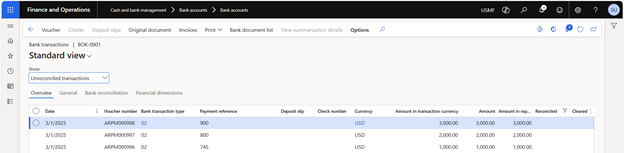
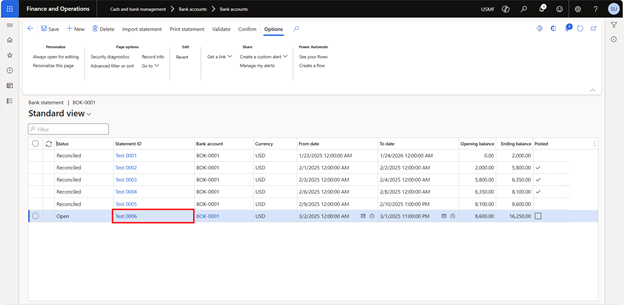
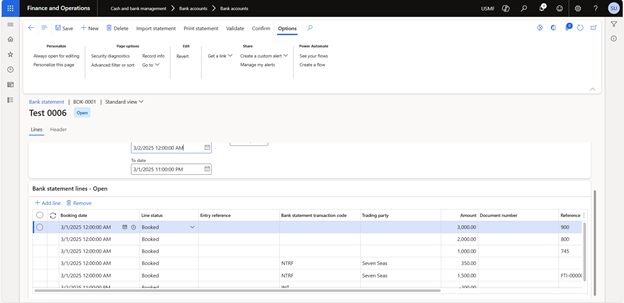
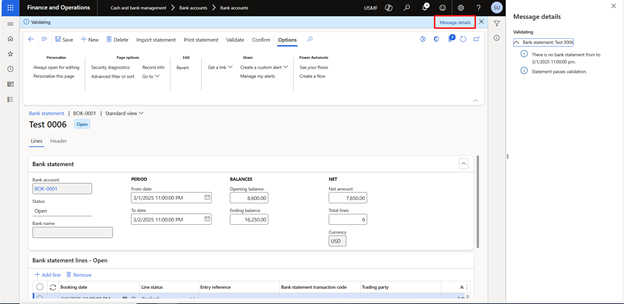
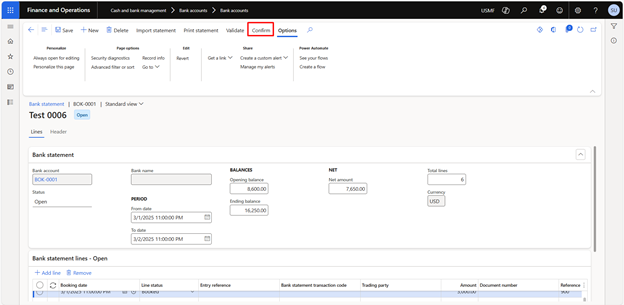
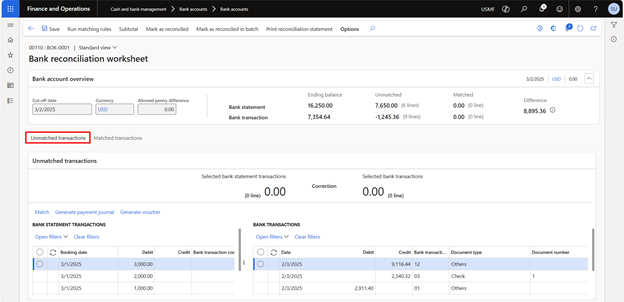
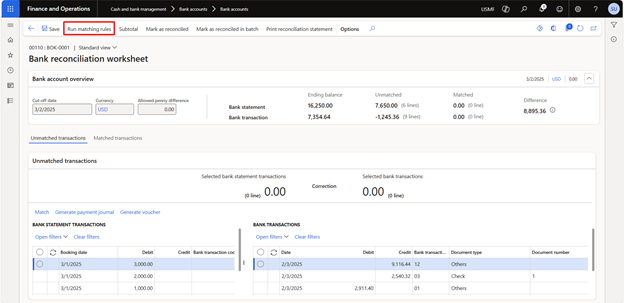
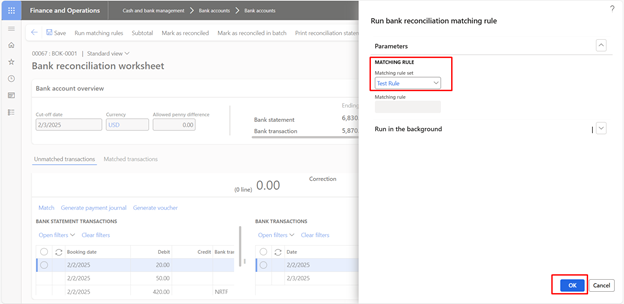
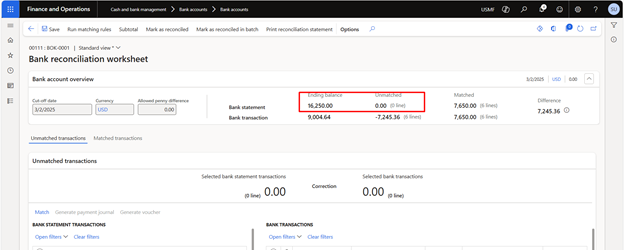
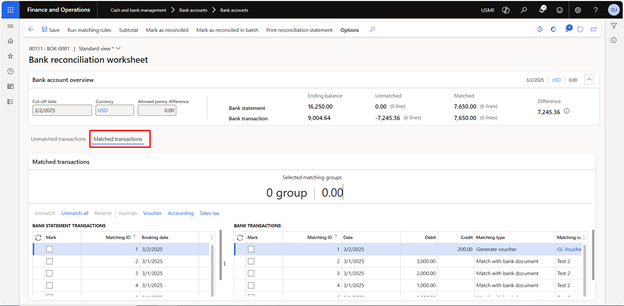
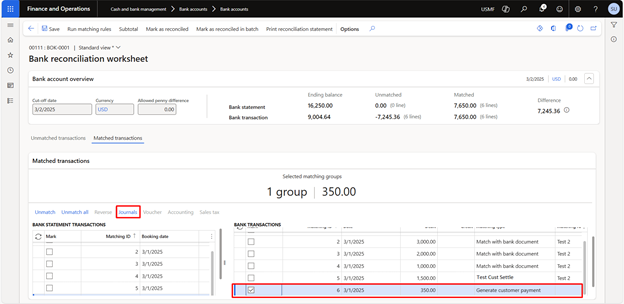
In Dynamics 365 Finance, bank reconciliation is done by importing electronic bank statements, either via file upload or direct integration. The system automatically matches bank transactions with ledger entries based on predefined rules. Users review and confirm unmatched transactions to complete the reconciliation process.

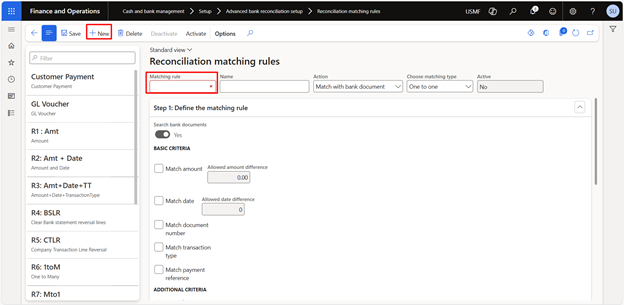
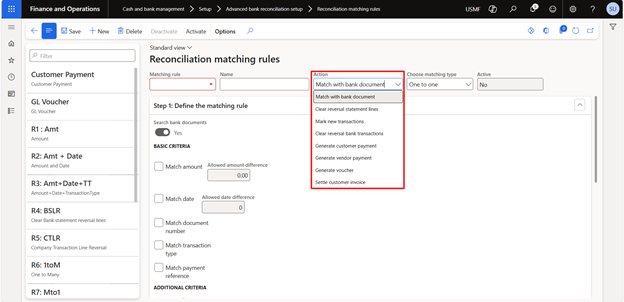
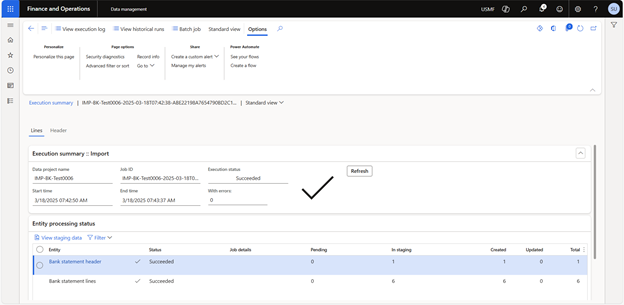
Setting up advanced bank reconciliation in Dynamics 365 Finance: A system walkthrough


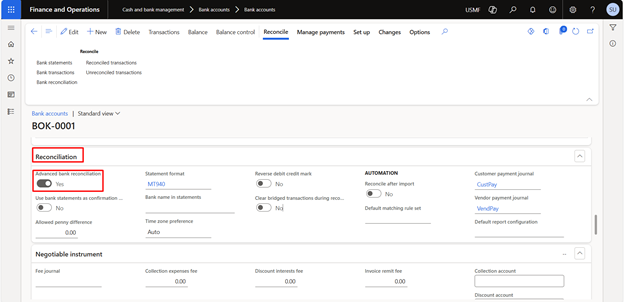
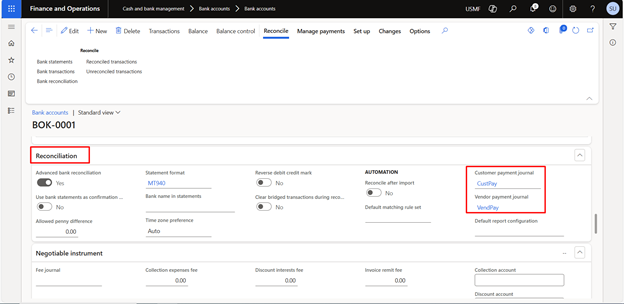
First, we must mark the advance bank reconciliation flag on the bank master form as “Yes.”


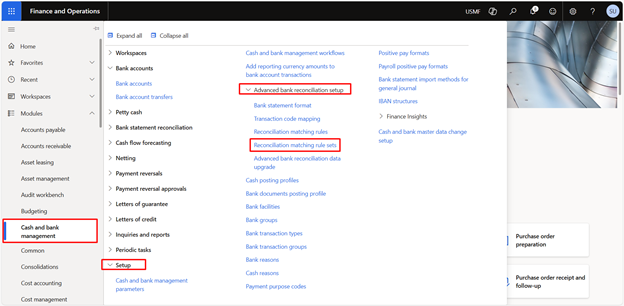
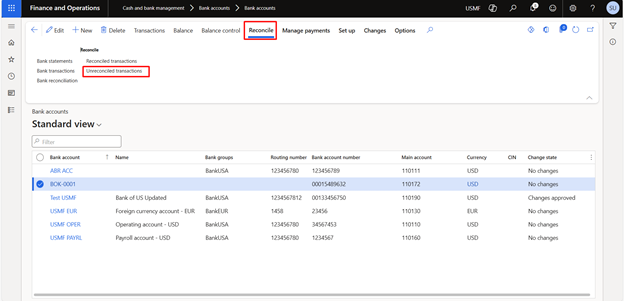
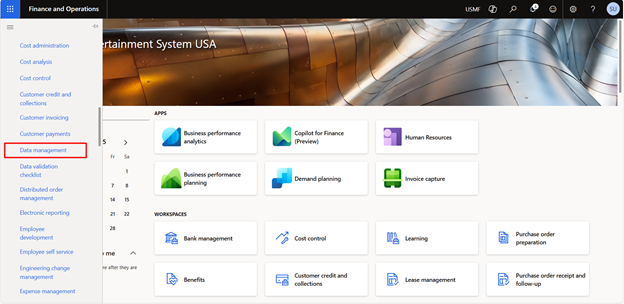
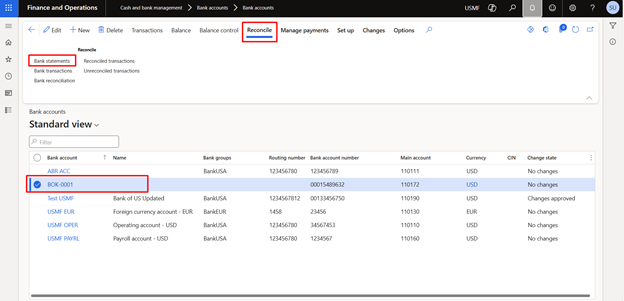
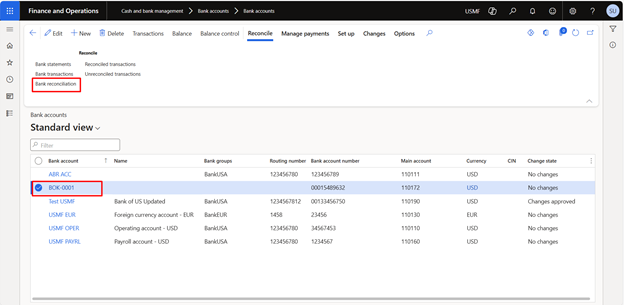
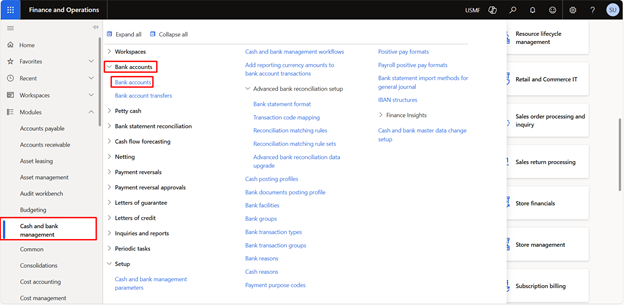
Navigate to Modules > Cash and Bank > Bank accounts.

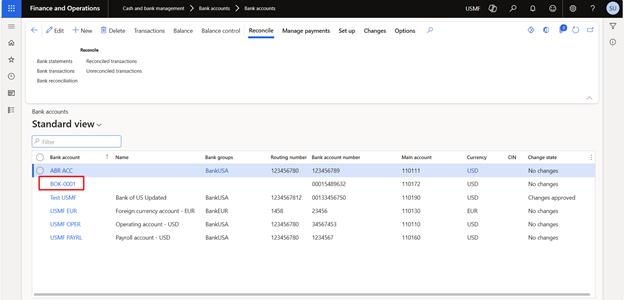
Select the relevant bank account.

Under the reconciliation tab, mark the advance bank reconciliation flag as “Yes.”

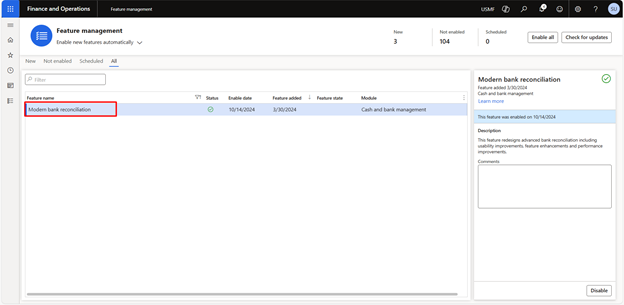
We have enabled the modern bank reconciliation feature from the feature management workspace. This feature is available in the 10.0.40 version.

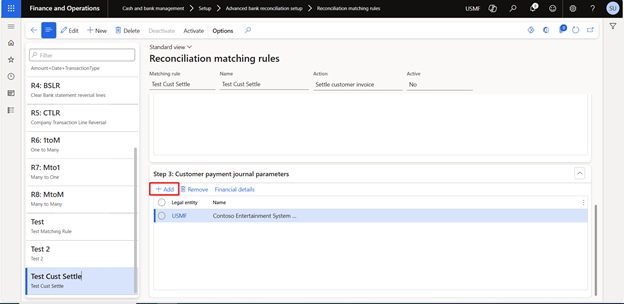
Similarly, add the customer payment journal and the vendor payment journal if there are payments that are required to be made/received on the bank master.

Note: We have enabled the Modern Bank Reconciliation feature from the Feature Management workspace. However, from version 10.0.40 onwards, Excel import can also be performed using Advanced Bank Reconciliation.

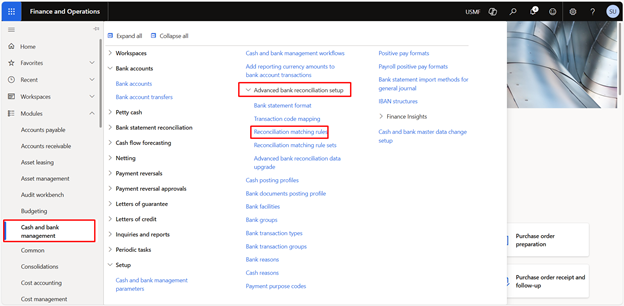
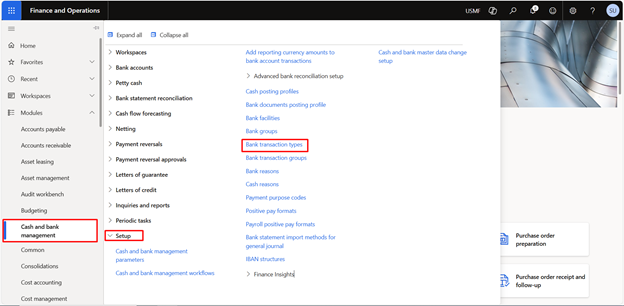
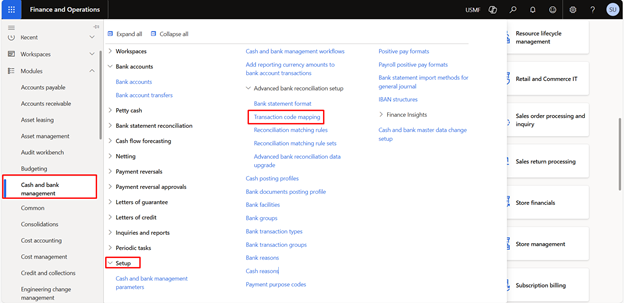
Now, we will set up the bank transaction types. For that, navigate to:


Modules > Cash and Bank Management > Setup > Types

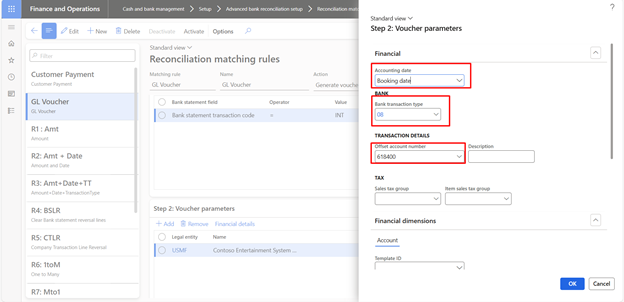
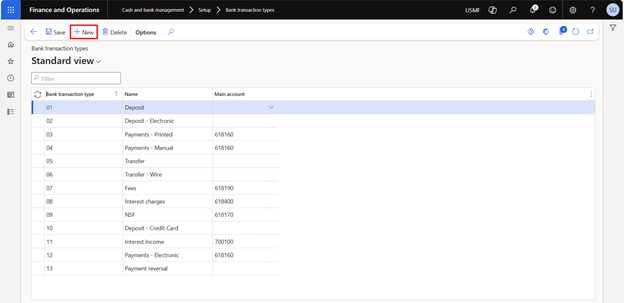
Click New and add the transaction type. Select the main account if any required:

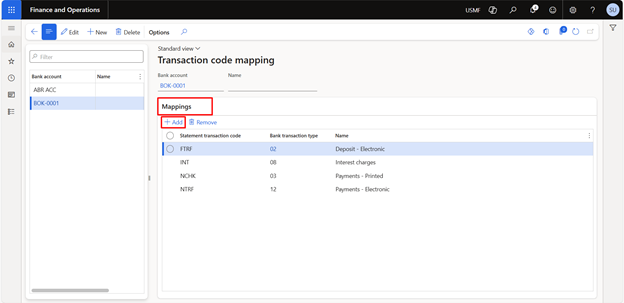
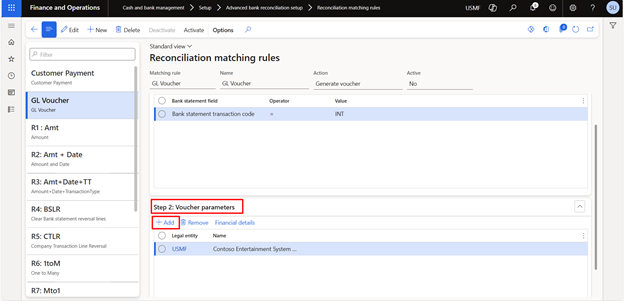
We can map the bank statement transaction code with the bank transaction type as well.


For that, navigate to:


Modules > Cash and Bank Management > Setup > Transaction code mapping

Click New, and in the dropdown, the system will only show the bank accounts on which the advanced bank reconciliation is marked as “Yes.”

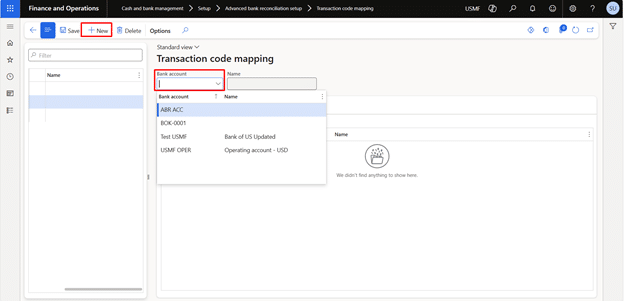
Select the relevant bank account, and under the mapping tab, add the details.

Setting up matching rules


Once the mapping is done, we need to set up the matching rules. The system will run the matching rules during reconciliation and reconcile the transactions accordingly.

Navigate to:


Module > Cash and Bank Management > Setup > Advance bank reconciliation > Reconciliation matching rules

Click on New and add the matching rules details.

In the action dropdown, select the relevant action for which the matching rule is being set up. With modern bank reconciliation, we can now record customer payments, clear reversal bank transactions, settle customer invoices, and generate vendor payments as well.

These above highlighted are the actions for which the matching rule is being set up. We can match the transaction with the bank statement based on the amount, date, reference number, etc.

Similarly, for instance, we have set up a matching rule for settling a customer invoice. If the customer’s payment is received against the invoice in the bank statement, the system will automatically post the payment journal against the invoice and settle that invoice.

Under the customer payment journal parameter, click on Add to add the details for the payment journal.

Once added, click on financial details.

We need to select the default method of payment, the default bank transaction type, and the accounting date there.

Similarly, there could be bank interest/charges that the bank deducts and shows in the bank statement, but have not been booked in the system. We can set up a matching rule so that at the time of reconciliation, the system automatically posts the general journal.


We need to select the action as “Generate Voucher” and provide the relevant details.

Under the voucher parameters, click on add and select the legal entity.

Click on the financial details and the relevant details.

Similarly, we can select the relevant action in the action dropdown and provide the criteria.

The “Choose Matching Type” dropdown displays options for how we want to perform the reconciliation of transactions.

  1. One to One (One Bank Statement line reconcile with One transaction in D365 Bank transaction)
  2. One to Many (One Bank Statement line reconciles with Many transactions in D365 Bank transaction)
  3. Many to One (Many Bank Statement lines reconcile with One transaction in D365 Bank transaction)
  4. Many to Many (Many Bank Statement lines reconcile with Many transactions in the D365 Bank transaction)

Matching rules sets


After the rules have been created, we can either use them for reconciliation or create a rule set that will run in a certain order (which we define in the rule set). If we create the rule set, then D365 will auto-evaluate the transactions on all matching rules (if a transaction isn’t reconciled by one rule, it will be evaluated against the next rule in the set).


To create a matching rule set, navigate to:


Modules > Cash and Bank Management > Setup > Advance bank reconciliation setup > Reconciliation matching rule sets

Click New and add the matching rules that have already been created.

After the matching rules are set up, we need to export the bank statement header and lines entity from D365 and edit them accordingly. But before that, we will see if there is any unreconciled transaction in the system.

Navigate to:


Module > Cash and Bank > Bank accounts

Select the relevant bank account, and under the reconcile fast tab, click on unreconciled transactions.

There, all the unreconciled transactions are shown.

Export the bank statement entity


We can export the bank statement entities from D365 in Excel.

Navigate to:

Workspaces > Data management

Click on Export.

Provide the group name and click on “Add entity.”

Select the entity name and the target data format, and click “Add Entity.”

Similarly, add the entity for the bank statement lines.

After adding the entities, click on “Export.”

After completing the export batch job, click on the download file.

After downloading the files, open them in Excel and add the details.


Now, we need to prepare the Excel File according to the required bank. First, we will prepare the Bank Statement Header. Below is the Template for importing the bank statement header.


· STATEMENTID ENDINGBALANCE
· BANKACCOUNT FROMDATE
· CURRENCY TODATE
· OPENINGBALANCE

Similarly, we also need to prepare the Bank Statement Lines. The template for the bank statement lines is:

However, not all the fields mentioned above are necessary for the Bank Statement lines. We can also keep some of them blank. You can see in the screenshot below that we have kept some of the fields blank.

In the above screenshot, the first two lines are for the unreconciled transactions already in the system. However, the remaining three include customer payment to settle customer invoices, interest expense charged by the bank, and customer payment.


After adding the details, we will import the bank statement into the system. For that, navigate to:
Workspaces > Data management

Click on “Import.”

Add the group name and click on “Add entity.”

Add the entities and upload the files.

Click on “Import” to import the bank statement into D365.

If the data in the bank statement header and lines is correct, the system will upload the bank statement.

Check the bank statement by navigating to:

Modules > Cash and Bank Management > Bank Accounts.

Select the relevant bank account, and under the Reconcile Fast tab, click on Bank Statement.

The bank statement will be available there.

Click on the statement ID to see the details of the lines imported into the system.

There, the details can be seen.

Click on Validate to validate the imported bank statement. If the validation is successful, the system will allow you to proceed.

Click on “Confirm” to confirm the bank statement.

Upon confirmation, the system will display the option to reconcile in the worksheet.

There, the unmatched transactions will be shown.

Click on run matching rules to run the defined matching rules.

Select the matching rule set and click “OK.”

The system will run the matching rules and mark the transactions as “Matched.”

Click on matched transactions to view the details.

Mark the transaction and click on the journal to see the journal posted by the system.

Similarly, we can navigate to the customer transactions to see the posted transactions. The invoice settled against the payment journal can also be seen from the customer transactions.

Navigate to:

Modules > Accounts Receivable > Customers > All customers

Select the relevant customer and click on transactions.

All the transactions will be displayed there.


Select the invoice and click on View Settlement.


The settlement details will be displayed there.


The bank reconciliation can be viewed within the bank account.

To access it, navigate to:

Modules > Cash and Bank Management > Bank Accounts

Select the appropriate bank account, navigate to the Reconcile Fast tab, and click on Reconciled Transactions.

The reconciled bank transactions are displayed from the bank master as well.

This functionality can also be extended to vendor payments by configuring matching rules, enabling automated reconciliation, and optimizing financial processes.

Conclusion

Importing bank statements through Excel in Microsoft Dynamics 365 Finance marks a significant step toward financial automation. This feature offers greater flexibility and simplifies the reconciliation process. It enables finance teams to import and process bank statements more efficiently, reducing manual effort and improving the accuracy of financial records. By leveraging this capability, organizations can streamline reconciliation workflows, minimize errors, and strengthen overall financial management.

If you’re looking to enable this feature or need support optimizing your Dynamics 365 Finance environment, feel free to contact us at marketing@confiz.com. Our experts are here to help.