
Every business using Dynamics 365 Finance and Operations often needs customizations to meet their specialized needs that are not fully addressed by its out-of-the-box features. This is where the workflow engine in Dynamics 365 Finance and Operations comes into play. It allows you to define rules, set conditions, and trigger actions based on specific events or data changes.
Workflows enhance efficiency, reduce manual intervention, and perform complex business tasks with precision. In this blog, we will explore workflows in Dynamics 365 Finance and Operations and provide a step-by-step guide on how to create custom workflows.
What is a workflow in Dynamics 365 Finance and Operations?
A workflow in Dynamics 365 can be defined both as a system and a business process. As a system, the workflow runs on the Application Object Server (AOS), offering the capability to create individual workflows or automate business processes. As a business process, a workflow defines how a document moves through the system, detailing who must complete a task, perform an action, make a decision, or approve a document.
Workflows can involve various tasks such as approvals, notifications, data updates, and more, ensuring that business processes are carried out consistently and efficiently.
Creating custom workflows in Dynamics 365 Finance and Operations
A custom workflow allows you to incorporate complex processing steps into your configurable workflows. By using out-of-the-box components and customizing them with .NET, you can perform intricate business operations tailored to your specific needs.
We often create custom workflows for our own or pre-existing tables where Microsoft hasn’t provided default workflows, like Inventory to Fixed Asset Journal or Item Movement Journal in Microsoft Dynamics 365 Finance and Operations.
How to create a custom workflow in Dynamics 365 Finance and Operations?
Let’s consider a custom workflow example in Dynamics 365. Imagine you are building a form to input details about social events for an organization’s employees. The organizing team needs approval from a senior manager for these events, thus requiring a workflow linked to this form. To create this workflow, we will use the Inventory to Fixed Asset Journal form. Now let’s consider the steps for creating a custom workflow in Dynamics 365 Finance and Operations for this scenario.
Note: Before proceeding with this Microsoft Dynamics 365 Finance and Operations workflow tutorial, ensure your MS Dynamics 365 Unified Operations Batch service is operational.

If the service is not running, follow these steps to start it:
To start the Microsoft Dynamics 365 Unified Operations Batch Service, follow these steps:
Start menu > type ‘Services’ > run Services (App) > find ‘Microsoft Dynamics 365 Unified Operations Batch Service’ > Properties > click on ‘Start.’
This article will guide you through each step of creating a custom workflow. We’ll create the following necessary elements in the Visual Studio project for this purpose:
1) Base Enum
2) Query
3) Workflow type
4) Workflow category
5) Workflow approval
After creating a workflow type and workflow approval, the corresponding Workflow classes and action menu item button will be automatically generated. Now let’s look into the next steps in detail.
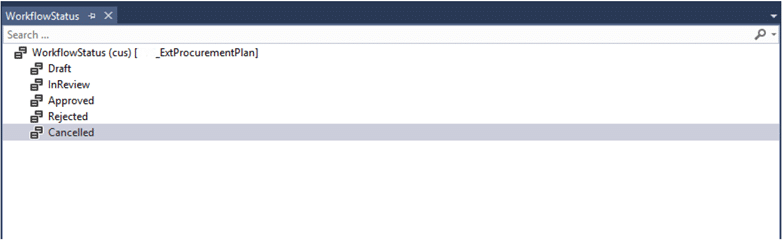
Step 1: Create a new base Enum and add elements as shown below. This base Enum will be used to maintain the status of the workflow.
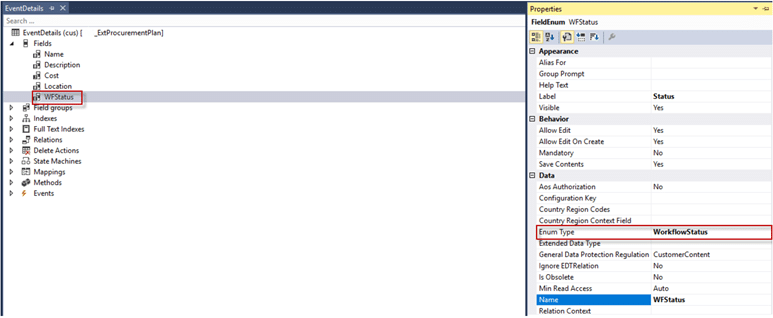
Step 2: Create a field in your table and give Enum name in the field properties. We will have to create this field on OOTB, too.
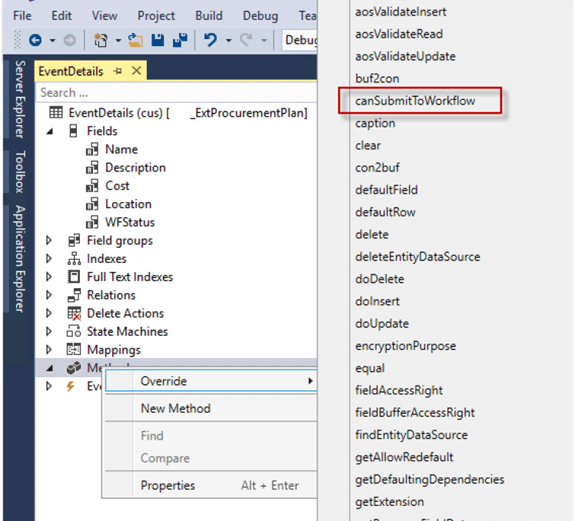
Step 3: Override CanSubmitToWorkflow() method on this table and write the following code.
In this method, we will define the conditions under which a user is allowed to submit a workflow. For example, we will enable the workflow submission when there is at least one record in the table and the workflow status is set to Draft.
public boolean canSubmitToWorkflow(str _workflowType = ”)
{
boolean ret = false;
if(this.RecId != 0 && this.WFStatus == WorkflowStatus::Draft)
{
ret = true;
}
return ret;
}
Step 4: In this table, create a new method named UpdateWorkflowState() and write the following code.
With this method, you will update the status of the workflow. This method will be called in workflow classes. The current status will be passed on to this method.
public static void UpdateWorkflowState(RefRecId _recId, WorkflowStatus _state)
{
EventDetails eventDetails;
;
select firstonly forupdate eventDetails
where eventDetails.RecId == _recId;
if (eventDetails !=null)
{
ttsBegin;
eventDetails.WFStatus = _state;
eventDetails.update();
ttsCommit;
}
}
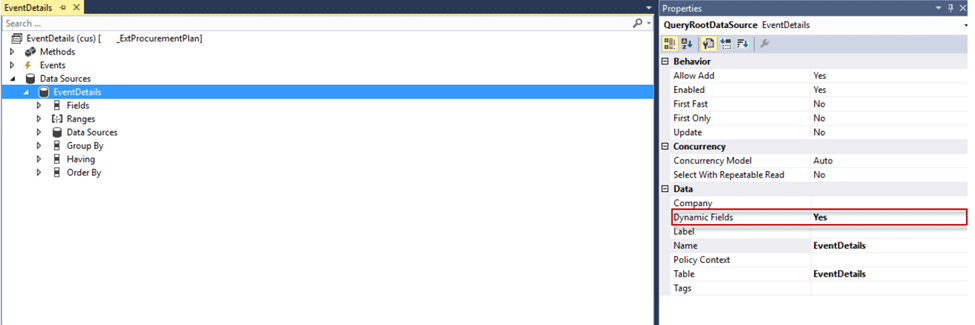
Step 5: Create an AOT query for your table. Set the “Dynamic fields” property to YES.
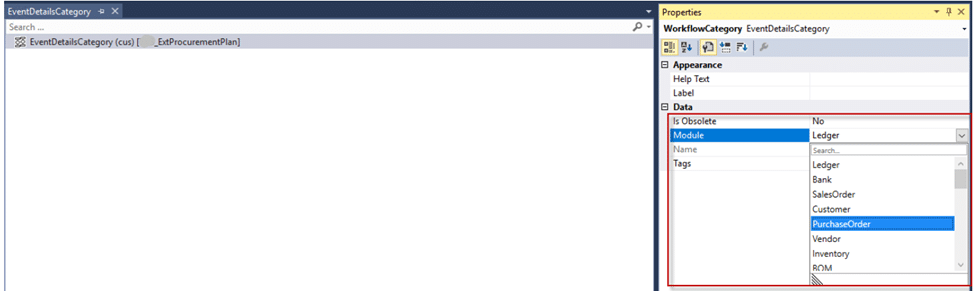
Step 6: Create a workflow category and give module for which you are creating the workflow.
In this case, your form is under the procurement and sourcing module, so you’ll select “Purchase.”
Step 7: Create workflow type and set required values as shown below.
Here, the Document menu item will be the Display menu item, which opens your form. Select the query and category you just created.
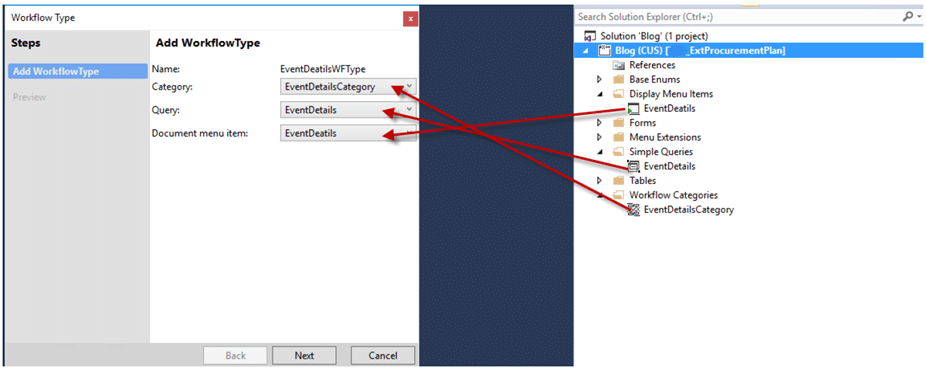
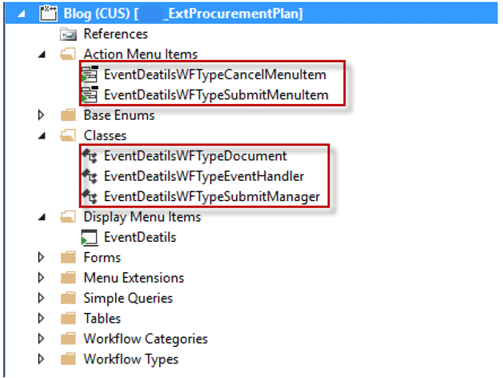
This will generate the following elements in your project. Their usage will be explained later on.
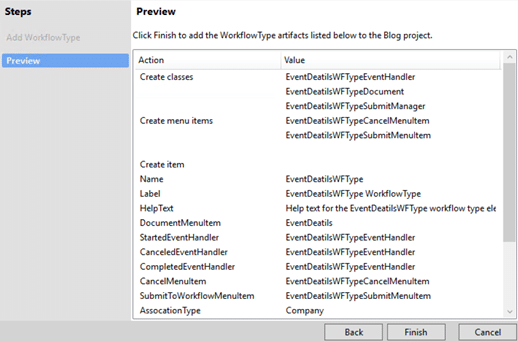
After finishing, you will see
Step 8: Create workflow approval and set the required values as shown below.
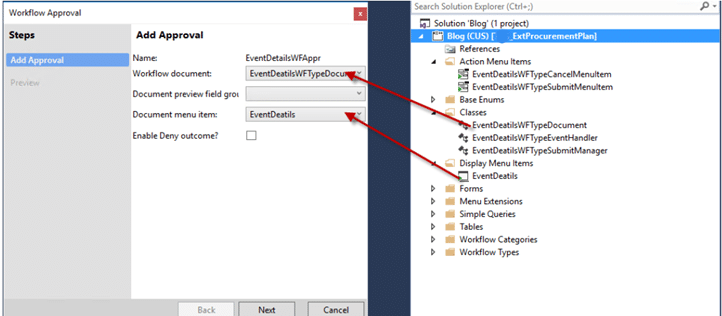
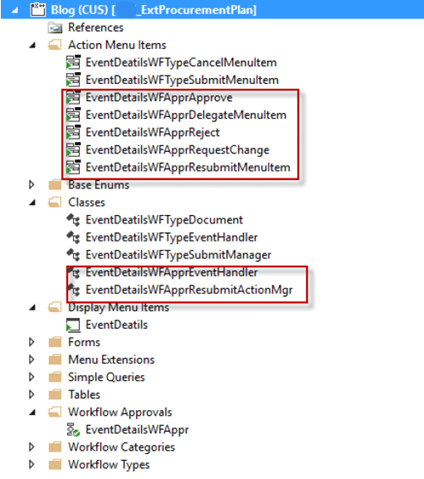
This will create the following elements in your project. The usage of these elements will be explained later.
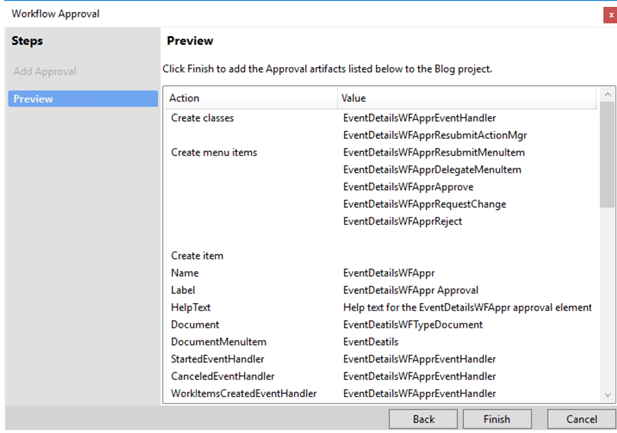
After clicking the Finish button, you will see these elements in your VS project.
Step 9: Copy and paste the following code into the EventDeatilsWFTypeSubmitManager class. This class controls actions after the user submits the workflow.
WorkflowSubmitDialog workFlowSubmitDialog;
Common workflowConfiguration;
RefRecId recordRecId;
WorkflowCorrelationId workFlowCorrelationId;
WorkflowTypeName workFlowTypeName;
WorkflowComment note;
WorkflowVersionTable workflowVersionTable;
WorkflowWorkItemTable workflowWorkItemTable;
FormDataSource callerDS;
FormRun callerForm;
Common callerRecord;
Args args;
boolean isSubmit;
public static void main(Args args)
{
EventDeatilsWFTypeSubmitManager submitManager = new EventDeatilsWFTypeSubmitManager();
submitManager.run(args);
}
/// /// Process workflow ///
/// Args
public void run(Args _args)
{
// Initializing params from caller argument object
this.init(_args);
//Bydefault canSubmit returns true always, you can add validations here if any
if (this.canSubmit())
{
// Activate workflow i,e submit document for processing
if (isSubmit)
{
this.submit();
}
else
{
this.reSubmit( _args );
}
}
}
private void reSubmit(Args _args)
{
WorkflowWorkItemActionManager workflowWorkItemActionManager = new WorkflowWorkItemActionManager();
// Initiating the Re-Submit process.
workflowWorkItemActionManager.parmArgs(_args);
workflowWorkItemActionManager.parmCaller(_args.caller());
workflowWorkItemActionManager.run();
if (workflowWorkItemActionManager.parmIsActionDialogClosedOK())
{
this.refreshCallerWorkflowControls();
}
}
private void refreshCallerWorkflowControls()
{
if (callerDS)
{
ttsBegin;
this.updateWorkflowState();
ttsCommit;
callerDS.reread();
callerDS.refresh();
}
//Refresh/update workflow controls on called form
callerForm.updateWorkflowControls();
}
private void updateWorkflowState()
{
//Add case for each caller table and update workflow state accordingly
switch (callerRecord.TableId)
{
case tableNum(EventDetails):
EventDetails::UpdateWorkflowState(callerRecord.RecId, WorkflowStatus::InReview);
break;
}
}
private void init(Args _args)
{
callerForm = _args.caller();
callerRecord = _args.record();
callerDS = FormDataUtil::getFormDataSource(callerRecord);
recordRecId = callerRecord.RecId;
workflowVersionTable = callerForm.getActiveWorkflowConfiguration();
WorkflowWorkItemTable = callerForm.getActiveWorkflowWorkItem();
// Construct dialog to prompt user to enter submit comments/note
workFlowSubmitDialog = WorkflowSubmitDialog::construct(workflowVersionTable);
isSubmit = this.isCalledFromSubmitMenuItem(_args.menuItemName());
}
private boolean isCalledFromSubmitMenuItem(str _menuItemName)
{
str name = _menuItemName;
//write the name of your WorkflowTypeSubmitMenuItem in line below
if (Name == ‘EventDeatilsWFTypeSubmitMenuItem’)
{
return true;
}
else
{
return false;
}
}
private boolean canSubmit()
{
boolean ret = true;
return ret;
}
private void submit()
{
workFlowSubmitDialog = WorkflowSubmitDialog::construct(workflowVersionTable);
workFlowSubmitDialog.run();
note = workFlowSubmitDialog.parmWorkflowComment();
if ( workFlowSubmitDialog.parmIsClosedOK() )
{
try
{
ttsBegin;
workFlowCorrelationId = Workflow::activateFromWorkflowConfigurationId(workflowVersionTable.ConfigurationId, recordRecId, note, false);
ttsCommit;
this.refreshCallerWorkflowControls();
}
catch(Exception::Error)
{
throw error (“@SYS303438”);
}
}
}
public static EventDeatilsWFTypeSubmitManager constructWith(RefRecId _recId)
{
EventDeatilsWFTypeSubmitManager submitManager = new EventDeatilsWFTypeSubmitManager();
submitManager.parmRecordRecId(_recId);
return submitManager;
}
public RefRecId parmRecordRecId(RefRecId _recordRecId = recordRecId)
{
recordRecId = _recordRecId;
return recordRecId;
}
Note: We have handled the resubmission scenario in this same class, so we can remove the EventDetailsWFApprResubmitActionMgr class from our project.
Step 10: Copy and paste the following code in EventDetailsWFApprEventHandlerclass. This class controls actions after the user submits the workflow.
public void started(WorkflowElementEventArgs _workflowElementEventArgs)
{
EventDetails::UpdateWorkflowState(_workflowElementEventArgs.parmWorkflowContext().parmRecId(), WorkflowStatus::InReview);
}
public void canceled(WorkflowElementEventArgs _workflowElementEventArgs)
{
EventDetails::UpdateWorkflowState(_workflowElementEventArgs.parmWorkflowContext().parmRecId(), WorkflowStatus::Cancelled);
}
public void completed(WorkflowElementEventArgs _workflowElementEventArgs)
{
EventDetails::UpdateWorkflowState(_workflowElementEventArgs.parmWorkflowContext().parmRecId(), WorkflowStatus::Approved);
}
public void returned(WorkflowElementEventArgs _workflowElementEventArgs)
{
EventDetails::UpdateWorkflowState(_workflowElementEventArgs.parmWorkflowContext().parmRecId(), WorkflowStatus::Rejected);
}
Step 11: Copy and paste the following code in EventDeatilsWFTypeEventHandler. This class controls actions after the user submits the workflow.
public void started(WorkflowEventArgs _workflowEventArgs)
{
EventDetails::UpdateWorkflowState(_workflowEventArgs.parmWorkflowContext().parmRecId(), WorkflowStatus::InReview);
}
public void canceled(WorkflowEventArgs _workflowEventArgs)
{
EventDetails::UpdateWorkflowState(_workflowEventArgs.parmWorkflowContext().parmRecId(), WorkflowStatus::InReview);
}
public void completed(WorkflowEventArgs _workflowEventArgs)
{
EventDetails::UpdateWorkflowState(_workflowEventArgs.parmWorkflowContext().parmRecId(), WorkflowStatus::Approved);
}
public void denied(WorkflowElementEventArgs _workflowElementEventArgs)
{
// TODO: Write code to execute once the workflow is denied.
}
public void changeRequested(WorkflowElementEventArgs _workflowElementEventArgs)
{
// TODO: Write code to execute once change is requested for the workflow.
}
public void created(WorkflowWorkItemsEventArgs _workflowWorkItemsEventArgs)
{
// TODO: Write code to execute once work items are created.
}
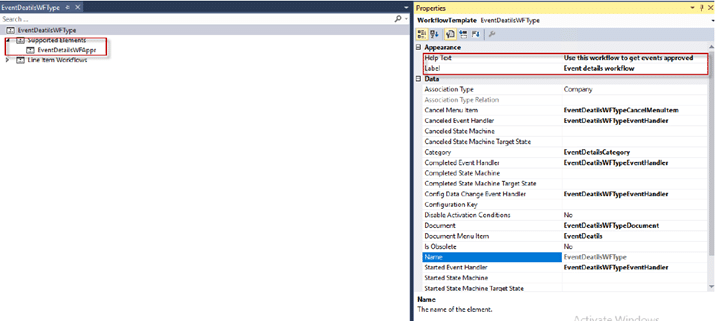
Step 12: Drag workflow approval to workflow type supported elements.
Step 13: Change the labels of each action menu item button.
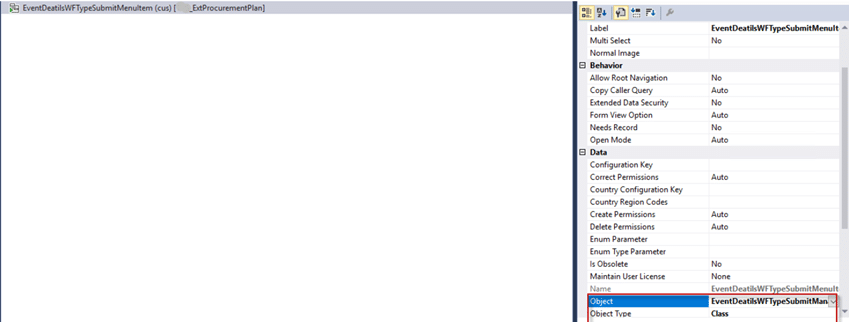
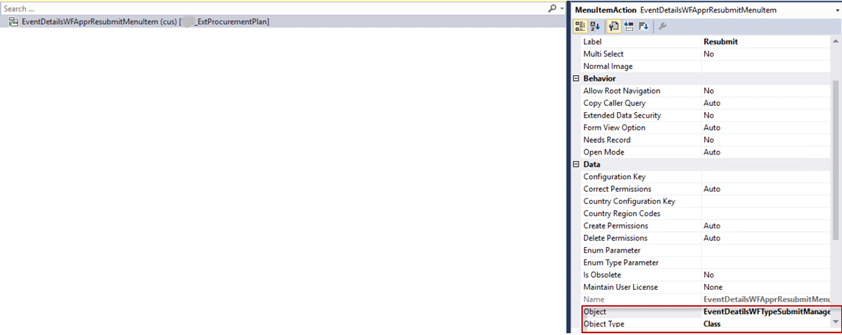
Step 14: Give EventDeatilsWFTypeSubmitManager in the object property of EventDetailsWFApprResubmitMenuItem and EventDeatilsWFTypeSubmitMenuItem action menu item button.
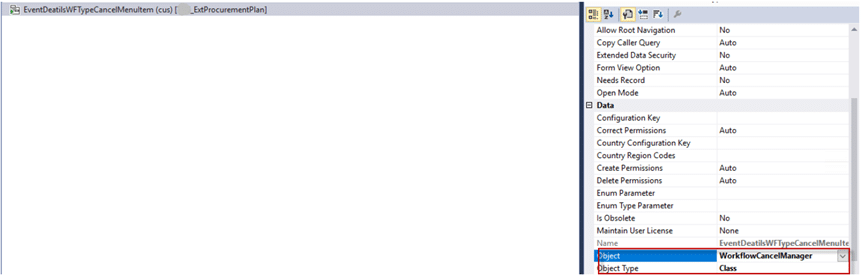
Give WorkflowCancelManager in the object property of EventDeatilsWFTypeCancelMenuItem.
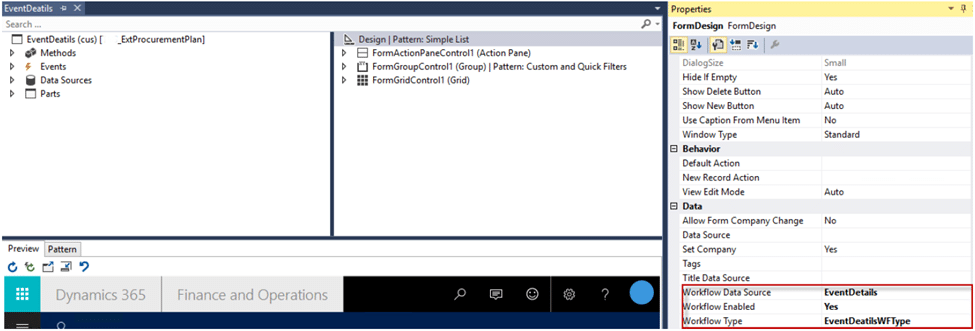
Step 15: Change the following properties on your form.
Step 16: After you build your project, you will see your Workflow type in the Procurement and Sourcing workflows form.
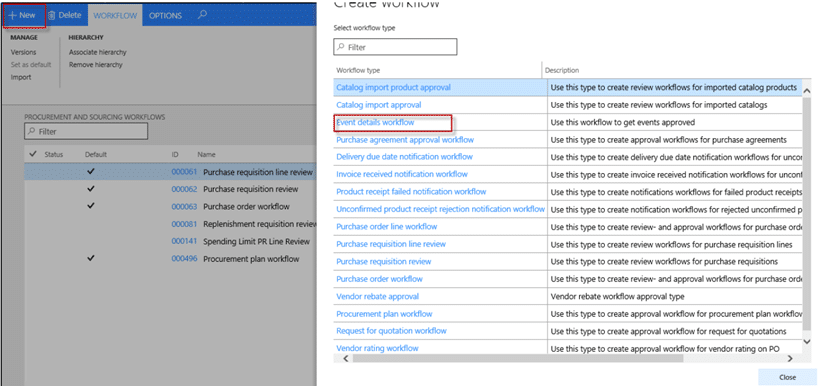
Clicking this workflow type will open a workflow configuration window. After this, your workflow will be added to the list.

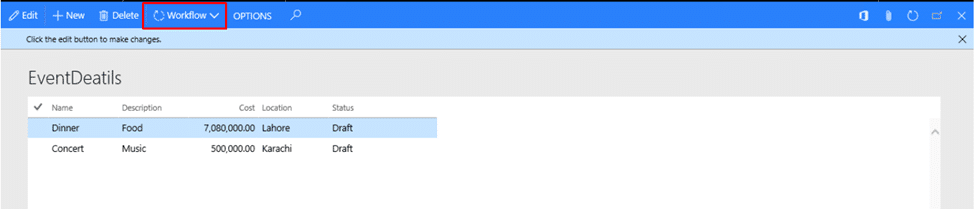
Now, go to your form, and you will see the workflow button.
Create a custom workflow for the OOTB table:
It is a best practice to avoid over-layering the OOTB (Out-of-the-Box) code provided by Microsoft. Hence, the extension programming concept is recommended for customizing Dynamics 365.
/// /// Can submit to workflow ///
///
[PostHandlerFor(classStr(FormDataUtil), staticMethodStr(FormDataUtil, canSubmitToWorkflow))]
public static void FormDataUtil_Post_canSubmitToWorkflow(XppPrePostArgs args)
{
Common record = args.getArg(identifierStr(_record));
HcmGoal hcmGoal = record as HcmGoal;
boolean ret = args.getReturnValue();
if (record.TableId == tableNum(HcmGoal))
{
if (hcmGoal.RecId != 0 && hcmGoal.HRHcmGoalWFStatus == HRHcmGoalWFStatus::Draft)
{
ret = boolean::true;
}
else
{
ret = boolean::false;
}
}
args.setReturnValue(ret);
}
For Step 16, we can change the properties of from without over-layering.
Just copy the onInitialized event of the form data source in a class. For the present scenario, we will copy the onInitialized of InventJournalTable. You can change the properties of that form as shown below:
[FormDataSourceEventHandler(formDataSourceStr(InventJournalMovement, InventJournalTable), FormDataSourceEventType::Initialized)]
public static void InventJournalTable_OnInitialized (FormDataSource sender, FormDataSourceEventArgs e)
{
sender.formRun().design().workflowEnabled(true); sender.formRun().design().workflowDatasource(formDataSourceStr(InventJournalMovement, InventJournalTable));
sender.formRun().design().workflowType(workflowTypeStr(MovJournalWFType));
}
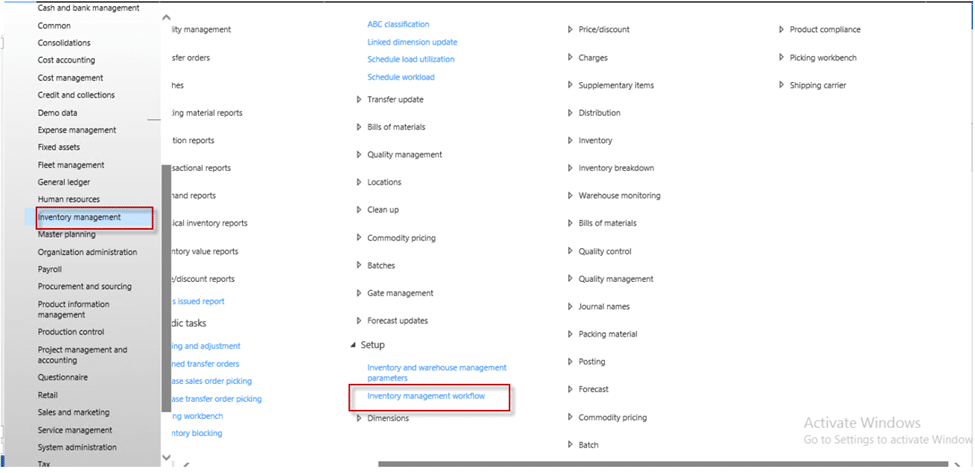
In this example, we do not have a workflow form in the Inventory management module.
For this:
1) Create a Display menu item button and drag-drop it under the menu of the inventory management module.
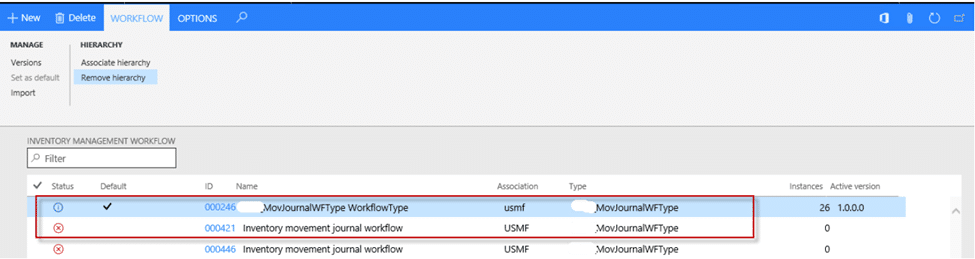
2) Set object type to Form and give in WorkflowTableListPageRnr object property. You will see the workflow types you created for this module in this form. It is demonstrated in the image below.
Summing up
The process of creating Microsoft Dynamics 365 Finance and Operations workflows is almost similar to that of Microsoft Dynamics AX 2012.
Consider a workflow to be a business process. However, creating a custom workflow in Dynamics 365 requires a deep understanding of the process and its technicalities. The best way to start with custom workflows in Dynamics 365 Finance and Operations is to plan them properly. Working with an experienced Microsoft Solutions partner can help you activate workflows without errors.
At Confiz, our certified Dynamics 365 ERP functional consultants can help you set up the best workflows for your business processes. If you have any questions, reach out to us at marketing@confiz.com.