Configuring Dynamics 365 Finance & Operations pricing often becomes challenging when multiple customer types, product attributes, and sales channels are involved. Without a clear structure, businesses risk inconsistent pricing, duplicated efforts, and errors in applying discounts or trade agreements.
Unified Pricing Management (UPM) in Dynamics 365 offers a streamlined approach to setting up these rules. By using attributes, price component codes, and price trees, organizations can automate pricing decisions, maintain consistency, and respond quickly to market changes.
In this blog, we’ll walk you through the configuration of D365 Unified Pricing Management, covering how to set up attributes, define price attribute groups, configure price component codes, and arrange price trees to ensure accurate, real-time pricing.
Step 1: Enable the Unified pricing management module
If you have a D365FO application version 10.0.43 or higher, you can enable UPM by opening the application by following the steps shown below.
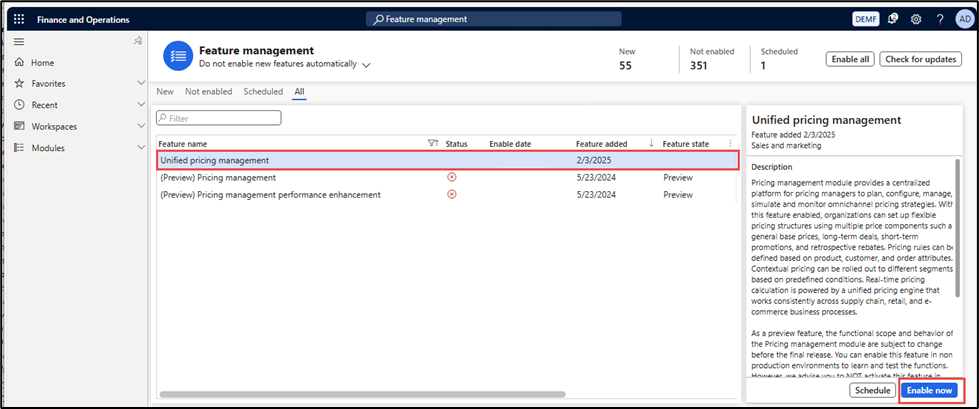
Navigate to System administrator > Workspaces > Feature management. The feature management workspace will open as follows. Click the All tab and look for the “Unified pricing management” feature, which will be selected, as shown in the screenshot below.
Click the Enable now button, and the price management feature status will be enabled.
After the unified pricing management module is enabled, do a full-page refresh, and you will see the Pricing management module as shown in the screenshot below.
Step 2: Parameter setup for Unified Pricing Management
The next step is to set up UPM parameters as follows:
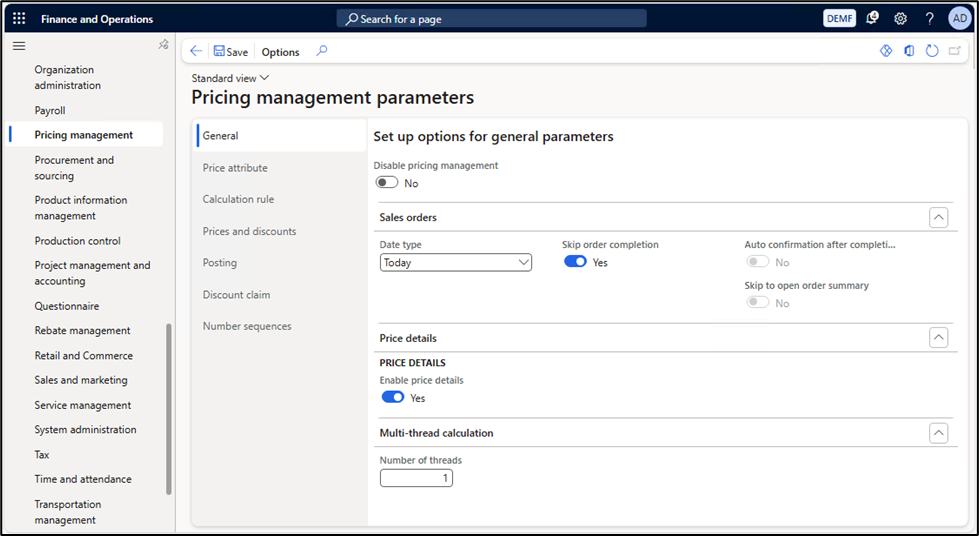
Open the D365FO application and navigate to Pricing Management> Setup > Pricing Management Parameters, which will open the parameter form.
Click the General tab and set up parameters as shown in the screenshot below. You may leave other parameters at their default values.
Figure 2: Pricing management parameter
After the unified pricing management module is enabled, open the Released Products form. You will notice a new action tab named ‘Price,’ which allows you to view product-specific prices, trade agreements, and discounts. This confirms that the pricing management module is ready for use.
Figure 3: Released Product page showing Price tab visible after the pricing management module is enabled
Take control of your business operations
Discover how Confiz services can simplify your complex workflows and improve decision-making.
Configuring the Unified Pricing Management (UPM) module in Dynamics 365
Configuring Unified Pricing Management (UPM) in Dynamics 365 enables businesses to implement dynamic, attribute-based pricing across retail and wholesale operations.
To illustrate the setup, we’ll use Contoso Entertainment Germany as an example. The company sells to both retail and wholesale customers, with sales prices determined in real time based on product and customer attributes highlighted in the tables below.
Item ID
Products Name
Type
Material
Price (USD)
T0001
SpeakerCable
Learn
Fiber
15
T0006
VideoProjector
Learn
Fiber
288
T0007
VideoCamera
Learn
Fiber
245.49
TD0001
Tiny Furniture Toy
Play
Wooden
100
TD0002
Building blocks
Creative
Wooden
150
PS0001
Lego 22 pcs
Play
Fiber
50
PS0002
Alphabet blocks
Learn
Wooden
100
SA0001
SA0001 Puzzle
Creative
Wooden
200
SA0002
SA0002 Lego 60 pcs
Learn
Fiber
150
Table 1: List of Products having “Type” and “Material” defined as attributes
Customer ID
Customer Name
Group
Country
Site
Warehouse
DE-17
French Customer (Export)
10
FRA
1
11
DE-18
Deutch Customer (Retail)
30
DEU
1
11
DE-19
Danish Customer (Retail)
30
DEN
1
11
DE-20
Danish customer (Loyalty)
40
DEN
1
11
DE-21
UK customer (Loyalty)
40
GER
1
11
Table 2: List of Customers having “Group” and “Country” defined as attributes
It is assumed that the UPM module is already enabled, parameters are configured, and the product and customer master data shown above are available for practice.
The next step is to define and configure the following components based on the product and customer attributes.
Step 1: Attribute groups
To define attributes, we will follow three simple steps:
Define Attribute types (it’s a data type)
Attributes (Link Attribute types to Attribute)
Attribute Groups (Group attributes into Attribute groups)
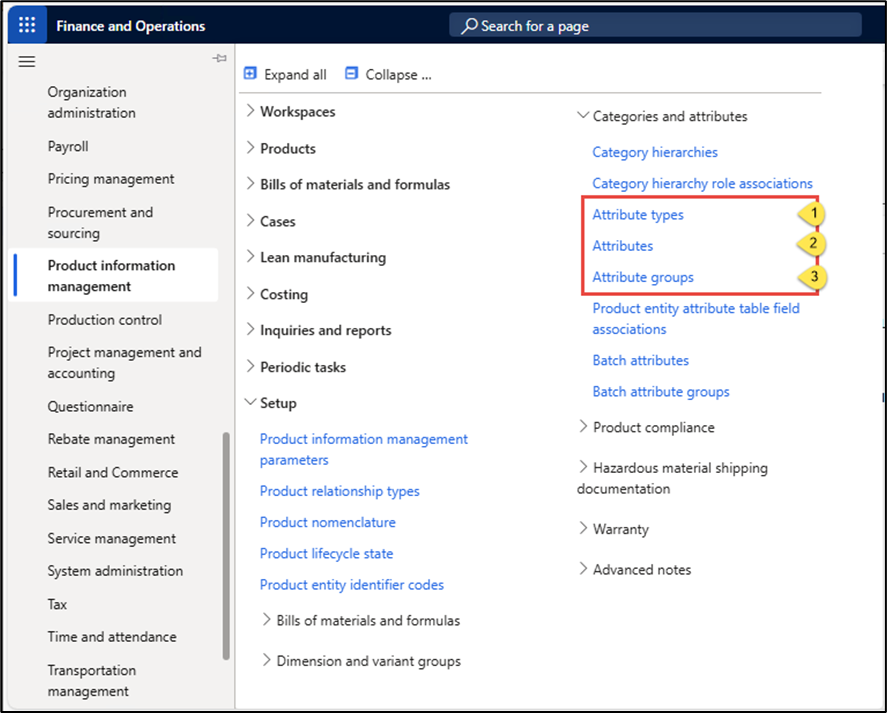
The screenshot below shows the application menu items that you will use to define attributes & attribute groups for products and customer master data shown in Tables 2 & 3 above.
Path: Product information management > Setup> Categories and attributesFigure 4: Showing Attributes and Attribute groups menu items in the Product information management module
1.1 Attribute type
Attribute type defines the type of data that an attribute will handle; it can be a “Text”, “Boolean”, “Date”, “Numeric value”, etc. Follow the steps below to define an attribute type.
Here is how to get started:
Go to path: Product information Management> Setup> Categories and Attributes> Attribute type.
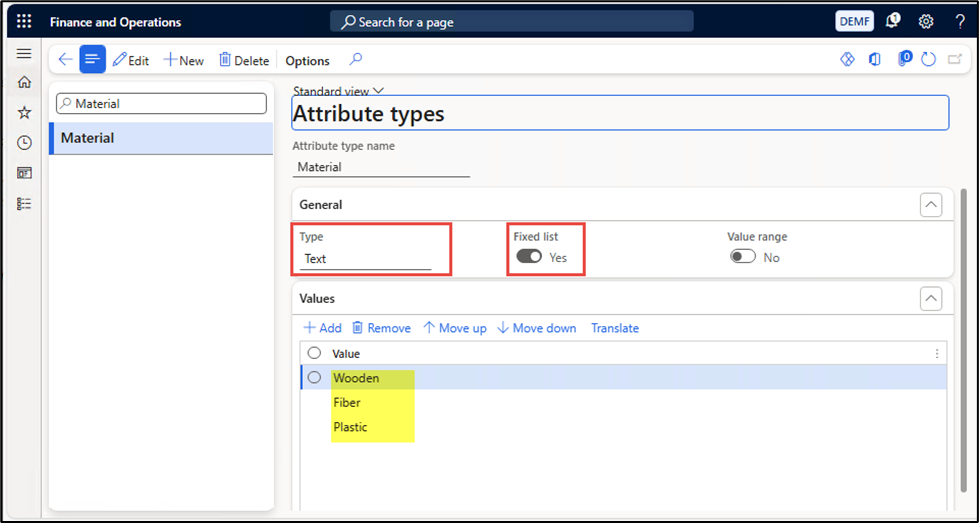
To create a new attribute type, click the New button. Enter Material as the name of the attribute type.
Next, select Text as the value of the Type field.
Set the Fixed list checkbox to Yes and enter a fixed list of values like “Fiber”, “Wooden” (as shown in the screenshot below).
Click the Save button to save the attribute type.
Repeat steps 1 to 5 for the “Type” attribute as well.
Figure 5: Form showing the definition of the Attributes type with a fixed list of values
1.2 Attribute
Now we will define an “Attribute” using the “Attribute types” of “Material” and “Type” described in the previous step. Follow the steps below to define an attribute type.
Here is how to get started:
Go to path: Product information Management > Setup > Categories and Attributes > Attribute.
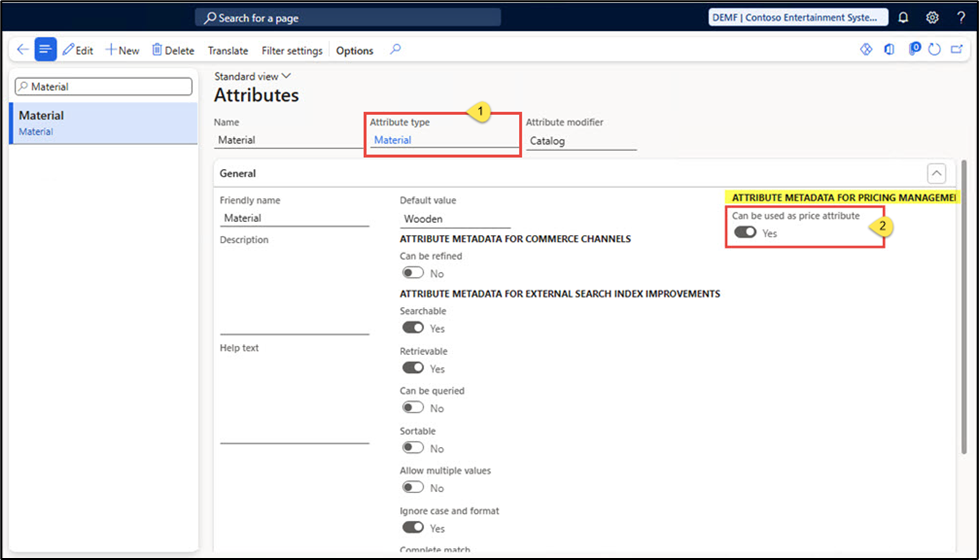
Create a new attribute by clicking the New button and entering Material as the name of the attribute.
Next, select “Attribute type” (named Material) created in the previous step (as shown in the screenshot below).
Next, set the flag “Can be used as price attribute” to “Yes” (as shown highlighted in the screenshot below). This is a mandatory setting for attributes that you want to use for pricing management. If the flag is set to “No”, the attribute would not be listed in “price attribute groups” for selection.
Press the Save button to save the newly created attribute.
Repeat steps 2 to 4 to define more attributes (if needed).
Figure 6: Form showing the definition of attribute types
To add attributes in Attribute Groups, follow the steps below:
Here is how to get started:
Navigate to Product Information Management > Setup > Categories and Attributes > Attribute groups.
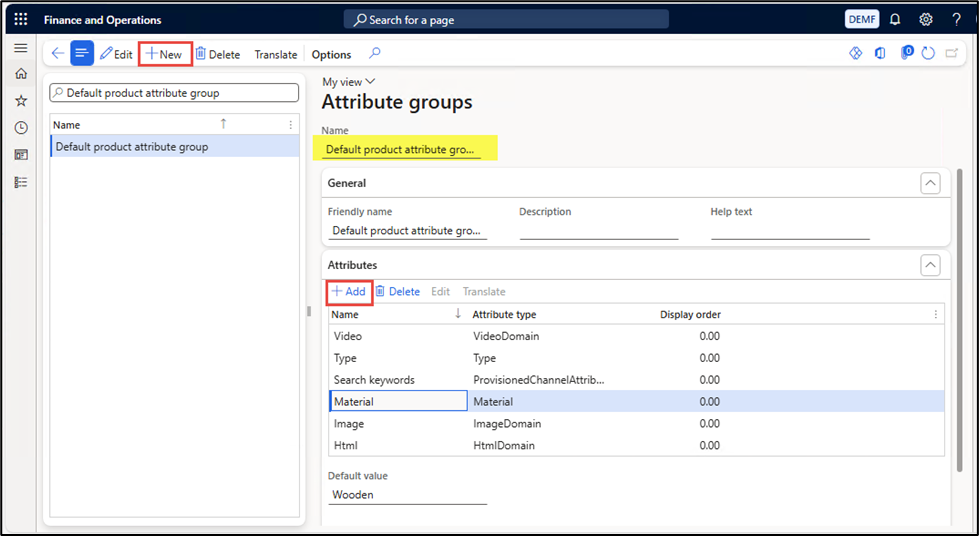
Create a new attribute group by clicking the “New” button. Enter “Default Product attribute group” as the name of the attribute group.
Next, click the “Add” button in the Attributes section, and a new window will open as shown in the screenshot below. Select attributes that you want to add and press the Add button (à) available in the middle of the form.
After attributes are added, press the OK button. The attributes will be added to the group; you are done.
Repeat steps to create an attribute group for the customer named “Default Customer attribute group”. We will utilize both attribute groups in the next section to demonstrate how pricing management works.
Figure 7: Form showing the definition of the Product Attribute group
Step 2: Associate attribute groups with products and customers
We have now finished creating attributes & attribute groups for products and customers. The section below will guide you in associating attribute groups with products and Customers.
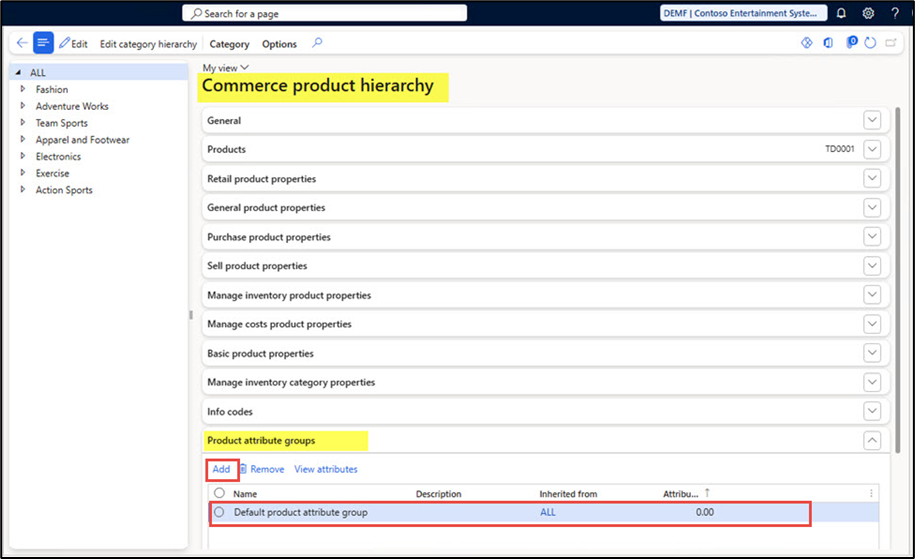
To associate attributes with the Products master, the “Default Product Attribute group” should be assigned to each node of the “Commerce product hierarchy” as detailed in the steps below:
Here is how to get started:
Navigate to Retail and Commerce à Products and Categories à Commerce products hierarchy
On the Commerce product hierarchy form, you would see category nodes on the left pane of the hierarchy form. Select the appropriate category node to which products are attached.
Next, switch to the Product Attribute groups fast tab and click the Add button (as shown highlighted in the screenshot below)
A new window will open, select the Default product attributes group and click the Add (à) button to add the attribute group to the product category, and press the OK button at the bottom of the page (as shown in the screenshot below)
The product attribute group is now associated with all the products in the selected category.
Repeat steps 2 to 4 to associate the product attribute group with other category node(s).
Figure 8: Commerce hierarchy form showing the Product Attribute group associated with a category
2.2 Associate attribute groups with Customer
To associate attribute groups with customers, follow the steps shown below.
Here is how to get started:
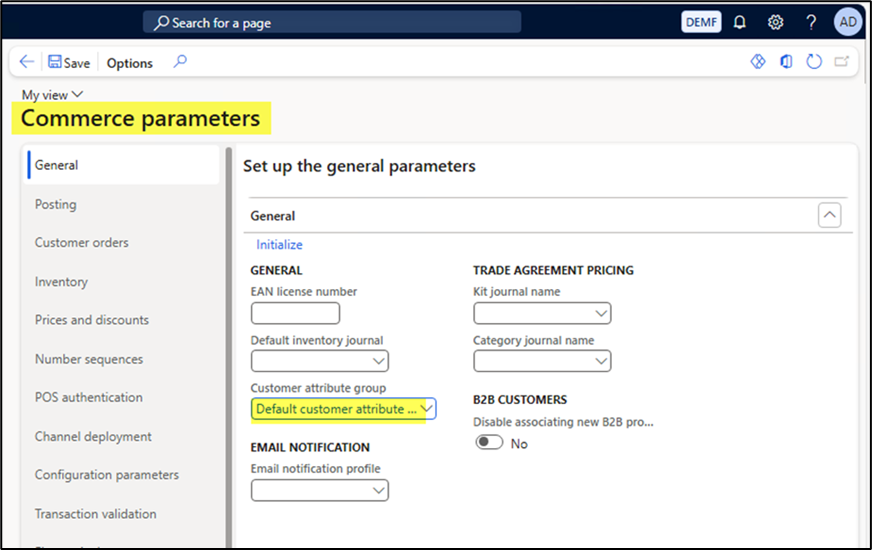
Navigate to Retail and Commerce > Headquarters setup > Parameters > Commerce parameters
On the “General” tab, look for the field name “Customer attribute group”. Select the “Default Customer attribute group” as value (as shown in Yellow highlighted in the screenshot below)
After the customer attribute group is set up in Commerce parameters, the “Customer attributes” will appear under the Price action tab with the Customer master as shown in the screenshot below.
Figure 9: Commerce parameters form showing Customer attribute group setup
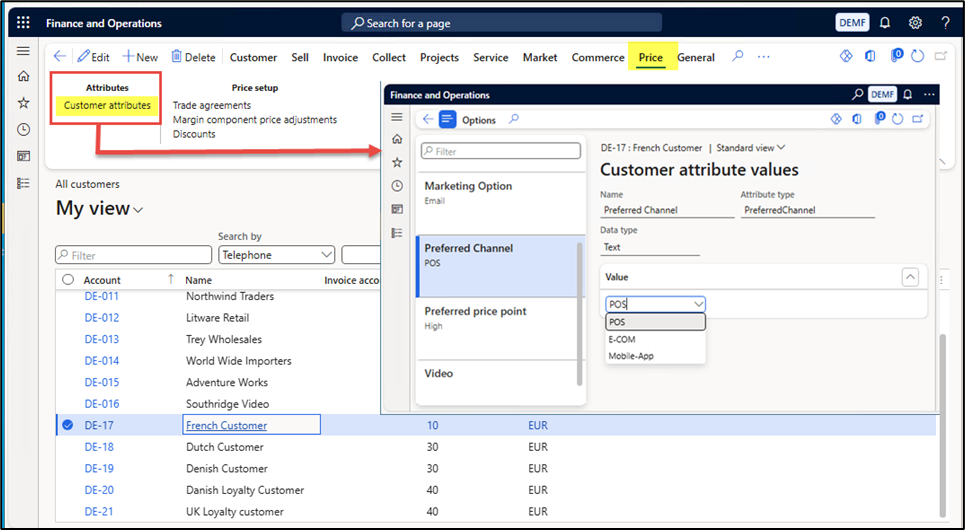
4. After the customer attribute group is set up in Commerce parameters, the “Customer attributes” will appear under the Price action tab with the Customer master as shown in the screenshot below.
Figure 10: Customer master form showing Customer attributes under Price action tab
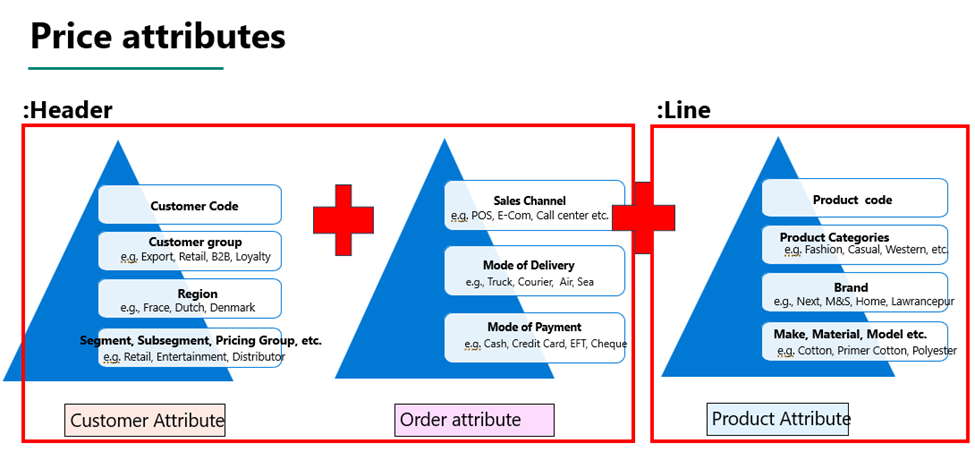
Step 3: Price attribute groups
Let’s define “price attribute groups” by using “Product and customer attribute groups” created in the “Attribute groups section”. We will define “Price attribute groups”, one for “Customer (order header level)” and the second for Products (order Lines), which is elaborated in the “Price attributes” screenshot below.
Path: Pricing managementà Setupà Price attribute groups àPrice attribute groups
Figure 11: Showing sales order Header and Line price attributes sample
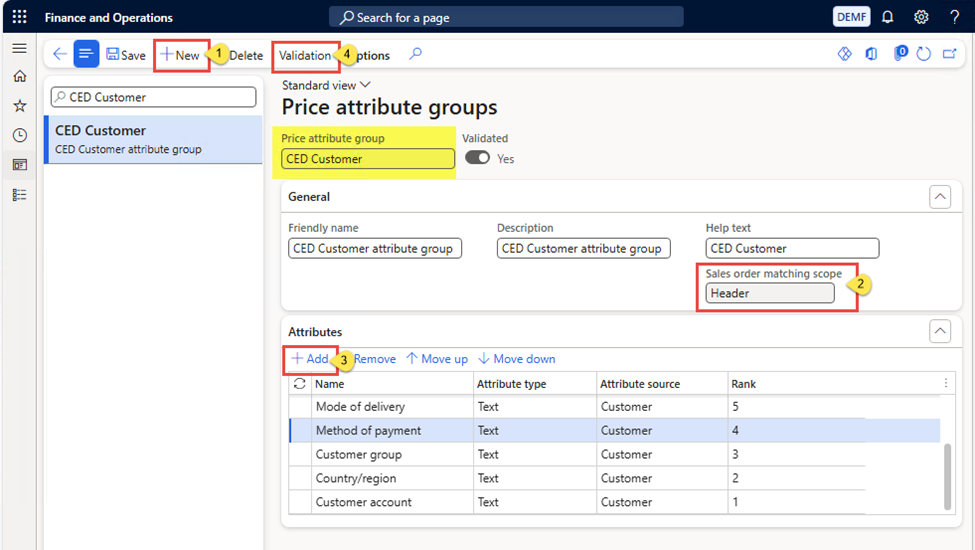
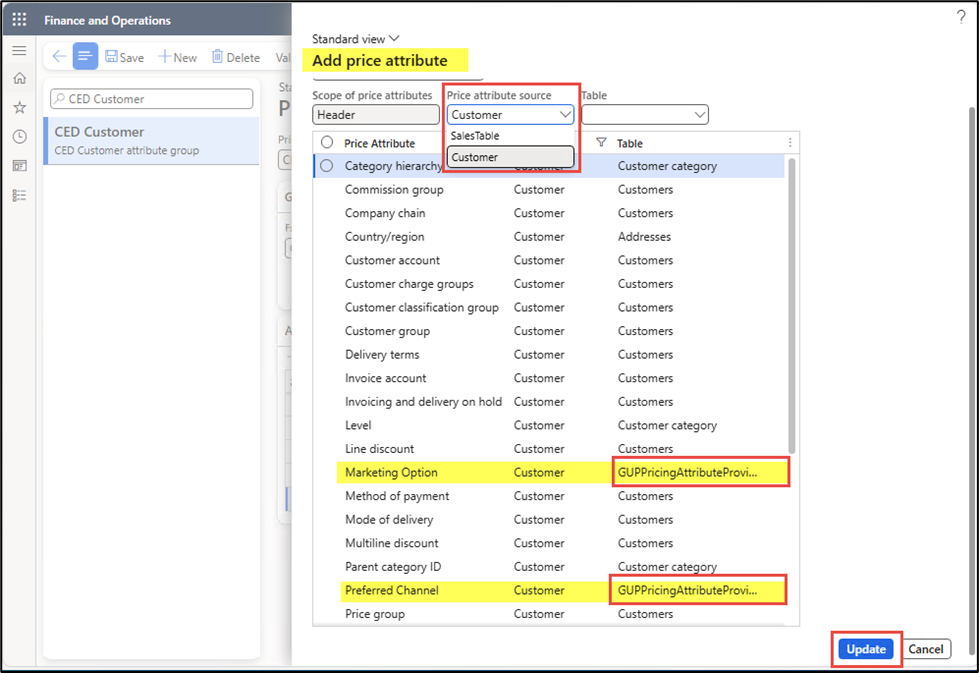
Now we will pick a few attributes defined earlier in the customer attribute group and create a “price attribute group” for the customer using the following steps. Here is how to get started:
Navigate to Pricing managementà Setupà Price attribute groups àPrice attribute groups
Create a new attribute group by clicking the “New” button. Enter “CED Customers” as the name of the price attribute group.
Select “Header” as the value of “Sales order matching scope”. This setting determines whether the price applies to the order (header) or individual line items (line).
Next, click the “Add” button in the Attributes section, and a new window will open showing a list of customer/order attributes. Select Mode of delivery, Country/Region, Customer group, and customer account attributes to be used for price determination, and click the Update button (as shown in Yellow highlight in the screenshot below).
The selected attributes will be added to the attributes section. Once done, click the Validation button to validate the newly created price attribute group.
Figure 12: Customer master form showing Customer price attribute groupFigure 13: Price attributes form showing Customer and sales order attributes available for use in the Pricing management module
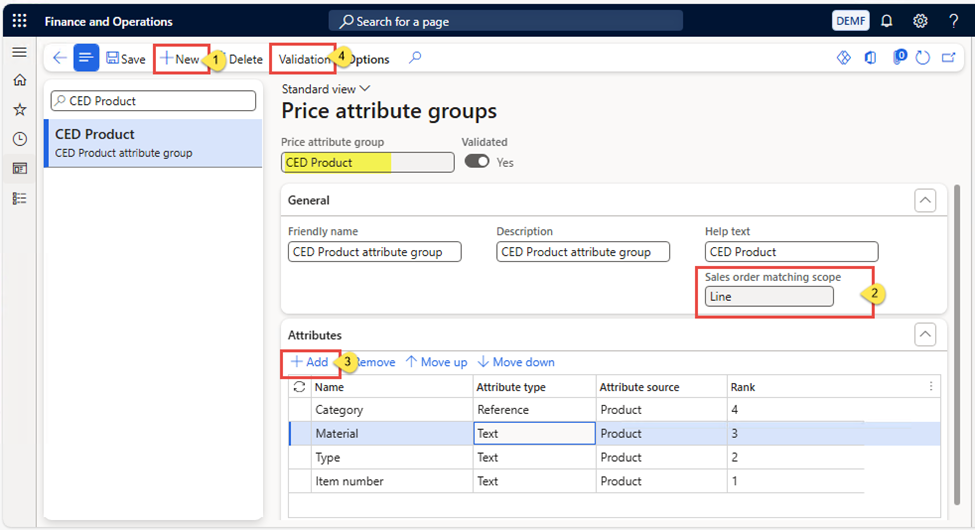
Now, let’s define the “product price attribute group" by selecting “product attributes” using the following steps. Here is how to get started:
Navigate to Pricing management>Setup>Price attribute groups>Price attribute groups
Create a new attribute group by clicking the “New” button. Enter “CED Products” as the name of the price attribute group.
“Line” as the value of “Sales order matching scope”. This setting determines that these price attributes apply to order line items (or products).
Next, click the “Add” button in the Attributes section, and a new window will open showing a list of product attributes. Select Make, Type, Category, and Item code attributes to be used for price determination and click the Update button (as shown in yellow highlight in the screenshot below).
The selected attributes will be added to the attributes section. Once done, click the Validation button to validate the newly created price attribute group.
Figure 14: Price attributes form showing Product price attributes
Step 4: Price component code
After price attribute groups are created, we will use the “price attribute group” to define price components, such as Base Price, Sales Trade Agreement, Discounts, Charges, etc.
In this section, we will define the price component code for “Base price-sales price” and “sales trade agreement”, following the steps outlined below. We will define and utilize other price component codes in subsequent blog posts.
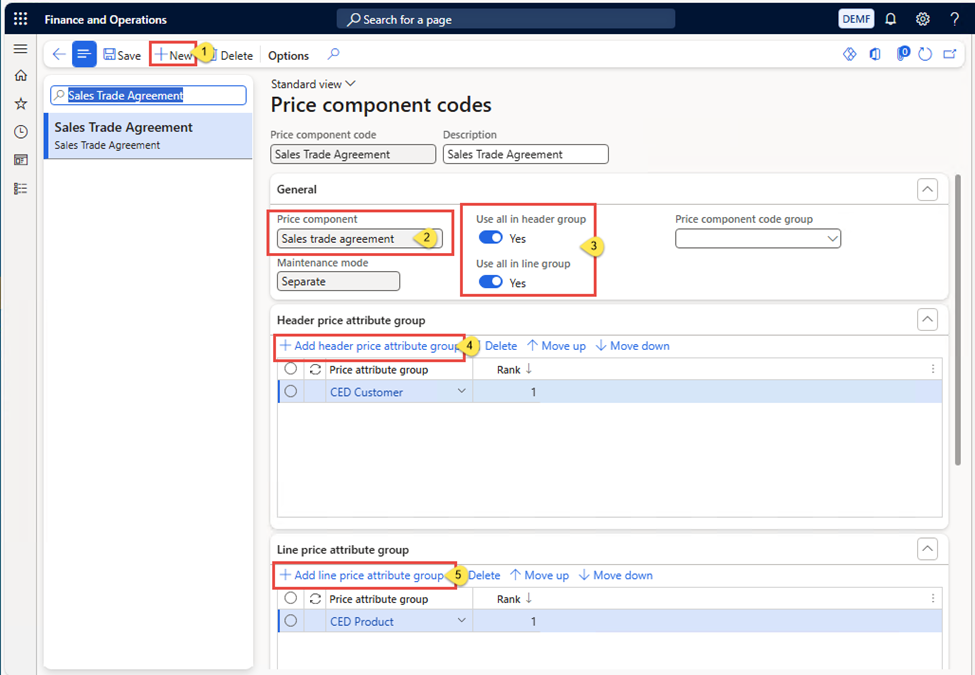
Price component code - Sales trade agreement
Here is how to get started:
Go to Pricing management > Setup > Price component codes > Price component codes
The price component codes page will open, and click the New button on the action pane
Next, enter a name for the code “Sales trade agreement”.
Select “Sales trade agreement” as the value of the “Price component” field,
And select “Separate” as the value of the “Maintenance mode” field. This enables the system to automatically generate all possible combinations of header and line attribute groups and assign a rank to each combination.
Select “Yes” as the value of “Use all in header group” and “Use all in line group”. This allows us to create pricing rules that apply to all customers and all products.
Next, in the Header price attribute group section, click the “Add header price attribute group” button. A new record will be created below. Select “CED customer” as the value of the header price attribute group (see the screenshot below), which we created earlier in the Customer price attribute group section.
Next, in the " Next in Line price attribute group section, click the “Add line price attribute group” button. A new record will be created below. Select “CED Product” as the value of the line price attribute group (see the screenshot below), which we created earlier in the Product price attribute group section
Figure 15: Price component codes for Sales trade agreement
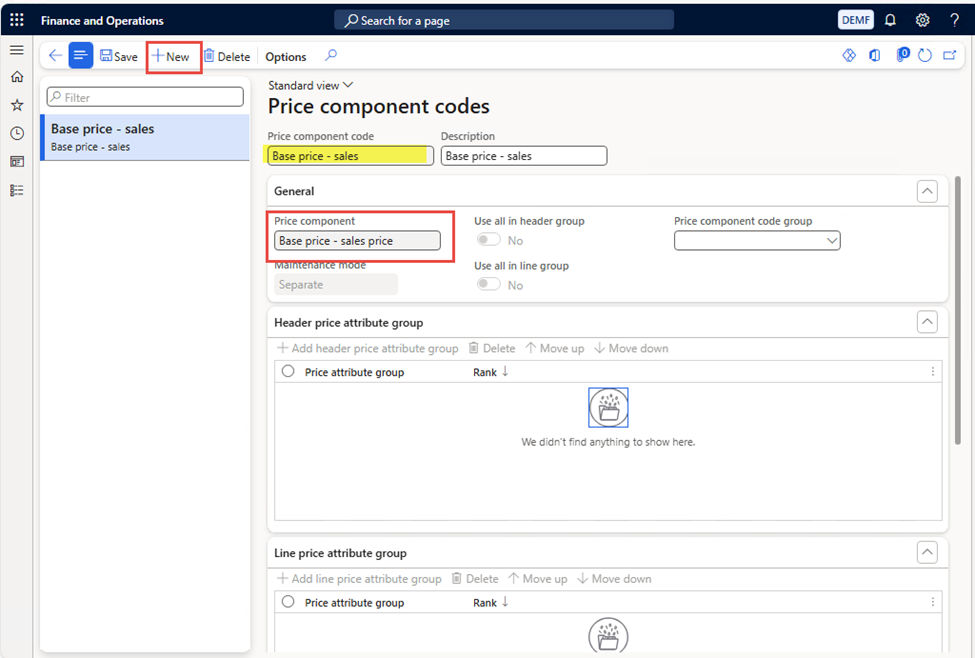
Price component code – Base price -sales price
Next, we will create a price component code for the Base price, which will help determine the sales price in cases where the price is missing from the item master.
Here is how to get started:
Go to Pricing management > Setup > Price component codes > Price component codes
The Price Component Codes page will open. Click the New button on the action pane
Select “Base price – sales price” as the value of the “Price component” field.
As soon as you select the base price-sales price, the other fields, “Use all in header group” and “Use all in line group”, along with the Header & Line price attribute group, will become read-only (as shown in the screenshot below).
Save the record and exit the form.
Figure 16: Price component codes for Base price – sales price
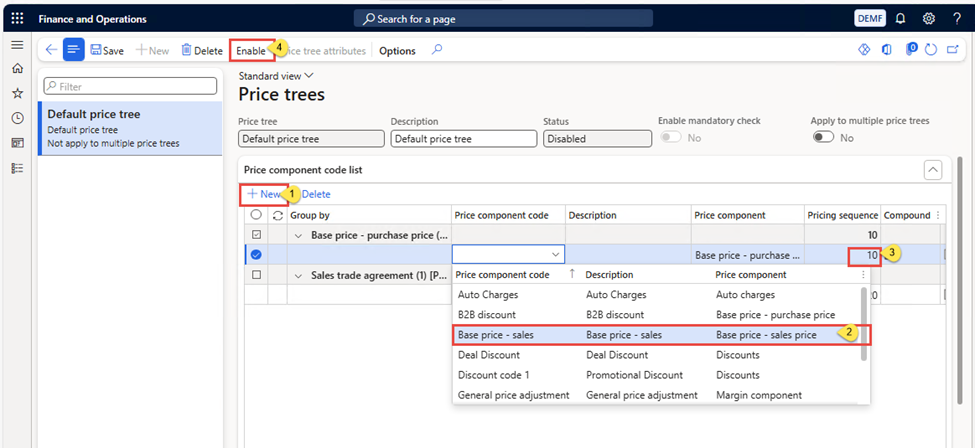
Step 5: Price tree
We have defined price components like “Base sales price”, “Sales trade agreement”. Now we will add each price component code to the “price tree”. In the price tree, the final price is determined based on the priority of the price components code defined. The following steps provide a step-by-step guide for adding price component codes to the price tree.
Here is how to get started:
Go to Pricing management > Setup > Price component codes > Price trees
The price tree page will open, click the disabled button to disable the price tree (if already enabled)
Next, click the Add button, and a new record will be added.
From the price component code list, select “: Base price – Sales” and set “10” as the value of the Pricing sequence (as shown in the screenshot below). The final price is determined based on the pricing sequence. The lower the sequence value, the higher the priority.
Click the Add button again, and a new record will be added. This time, select “Sales trade agreement” and set “20” as the value of the Pricing sequence.
Next, save and enable the price tree.
Figure 17: Price tree structure showing Price component codes and their evaluation sequence for sales price
We have completed configuring the pricing management module, and now let’s define sales prices and trade agreements using “price attribute groups”.
Accelerate growth at an unprecedented pace
Discover how Confiz can help you take control of your daily operations, increasing growth and revenue.
With the price tree configured to include Base Price – Sales and Sales Trade Agreement, we can now see the setup in action.
For this demonstration, we’ll use Item PS0001 and create both a costing version and a sales trade agreement. These will apply different prices for retail and export customers, determined by the price attributes defined earlier.
Item ID
Products Name
Type
Material
Price (USD)
PS0001
Lego 22 pcs
Play
Fiber
50
PS0002
Alphabet blocks
Learn
Wooden
100
Table 3: List of Products having “Type” and “Material” defined as attributes
Customer ID
Customer Name
Group
Country
Site
Warehouse
DE-17
French Customer (Export)
10
FRA
1
11
DE-18
Deutch Customer (Retail)
30
DEU
1
11
Table 4: List of Customers having “Group” and “Country” defined as attributes
Before moving on to the price demo, it’s good to understand how the “item sales price is determined” in D365FO. The pricing engine determines the item sales price according to the following set sequence, which we will observe & validate during the upcoming pricing demo.
It begins by evaluating the active/posted sales price, as outlined in the “Sales Trade agreement”. When a price is found, the search stops, and that value is applied.
Else if no price is found, then the active “Price/Costing version” of the sales price is evaluated.
If no price/costing version is found, then the “Release product base sales price” or “standard cost” of the item is applied.
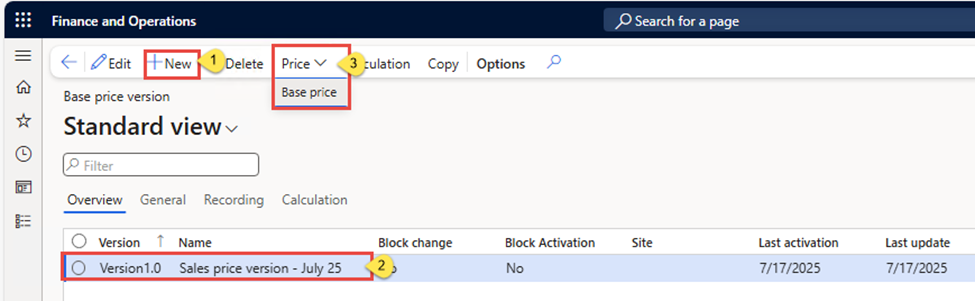
Step 1: Create a base price version
Our sample product PS0001 doesn’t have a sales price defined for the released product. This means that, in the absence of a sales price, the system will fetch zero (0) as the sales price from the item master.
Now, we will create a “base price version” for Item “PS0001” so that the pricing engine fetches the sales price. This will demonstrate that the sales price is picked from the “active price/costing version” in the absence of any sales trade agreement for the product.
Here is how to get started:
Go to Pricing Management > Pre-sales Pricing > Base Price Version. The base price version form will open.
Click the “New” button and enter “Version 1.0” and “Sales price version” as values in the Version and Name fields (as shown in the screenshot below).
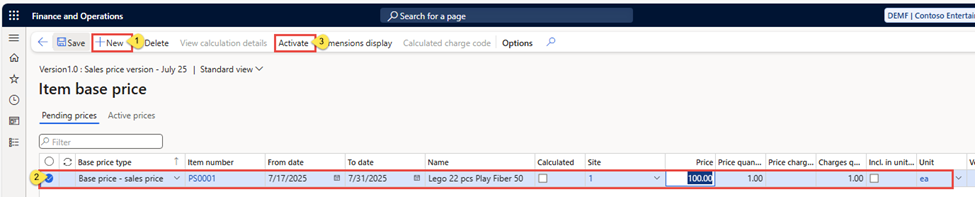
Next, click Price à Base price button in the action tab, which will open the Item base price form.
Click the “New” button to create a Base price-sales price record for Item=PS0001, Site=1, Price=100 for a specified date range, and press the Save button to save the record.
Next, click the Activate button to activate the pending price version.
Figure 18: Released product form showing zero(0) sales price and Item price under the Managed costs optionFigure 19: Item base price form showing “Base price -sales price” for Item PS0001
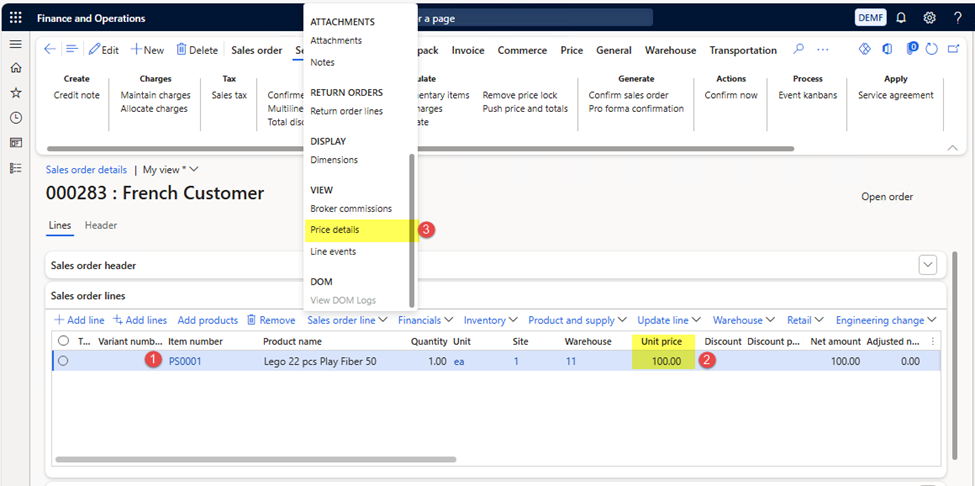
Step 2: Validate base price on sales order
Now create a sales order for customer DE-17, French Customer (Wholesales), and add line item# “PS0001”. The pricing engine will evaluate and pick the price defined on the Base sales price version. This means that, in the absence of a “sales trade agreement,” the system will fetch the sales price from the Base price. To explore the source of the sales price, click on "Sales order line"> "Price details" (as shown in the screenshot below).
Figure 20: Sales order line showing “100” as sales price for Item PS0001
The Price Details form will open, and the Base price will display a value of 100 in the Calculation section, indicating that the sales price is derived from the base price version. Similarly, other components and sources of price will be displayed in the details section, along with the Base Price, Margin Adjustment, and Discounts tabs on the Price Details form.
Figure 21: The price details form shows the line item sales price source as 'Base price'.
Step 3: Create a sales price trade agreement for the wholesale customer group
Now, we will define a “sales trade agreement” for customer DE-17, the French Customer (Wholesale, Customer group = 10), and, in line, add item “PS0001”. This means that, in the presence of a sales trade agreement, the pricing engine will determine the item's sales price from the trade agreement, rather than the Base price version, as described in the set sequence earlier in Section "How sales price is determined."
To create a sales trade agreement, follow the steps below.
Here is how to get started:
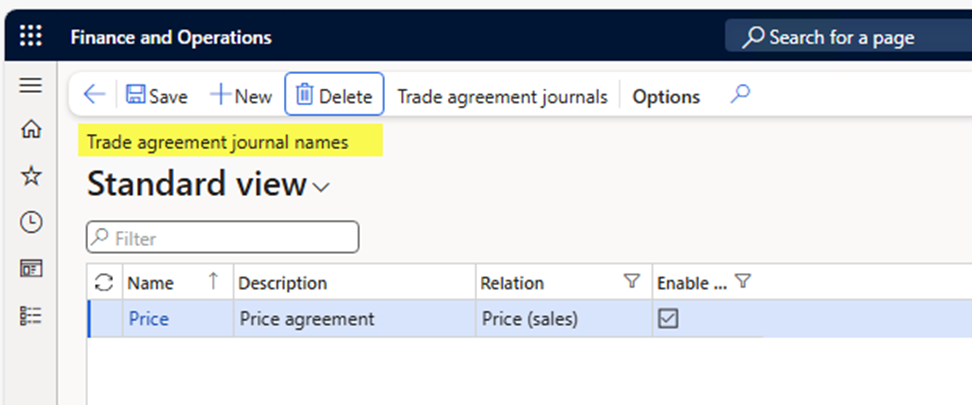
Go to Pricing management > Setup > Trade agreement prices > Trade agreement journal names
The journal names form will open, click the New button, and enter the Name and description for the Price (sales) journal (as shown in the screenshot below). We will use the newly created journal to create and post the sales trade agreement.
Figure 22: Trade agreement journal name for relation Price (sales)
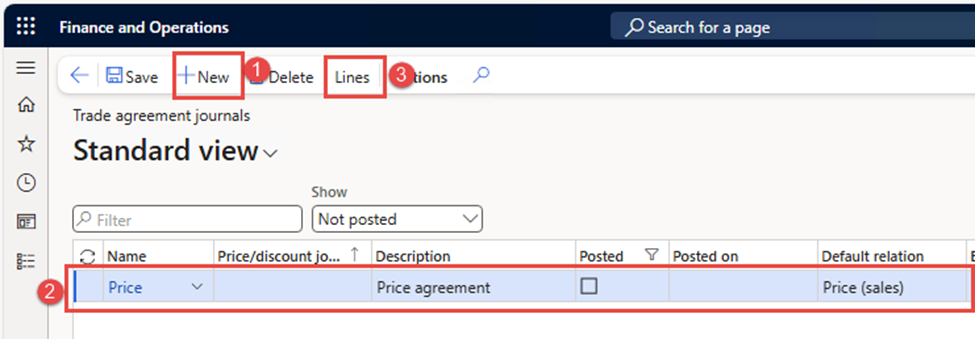
3. Next, go to Pricing management > During-sales pricing > Sales Trade agreement prices > Trade agreement journal
4. The trade agreement journal form will open, click the “New” button, and select the “Name” of the journal from the drop-down (as shown in the screenshot below).
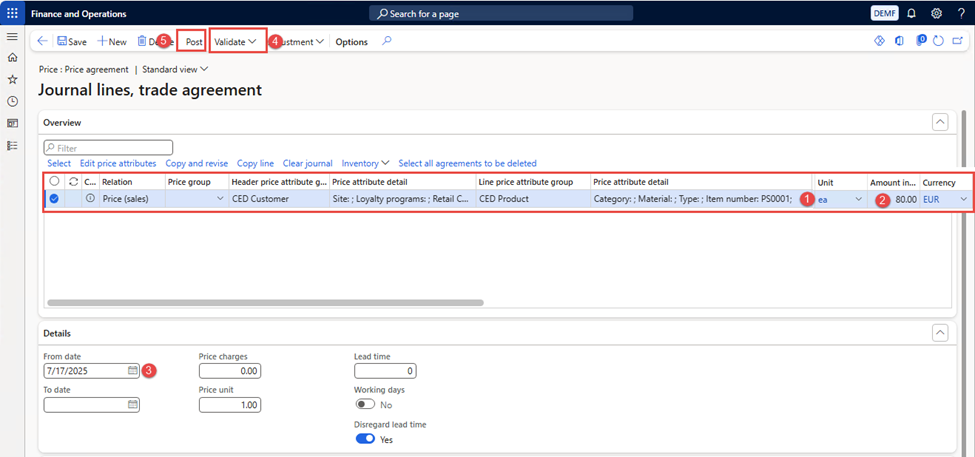
5. Next, click the “Lines” button on the action tab, which will open the journal lines form where you will add a combination of customers & products with appropriate prices.
Figure 23: Sales trade agreement journal header showing newly created Price (sales) journal
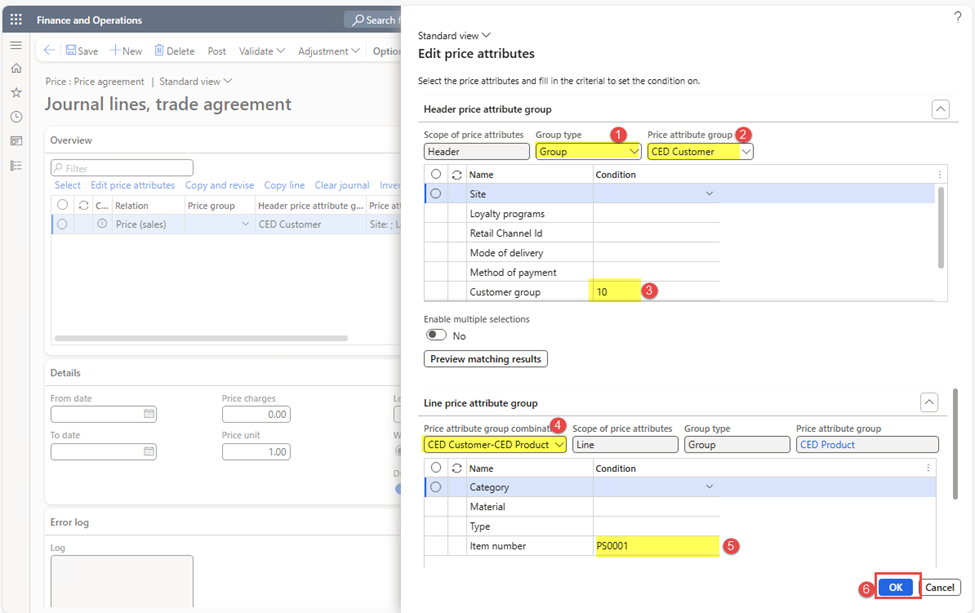
Next, the “New” button on Journal lines opens a dialog where you should select the header and price attribute groups. Recall we defined “CED Customer (header)” and “CED Product (line)” price attribute groups, using which we will explain the sales price rule.
Select “Group” and “CED-Customer” as values in the header price attribute group. Next, select “10” wholesale customers as the value of the “Customer group” field. This means that the sales price rule will only be applied to wholesale customers.
Next, in the Line attribute group, select the “CED-Customer, CED-Product” combination, as we want to define the sales price for a particular item only. And select “Item number=PS0001” and click the OK button.
Figure 24: Journal line form showing Header (customer) and Line (Product) price attribute groups and rule values
The sales price rule line will be inserted in the journal line.
Enter sales price=80, unit=ea, from/to date range, and press the Save button.
Next, validate and post the journal.
Figure 25: Journal line showing sales price rule for wholesale customer group=10 and Product PS0001
We will now validate the sales trade agreement price rule using a sales order transaction.
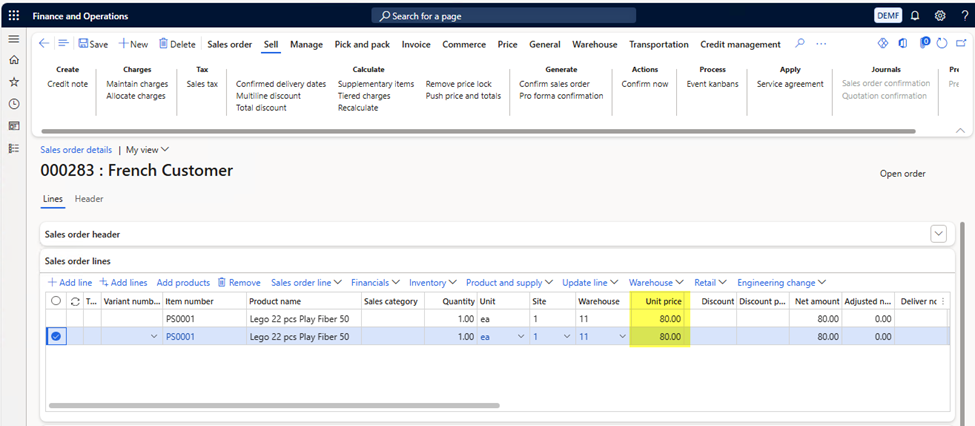
Step 4: Validate base price on sales order
Now create a sales order for customer DE-17, French Customer (Wholesales), and add line item# “PS0001”. The pricing engine will evaluate and pick the sales price defined from the Trade agreement, and does not evaluate the Base price version. The reason is that as soon as an active “sales trade agreement” is found, the pricing engine will stop further evaluation, fetch the sales price & place it on the order line.
Figure 26: Sales order line showing “80” as sales price for Item PS0001 picked from the active trade agreement journal
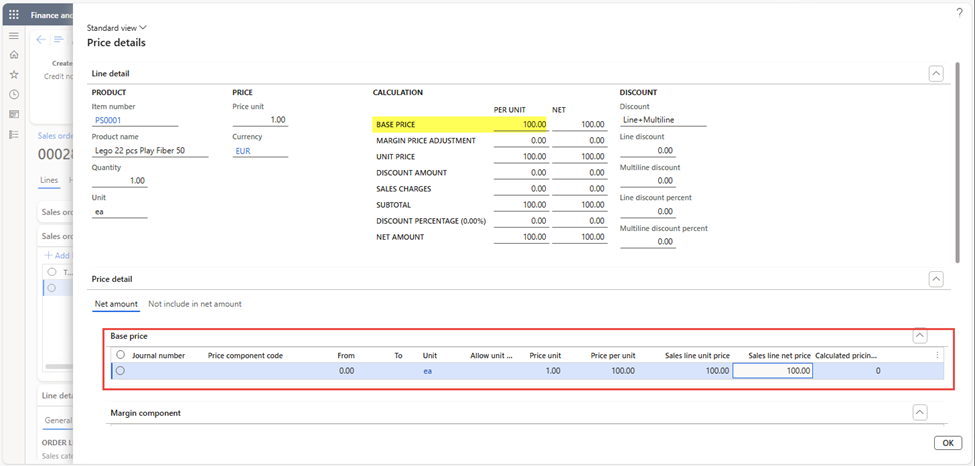
To explore the source of the sales price, click on Sales order line > Price details. The Price Details form will open; the Base price will display a value of 80 in the Calculation section, and it also shows trade agreement journal details in the Base price section (as highlighted in the screenshot below).
Figure 27: Order line, Price details showing “80” as sales price, and the source is the Sales trade agreement
Conclusion
Configuring Unified Pricing Management in Dynamics 365 Finance & Operations unlocks the full potential of its centralized pricing framework. By setting up attributes, price attribute groups, price component codes, and price trees, businesses can implement dynamic, attribute-driven pricing that ensures consistency across retail, wholesale, and omnichannel operations.
At Confiz, we help organizations maximize the value of Dynamics 365 Finance & Operations Unified Pricing Management by designing secure, scalable, and business-aligned pricing configurations that align with their needs. From the initial setup to advanced pricing rules, our experts ensure a seamless implementation tailored to your needs.
Looking to optimize your pricing in D365 F&O? Contact us at marketing@confiz.com to explore how we can help.
Tariq Rafique is an accomplished Associate Director and Functional Solution Architect with over 13 years of hands-on experience in Microsoft Dynamics AX and Dynamics 365 Finance & Operations. He excels at aligning ERP solutions with business objectives, helping organizations drive transformation across Retail, Supply Chain, and Manufacturing sectors. Tariq has led multiple end-to-end ERP implementations for industries such as Pharmaceuticals, Electronics, Fashion Retail, and Manufacturing - delivering scalable, efficient, and outcome-driven solutions tailored to business needs.
New to implementation guide?
Start here to understand how it’s reshaping the future of intelligent systems.